
User Manual


first time, we ask that you start with the Adafruit_DotStar library. Once the hardware is confirmed working, you can
then graduate to whatever code or library you’d like!
A Simple Code Example: strandtest
Launch the Arduino IDE. From the File menu, select Sketchbook→Libraries→Adafruit_DotStar→strandtest
(If the Adafruit_DotStar rollover menu is not present, the library has not been correctly installed, or the IDE needs to be
restarted after installation. Check the installation steps above to confirm it’s properly named and located.)
The “strandtest” example shows basic library use; declaring a strip object, setting LED colors and pushing this data to
the strip via the show() method. For more advanced examples, nearly any NeoPixel code should compile and run
with DotStars, just changing the library #include and the strip declaration.
Select your board type and serial port from the Tools menu, and try uploading to the board. If the DotStars are
connected and powered as previously described, you should see a little light show.
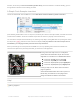
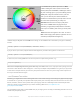
If using a one-meter strip or less, it’s usually OK to
power off the microcontroller’s 5V pin. Here’s how it
might look on an Arduino Uno or Adafruit Metro board:
Connect the strip 5V pin to the board 5V
Connect the strip GND pin to board GND
Connect the strip CI (Clock input) to digital pin 5.
Connect the strip DI (Data input) to digital pin 4.
For longer strips, see the “Power and Connections”
page for guidance.
Some microcontroller boards won’t have a pin 4 or 5.
Not to worry, we’ll show on the next page how to
change the software for different connections.
Help!
Nothing happens!
© Adafruit Industries https://learn.adafruit.com/adafruit-dotstar-leds Page 23 of 48