
User Manual


Power and Connections
Powering DotStar LEDs
The power requirements for DotStars are pretty much identical to NeoPixels…in fact, we’ll simply refer you to the
relevant page of the NeoPixel Überguide for pointers on estimating and routing power (https://adafru.it/iZe). In
summary:
Estimate up to 60 milliamps peak for each pixel at full brightness white.
A ground connection is required between the microcontroller and strip, in addition to the signal lines.
For long strips, try to add a power tap every meter or so. This prevents a brown-out effect toward the end of the
strip.
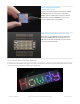
As with NeoPixels, adding a 1000µF (6.3V or higher) capacitor close to the strip (between 5V and GND wires) is a
good idea, do it!
Another guide, this one about minimizing NeoPixel power draw (https://adafru.it/wbm), is also 100% applicable to
DotStars!
Connecting DotStar LEDs
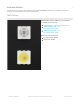
Our LED suppliers sometimes make unannounced production changes to the wiring. Therefore, the best way to
identify connections is a close visual examination of the strip.
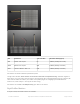
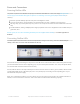
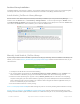
First, look for arrows printed along the strip next to each LED. These show the direction of data moving down the strip…
your microcontroller connects at the originating (“in”) end, the arrows point toward the “out” end. (In the photo above,
our microcontroller would be located off the left side.)
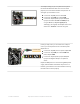
Second, look for labels on the strip to identify the function and order of the four wires: ground, 5 Volts, data and clock…
usually labeled GND, 5V, D or DI (data input) and C or CI (clock input). These will go to corresponding pins on your
microcontroller and power supply.
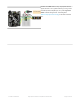
Again, due to production variations, you can’t always count on wire colors or plug genders as a reliable indication of
function, even if ordered at the same time. Take a close look to confirm before connecting anything.
© Adafruit Industries https://learn.adafruit.com/adafruit-dotstar-leds Page 18 of 48