
User Manual

You should see the LED dimly lit. Try experimenting with other duty cycle values to see how the LED changes
brightness!
For example make the LED glow on and off by setting duty_cycle in a loop:
These for loops take a while because 16-bits is a lot of numbers. CTRL-C to stop the loop from running and return to
the REPL.
That's all there is to dimming LEDs using CircuitPython and the PWM/Servo HAT and Bonnet!
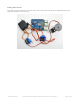
Controlling Servos
We've written a handy CircuitPython library for the various PWM/Servo kits called Adafruit CircuitPython
ServoKit (https://adafru.it/Dpu) that handles all the complicated setup for you. All you need to do is import the
appropriate class from the library, and then all the features of that class are available for use. We're going to show you
how to import the ServoKit class and use it to control servo motors with the Adafruit PWM/Servo HAT or Bonnet.
First you'll need to import and initialize the ServoKit class. You must specify the number of channels available on your
board. The HAT and Bonnet have 16 channels, so when you create the class object, you will specify 16 .
Now you're ready to control both standard and continuous rotation servos.
Standard Servos
To control a standard servo, you need to specify the channel the servo is connected to. You can then control
movement by setting angle to the number of degrees.
For example to move the servo connected to channel 0 to 180 degrees:
To return the servo to 0 degrees:
With a standard servo, you specify the position as an angle. The angle will always be between 0 and the actuation
led_channel.duty_cycle = 1000
# Increase brightness:
for i in range(0xffff):
led_channel.duty_cycle = i
# Decrease brightness:
for i in range(0xffff, 0, -1):
led_channel.duty_cycle = i
from adafruit_servokit import ServoKit
kit = ServoKit(channels=16)
kit.servo[0].angle = 180
kit.servo[0].angle = 0
© Adafruit Industries https://learn.adafruit.com/adafruit-16-channel-pwm-servo-hat-for-raspberry-pi Page 16 of 28