
User Manual

Attach & Test HAT/Bonnet
Step 1 - Plug in HAT
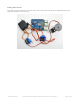
Now you have soldered the HAT up and you know how to power the servos, we can install the HAT
Begin by having the Pi shutdown and not powered, plug the HAT on top to match the 2x20 headers, and power up the
Pi
Step 2. Configure your Pi to use I2C devices
To learn more about how to setup I2C with either Raspbian or Occidentalis, please take a minor diversion to this
Adafruit Tutorial: http://learn.adafruit.com/adafruits-raspberry-pi-lesson-4-gpio-setup/configuring-
i2c (https://adafru.it/aTI)
When you are ready to continue, enter the following commands to add SMBus support (which includes I2C) to Python:
i2c-tools isn't strictly required, but it's a useful package since you can use it to scan for any I2C or SMBus devices
connected to your board. If you know something is connected, but you don't know it's 7-bit I2C address, this library has
a great little tool to help you find it. python-smbus is required, it adds the I2C support for python!
Don't forget you must add kernel support for I2C by following this tutorial! (https://adafru.it/dEO)
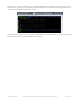
You can then detect if the HAT is found on the #1 I2C port with:
sudo apt-get install python-smbus
sudo apt-get install i2c-tools
sudo i2cdetect -y 1
© Adafruit Industries https://learn.adafruit.com/adafruit-16-channel-pwm-servo-hat-for-raspberry-pi Page 12 of 28