
Datasheet


Arduino Code
Wiring for Arduino
You can easily wire this breakout to any microcontroller, we'll be using an Arduino. For another kind of microcontroller,
just make sure it has I2C or SPI, then port the code - its pretty simple stuff!
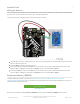
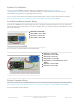
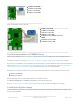
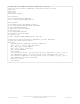
Let's start with just I2C interfacing since it requires the fewest # of wires:
Connect Vin to the power supply, 3-5V is fine. Use the same voltage that the microcontroller logic is based off of.
For most Arduinos, that is 5V
Connect GND to common power/data ground
Connect the SCL pin to the I2C clock SCL pin on your Arduino. On an UNO & '328 based Arduino, this is also
known as A5, on a Mega it is also known as digital 21 and on a Leonardo/Micro, digital 3
Connect the SDA pin to the I2C data SDA pin on your Arduino. On an UNO & '328 based Arduino, this is also
known as A4, on a Mega it is also known as digital 20 and on a Leonardo/Micro, digital 2
Download Adafruit_LSM9DS1
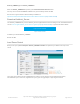
To begin reading sensor data, you will need to download the Adafruit_LSM9DS1 Library from our github
repository (https://adafru.it/uaX). You can do that by visiting the github repo and manually downloading or, easier, just
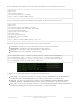
click this button to download the zip
https://adafru.it/uaY
https://adafru.it/uaY
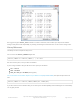
Rename the uncompressed folder Adafruit_LSM9DS1 and check that the Adafruit_LSM9DS1 folder contains
© Adafruit Industries
https://learn.adafruit.com/adafruit-lsm9ds1-accelerometer-plus-gyro-plus-
magnetometer-9-dof-breakout
Page 11 of 23