
User Manual


MakeCode Signals
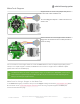
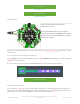
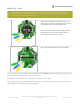
The Signals block on Crickit allows you to expand your
general-purpose inputs and outputs (GPIO).
The Circuit Playground Express and Crickit combination
is at left.
You may want to add buttons, LEDs, switches or simple sensors to your robot project. With Crickit, you get 8 x 'general
purpose in/out' (GPIO) pins called signals. Each signal can be a digital input (button/switch), digital output (LED, for
example), or
analog input.
This lets you add a ton of external components easily, and its all handled by seesaw. Perfect when you have a Feather
without analog inputs (like the ESP8266) or just need a ton of extra pins.
The signal pins are on a 3x8 female header, so you can poke wires directly in!
Using Signals in MakeCode
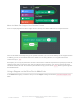
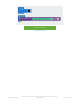
MakeCode has three blocks under the CRICKIT group to help you work with signals:
crickit digital read signal allows you to read digital values in
crickit analog read signal reads a signal and provides an analog value from 0-1023
crickit digital write signal allows you to write out to a signal line
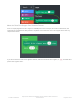
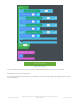
Analog read returns a number so the block is rounded to place where a number may be used. Digital read is angled so
it fits where a decision like if..then..else blocks use. Write signal is a block of its own and will set a signal (Make it
HIGH / 3.3 volts or LOW / 0 volts).
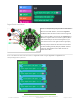
Crickit Inputs such as reading analog/signals can sometimes lock up when using MakeCode with
CircuitPlayground - we recommend using the alligator connection pads on the 'bare' CPX instead of the
Crickit until this is fixed! Or you can use Arduino, CircuitPython, micro:bit, etc.
The Signal pins in MakeCode currently do not have configurable pull up resistors like in CircuitPython or
Arduino. Please add external resistors between 3.3V and the signal wire to read things such as buttons
where a resistor is needed.
© Adafruit Industries
https://learn.adafruit.com/adafruit-crickit-creative-robotic-interactive-
construction-kit
Page 70 of 201