
User Manual

Powering Crickit
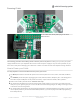
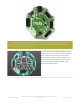
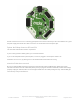
On the Crickit HAT, the 5V power plug is next to the
2x20 connector
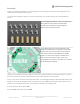
The first thing you'll learn when making robots is that they use a lot of power. So making sure you have your power
supply all worked out is super important. We've tried to make the power supply as easy and safe as possible, so you
don't have to worry about damaging your electronics or robot. To do that we made some important design decisions.
How to Power your Crickit
It's really important to read and understand how to power your Crickit!
You MUST provide about 4-5 Volts DC power to the Crickit to power the servos, motors, solenoids, NeoPixels,
etc.
You CANNOT provide this power by plugging the Crickit, micro:bit, Feather, Raspberry Pi or Circuit Playground
into USB. Computer USB ports cannot provide the 2 Amp + required to drive robotics, LEDs, speakers...
Power to the Crickit is provided via the 2.1mm DC Jack only!
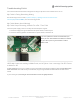
The Cricket has two LEDs to let you know how the power supply is doing. If you see the green LED next to the
smiley face, you're good to go. If you see the red LED next to the warning triangle, the voltage is too high, too low
or too much current is being drawn.
The Crickit power will
also
power the Circuit Playground Express, micro:bit, Raspberry Pi or Feather so you don't
need separate power for your microcontroller board (however, if you want to plug it into USB for programming,
that's totally OK too!)
© Adafruit Industries
https://learn.adafruit.com/adafruit-crickit-creative-robotic-interactive-
construction-kit
Page 27 of 201