
User Manual
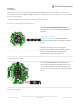


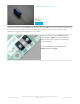

Turn the Crickit over and locate the jumper block on the
bottom as circled in yellow in the first image.
You will need to take a knife and cut the tiny gold trace
pointed by the red arrow to sever the current NeoPixel
to microcontroller connection.
Using a soldering iron, put a mice bright solder
connection between the pads as marked by the blue
arrow.
The Seesaw Pin 20 is now connected to the NeoPixel
connections on Crickit.
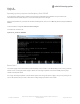
The Adafruit_seesaw library (https://adafru.it/BrV) has seesaw NeoPixel support. You can get the latest version of this
library through the Arduino board manager as described in this guide on the Arduino page (https://adafru.it/EvT).
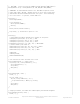
Your Arduino sketch should include seesaw_neopixel.h which provides the NeoPixel functions for seesaw.
The following example sets up a strand of NeoPixels and runs through some animations.
#include <seesaw_neopixel.h>
#define PIN 10
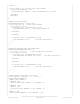
// Parameter 1 = number of pixels in strip
// Parameter 2 = Arduino pin number (most are valid)
// Parameter 3 = pixel type flags, add together as needed:
// NEO_KHZ800 800 KHz bitstream (most NeoPixel products w/WS2812 LEDs)
// NEO_KHZ400 400 KHz (classic 'v1' (not v2) FLORA pixels, WS2811 drivers)
// NEO_GRB Pixels are wired for GRB bitstream (most NeoPixel products)
// NEO_RGB Pixels are wired for RGB bitstream (v1 FLORA pixels, not v2)
© Adafruit Industries
https://learn.adafruit.com/adafruit-crickit-creative-robotic-interactive-
construction-kit
Page 189 of 201