
User Manual

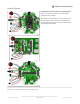


This example is similar to the 1 drive example, but instead of using just 1 PWM driver, we'll make an array called drives
that contains the pin numbers of 4 PWM drivers. Then we can assign them using crickit.analogWrite(drives[0],
CRICKIT_DUTY_CYCLE_MAX); or iterate through them as we do in the loop. You don't
have
to do it this way, but its very
compact and doesn't take a lot of code lines to create all 4 drivers at once!
#include "Adafruit_Crickit.h"
Adafruit_Crickit crickit;
#define NUM_DRIVES 4
int drives[] = {CRICKIT_DRIVE1, CRICKIT_DRIVE2, CRICKIT_DRIVE3, CRICKIT_DRIVE4};
void setup() {
Serial.begin(115200);
Serial.println("4 Drive demo!");
if(!crickit.begin()){
Serial.println("ERROR!");
while(1);
}
else Serial.println("Crickit started");
//our default frequency is 1khz
for(int i=0; i<NUM_DRIVES; i++)
crickit.setPWMFreq(drives[i], 1000);
}
void loop() {
for(int i=0; i<NUM_DRIVES; i++){
//turn all the way on
crickit.analogWrite(drives[i], CRICKIT_DUTY_CYCLE_OFF);
delay(100);
//turn all the way off
crickit.analogWrite(drives[i], CRICKIT_DUTY_CYCLE_MAX);
delay(100);
}
}
© Adafruit Industries
https://learn.adafruit.com/adafruit-crickit-creative-robotic-interactive-
construction-kit
Page 178 of 201