
User Manual
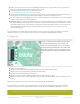

Mono Enclosed Speaker - 3W 4 Ohm (https://adafru.it/uyB)
Breadboard-Friendly PCB Mount Mini Speaker (https://adafru.it/yFg) - 8 Ohm 0.2W
And more in the Adafruit shop (https://adafru.it/BzC)!
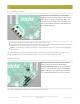
Connecting Your Microcontroller to your Crickit Board
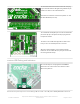
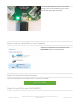
If you have a Circuit Playground Crickit, you can attach
the Playground in the middle using 6 standoff bolts that
come with the kit. Make sure you tighten these as loose
bolts can cause connection issues.
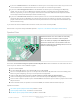
There's six connections to make
Ground - signal and power ground between Crickit
and Playground
SDA and SCL - the I2C data connection used to
send/receive data from the Crickit
A1 - Used for the NeoPixel output default
A0 - Used for the speaker output
VOUT - This bolt lets you safely power the Circuit
Playground
from the Crickit
so you don't need to
separately power the Playground with batteries
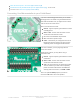
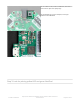
If you have a Feather, you can plug it right into the
center of the Crickit.
Despite all the sockets, you only will be using 4
connections total:
Ground - signal and power ground between Crickit
and Feather
SDA and SCL - the I2C data connection used to
send/receive data from the Crickit
3.3V - This connection lets you power the Feather
from the Crickit
so you don't need to separately
power the Feather with batteries or USB. Note it
will only power the 3.3V line, not VUSB or VBAT
There's an optional AUDIO jumper if you want to
connect the A0 Feather line to the Speaker.
© Adafruit Industries
https://learn.adafruit.com/adafruit-crickit-creative-robotic-interactive-
construction-kit
Page 20 of 201