
User Manual

CircuitPython Code
Our Python code is dual use. You can use the slide switch to select whether you want to log the accelerometer data to
the onboard storage. If you do, its easy to plot it and see the magnitude of the forces on your trapeze artist!
We mostly used data log mode to calibrate how 'hard' we required the person to push the trapeze to make the servo
release the gymnast-stand-in.
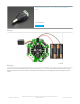
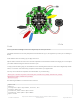
We also have two buttons on the CPX we use for different tasks. In logging mode, you use button A to turn on/off
logging. The red LED blinks to let you know logging is occuring. In trapeze mode, A and B let you manually open/close
the servo gripper so you can have it grab the gymnasts head. Hey life's tough all around!
Finally, if we're in trapeze mode, we look for when we're at the beginning of a swing, that's when the Z axis
acceleration drops below 3 m/s and the Y axis has positive acceleration (we used the data log info to figure this out!) If
so, the next time we reach max-acceleration, at the lowest point of the swing, we start opening the gripper, which
takes a little time so that when we are at the end of the swing, it's opened enough for the gymnast to be released!
We change the NeoPixel colors to help debug, by flashing when we reach the different sensor states, since we don't
have wireless data transfer on the CPX.
# Save as boot.py to turn on/off datalogging capability
import digitalio
import board
import storage
switch = digitalio.DigitalInOut(board.D7) # For Circuit Playground Express
switch.direction = digitalio.Direction.INPUT
switch.pull = digitalio.Pull.UP
# If the switch pin is connected to ground CircuitPython can write to the drive
storage.remount("/", switch.value)
2
import time
from digitalio import DigitalInOut, Direction, Pull
import adafruit_lis3dh
from busio import I2C
from adafruit_seesaw.seesaw import Seesaw
from adafruit_seesaw.pwmout import PWMOut
from adafruit_motor import servo
import neopixel
import board
# create accelerometer
i2c1 = I2C(board.ACCELEROMETER_SCL, board.ACCELEROMETER_SDA)
lis3dh = adafruit_lis3dh.LIS3DH_I2C(i2c1, address=0x19)
lis3dh.range = adafruit_lis3dh.RANGE_8_G
# Create seesaw object
i2c = I2C(board.SCL, board.SDA)
seesaw = Seesaw(i2c)
# Create servo object
pwm = PWMOut(seesaw, 17) # Servo 1 is on s.s. pin 17
pwm.frequency = 50 # Servos like 50 Hz signals
my_servo = servo.Servo(pwm) # Create my_servo with pwm signal
© Adafruit Industries
https://learn.adafruit.com/adafruit-crickit-creative-robotic-interactive-
construction-kit
Page 139 of 201