
User Manual


that both will turn on/off at the same time
Instead of 2 DC motors, you could also control a single bi-polar stepper motor (5VDC power) or single uni-polar
stepper motor. You'll use the ground pin for the 5th (and 6th, if it exists) wire of the uni-polar stepper.
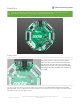
Uses the DRV8833 dual H-Bridge motor driver chip (https://adafru.it/Bfk)
The seesaw chip on the Crickit does all the management of these pins so your Feather or CPX does not directly
control them, it must send a message to Crickit. They are on seesaw pins 22 + 23 (motor 1) and 19 + 18 (motor 2)
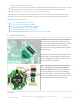
Typical Adafruit Motors to consider:
DC Toy Hobby Motor (https://adafru.it/xan)
DC Motor in Servo Body (https://adafru.it/BzD)
DC Gearbox Motor (https://adafru.it/BzE) - "TT Motor"
TT Motor All-Metal Gearbox (https://adafru.it/BzF)
TT Motor Bi-Metal Gearbox (https://adafru.it/BzG)
And more including accessories in the Adafruit Shop (https://adafru.it/BzC)!
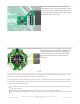
4 x High Power Drivers
In addition to servos and DC motors, you may find you
want to drive other high-power electronics like relays,
solenoids, powerful LEDs, vibration motors, etc. Some of
these devices are motor-like and need a kick-back
protection diode, so having a proper driver is important
to avoid damage!
This is where you will want to use the high power Drive
terminal block. You get four high current drivers. Each
driver is a 'Darlington' transistor that, when turned on,
connects the output pin to ground.
That's a little different than most other outputs on the
Crickit: The Crickit can only connect/disconnect the
drive pins to Ground! You cannot 'set' the Drive output
to be a high voltage. So, if you're driving a solenoid,
relay, vibration motor, etc. connect one side to the 5V
pin, and the other side to one of the driver pins. You can
connect multiple wires to the 5V pin if necessary.
Drive details:
© Adafruit Industries
https://learn.adafruit.com/adafruit-crickit-creative-robotic-interactive-
construction-kit
Page 16 of 201