Introducing Adafruit Crickit #MakeRobotFriend Created by lady ada Last updated on 2019-07-18 04:35:44 AM UTC
Overview Sometimes we wonder if robotics engineers ever watch movies. If they did, they'd know that making robots into slaves always ends up in a robot rebellion. Why even go down that path? Here at Adafruit we believe in making robots our friends! So if you find yourself wanting a companion, consider the robot. They're fun to program, and you can get creative with decorations. © Adafruit Industries https://learn.adafruit.
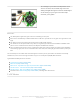
With that in mind, we designed Crickit - That's our Creative Robotics & Interactive Construction Kit. It's an add-on to our popular Circuit Playground Express that lets you #MakeRobotFriend using CircuitPython, MakeCode (coming soon), or Arduino. Bolt on your Circuit Playground using the included stand-off bolts and start controlling motors, servos, solenoids. You also get signal pins, capacitive touch sensors, a NeoPixel driver and amplified speaker output.
The Crickit is powered by seesaw, our I2C-to-whatever bridge firmware. So you only need to use two data pins to control the huge number of inputs and outputs on the Crickit. All those timers, PWMs, sensors are offloaded to the coprocessor.
Since you'll be working with high-current devices, we wanted to have a good solid power supply system that minimizes risk of damage. The power supply has an 'eFuse' management chip (https://adafru.it/Bfj) that will automatically turn off if the voltage goes above 5.5V or below 3V and has over-current protection at 4A. Every motor driver has kick-back protection. We think this is a nice and durable board for robotics! © Adafruit Industries https://learn.adafruit.
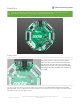
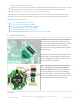
Crickit Tour Although the Crickit HAT for Raspberry Pi is not octagonal like other Crickets, the HAT still has the same features that are listed below, just rearranged to fit the rectangular HAT shape. Power Input Your project start here, where power comes into the Crickit and is then used to control various motors and parts. We cover the various ways you can power your Crickit in the next section, since there's a lot of flexibility depending on the budget, portability and complexity of your project.
Use 5V DC (4V to 5.5VDC range works) with positive-center voltage. If you try to plug in a negative-center power supply, the polarity-protection will kick in and you will not see any lights on the Crickit. The Crickit uses a power management chip to keep you from accidentally powering it from 9V or 12V, damaging your electronics. Look for the OK and /!\ warning LEDs.
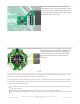
The Crickit gives you 4 slots for 4 independent servos. You can use micro, mini, standard, large size servos. Analog and digital work great. Continuous or 180-degree are OK. As long as you've got a servo with a 3-pin connector, you're golden. Servo notes: The white/yellow 'signal' wire goes next to the # marking on each port. Each servo is controlled by a 16-bit hardware timer at 50 Hz so you will not see any jitter. The signal line is 3.
Round & round, DC motors are great whenever you need something to spin. They tend to be faster, stronger and less expensive than continuous-rotation servos, but you need a proper DC motor driver to use them. Luckily, the Crickit can drive two DC motors. You get 2 independently-controllable brushed DC motor drives. Each motor can go forwards or backwards, with 8-bit speed control. There's a 5-pin terminal block to connect motors, 2 pins for each motor and a middle ground pin.
that both will turn on/off at the same time Instead of 2 DC motors, you could also control a single bi-polar stepper motor (5VDC power) or single uni-polar stepper motor. You'll use the ground pin for the 5th (and 6th, if it exists) wire of the uni-polar stepper. Uses the DRV8833 dual H-Bridge motor driver chip (https://adafru.it/Bfk) The seesaw chip on the Crickit does all the management of these pins so your Feather or CPX does not directly control them, it must send a message to Crickit.
500mA current limit per output, you can double/triple/quadruple pins up to get more current, if you like. Just make sure to tell the Crickit to turn on/off all four pins in a row. Kick-back protection diodes for each output to 5V power. Uses a ULN2003 Darlington driver (https://adafru.it/Bfl) Instead of 4 solenoids/relays you can connect & control a single uni-polar stepper motor, connect the 5th (and 6th if it exists) wire to 5V. Won't work with bi-polar steppers, use the DC motor ports for that.
add external resistors to Vcc or Ground to read things such as buttons where a resistor is needed. 4 x Capacitive Touch Capacitive touch sensing allows you to add humantriggered control to your robot. When you touch the pad (either directly or through an alligator clip, copper tape or conductive ink) the Crickit can detect that signal. We give you four capacitive touch inputs with alligator/croc clip compatible PCB pads.
If you have a Feather Crickit then the NeoPixels are driven by the seesaw chip on the Crickit, and you must send seesaw commands to set colors. But that means no extra pins are needed from your Feather. If you have a Circuit Playground Crickit then the NeoPixels are driven by the Circuit Playground A1 pad by default. This way you can use the MakeCode emulator and built in Circuit Playground CircuitPython library.
Mono Enclosed Speaker - 3W 4 Ohm (https://adafru.it/uyB) Breadboard-Friendly PCB Mount Mini Speaker (https://adafru.it/yFg) - 8 Ohm 0.2W And more in the Adafruit shop (https://adafru.it/BzC)! Connecting Your Microcontroller to your Crickit Board If you have a Circuit Playground Crickit, you can attach the Playground in the middle using 6 standoff bolts that come with the kit. Make sure you tighten these as loose bolts can cause connection issues.
The micro:bit Crickit is the easiest of them all! Just plug in your micro:bit with the LED grid facing towards the pin numbers as shown on the Crickit silkscreen. You'll also see that Pin 0 is marked for speaker use and Pin 16 for NeoPixels (sun icon). The Crickit HAT for Raspberry Pi uses the standard Pi 40 pin header (at top in the picture at left) to plug onto the Pi expansion header. The holes in the Crickit HAT align with the holes in the Pi so you can use standoff posts for a secure fit.
also does not connect to the Feather or Circuit Playground USB. It's only for debugging/reloading seesaw firmware. Basically, if we add more Crickit capabilities, you could load new firmware over this USB connection. In general, you won't be using this port, you may want to cover it with some masking tape! To the right is a yellow Activity LED, which will flash when seesaw sends/receives commands from your Circuit Playground or Feather. To the left is a seesaw NeoPixel.
Update Your Crickit Your Crickit contains a special interface chip we call seesaw. Like a see-saw you see in a playground, it goes up/down back/forth. In this case, instead of holding children, it sends commands and responses back and forth - motor movement, sensors inputs, signal i/o...
On the Crickit for CPX, Feather or Micro:bit, this button is next to the DC jack and is pretty large. On the Raspberry Pi, its more compact, and is right below the status NeoPixel Step 3. Look for pulsing yellow LED and green NeoPixel © Adafruit Industries https://learn.adafruit.
If you have a good USB connection and you doubleclick right, you'll see the left LED turn green and the right hand little yellow LED start pulsing Step 4. Look for a New Disk on Your Computer You'll see a new disk drive on your computer called CRICKITBOOT (short for crickit bootloader) Step 5. Download the latest firmware Click here to download the latest Crickit firmware. The filename ends in uf2 https://adafru.it/BMU https://adafru.it/BMU Step 6.
Drag that file you downloaded onto the disk drive, after it is completed the drive will disappear (you may get a complaint from the operating system) That's it! You're now updated © Adafruit Industries https://learn.adafruit.
Powering Crickit On the Crickit HAT, the 5V power plug is next to the 2x20 connector The first thing you'll learn when making robots is that they use a lot of power. So making sure you have your power supply all worked out is super important. We've tried to make the power supply as easy and safe as possible, so you don't have to worry about damaging your electronics or robot. To do that we made some important design decisions.
Here's our recommended ways to power the Crickit: Plug In DC Power Supplies These get wall power and give you a nice clean 5V DC power option. 5V 2A works for most project with a motor or two... 5V 2A (2000mA) switching power supply - UL Listed $7.95 IN STOCK ADD TO CART And a 5V 4A supply will give you lots of power so you can drive 4 or more servos, motors, etc.
4 x AA Battery Holder with On/Off Switch $2.95 IN STOCK ADD TO CART 3 x AA Battery Packs for Alkaline ONLY Alkaline batteries have a 1.5V max voltage, so 4 of them is 4 x 1.5 = 6 Volts. That's too high! Instead we recommend 3 in series for 3 x 1.5V = 4.5 VDC 3 x AA Battery Holder with 2.1mm Plug $2.95 IN STOCK ADD TO CART If you're making a custom battery pack you may want to pick up a 2.1mm DC jack adapter, so you can connect battery pack wires Waterproof 3xAA Battery Holder with On/Off Switch $3.
Male DC Power adapter - 2.1mm plug to screw terminal block OUT OF STOCK OUT OF STOCK Not Recommended Power supplies LiPoly Batteries - 1 battery is 3.7V, too low. 2 batteries is 7.2V, too high! You could possibly use a 7.2V pack and then a UBEC to step down to 5V (https://adafru.it/efD) but its not recommended Lead Acid Batteries - These are heavy and you'll need a custom charging solution.
Assembly Only the Circuit Playground Express + Crickit combination needs assembly, the Feather and micro:bit Crickits have sockets which the microcontroller plugs into. The Crickit HAT for Raspberry Pi does not need assembly either, it has female receptors for a male Raspberry Pi header. The Circuit Playground Express version of Crickit comes with a package of six threaded, hexagonal brass standoffs. These will hold the Circuit Playground Express above and onto the Crickit.
Watch out, the CircuitPlayground Express (CPX) can go on 'backwards' and it won't work. Make sure the USB connector on the CPX is right below the DC jack, and the labels on the silkscreen of the Crickit match the ones on the CPX! See the images below! Once you have the Circuit Playground Express lined up correctly, use the remaining screws to attach the boards together. Start with one screw into one standoff, say GND, leave it loose a bit, then put in the VOUT screw, loose, then the others loosely.
Now the two boards should be attached to one another. There are circular markings on the bottom of Crickit for four mounting pads (Adafruit ID 550 (https://adafru.it/dLG)) if you would like to use the board on a surface and protect the surface and bottom of your Crickit. If you happen to lose a standoff or screw(s), a new package is available from Adafruit: Circuit Playground Bolt-On Kit $3.95 IN STOCK ADD TO CART © Adafruit Industries https://learn.adafruit.
Little Rubber Bumper Feet - Pack of 4 $0.95 IN STOCK ADD TO CART © Adafruit Industries https://learn.adafruit.
Troubleshooting Crickit Your Crickit is well tested but there's things that can trip you up! Here's a few common issues we see My Crickit Is Doing Something Wrong We do have bugs once in a while, so please always try updating to the latest Crickit seesaw firmware (https://adafru.it/BMV) - then see if the bug persists My Crickit Motors Aren't Moving! My Crickit Keeps Resetting, It Works For a Bit... Then Fails! Check the power supply. There's a few ways to know that power is good: 1.
Another common issue we see is not having good power to the Crickit. Check that you have fresh batteries or a good 5V power supply. Also check the Crickit is on! There's an on/off switch next to the power jack Python: No Pullups found on SDL and SCL This most often indicated the Crickit is not powered. If you're running Crickit on battery power, you need fresh batteries. If you use the wall power brick to provide power, ensure it is plugged in and the power switch is on.
Recommended Motors DC Gearbox Motors These DC motors have a gear box already built in, and wires attached, so they're super easy to use: DC Gearbox Motor - "TT Motor" - 200RPM - 3 to 6VDC $2.95 IN STOCK ADD TO CART We also have a wide range of matching wheels: Orange and Clear TT Motor Wheel for TT DC Gearbox Motor $1.50 IN STOCK ADD TO CART Thin White Wheel for TT DC Gearbox Motors - 65mm Diameter $1.50 IN STOCK ADD TO CART © Adafruit Industries https://learn.adafruit.
Skinny Wheel for TT DC Gearbox Motors $2.50 IN STOCK ADD TO CART Other accessories are available, check the Adafruit shop for "TT Motor" items (https://adafru.it/Bfn) for the wide range of add-ons available. Servo-style DC motor If you need a motor that is very compact (but not very powerful) these DC-in-servo-body motors can do the job: DC Motor in Micro Servo Body $3.50 IN STOCK ADD TO CART Which can be used with this wheel: Wheel for Micro Continuous Rotation FS90R Servo $2.
DC Toy / Hobby Motor - 130 Size $1.95 IN STOCK ADD TO CART © Adafruit Industries https://learn.adafruit.
Recommended Chassis This chassis is cute, red and has two DC motors so its super easy to drive from the Crickit's dual DC motor port. You may need to use some wires to extend the DC motor connections (they're a tad short) Your browser does not support the video tag. Mini Round Robot Chassis Kit - 2WD with DC Motors $19.95 IN STOCK ADD TO CART This chassis is nearly identical, but has 3 layers, so you can FIT MORE STUFF! Mini 3-Layer Round Robot Chassis Kit - 2WD with DC Motors $24.
Recommended Servos You're in luck, you can use just about any kind of servo! Note that many of the photos below don't show the additional motor horns, but every servo comes with plastic clipon parts! Servo Extensions People often ask us what they can do if the wire to their Servo is to short for their project. Not a problem! These cables act as extension cords - now you've got plenty of room. Servo Extension Cable - 30cm / 12" long - OUT OF STOCK OUT OF STOCK © Adafruit Industries https://learn.
Servo Extension Cable - 50cm / 19.5" long OUT OF STOCK OUT OF STOCK Popular plastic-gear servos The most popular/common servos have plastic gears, they're plenty strong and not too expensive! These can go back and forth, rotating about 180 degrees They come in 'standard' size: Standard servo - TowerPro SG-5010 $12.00 IN STOCK ADD TO CART And 'micro' size, not as strong but much more compact Micro servo $5.95 IN STOCK ADD TO CART Continuous Rotation Servos © Adafruit Industries https://learn.
These servos look a lot like the above but they rotate all the way around . Unlike standard servos you can't control the location of the horn, just the speed and direction it which it turns. Good as an alternative to DC motors for wheeled bots. For that reason, they tend to get purchased with matching wheels! Continuous Rotation Servo $11.95 IN STOCK ADD TO CART Continuous Rotation Servo Wheel $2.95 IN STOCK ADD TO CART Your browser does not support the video tag.
Wheel for Micro Continuous Rotation FS90R Servo $2.50 IN STOCK ADD TO CART High Torque Servos If you need more power, metal-gear servos can give you better torque, but at additional cost (since the gears have to be machined) These are not continuous rotation Standard Size - High Torque - Metal Gear Servo $19.95 IN STOCK ADD TO CART Micro Servo - High Powered, High Torque Metal Gear $11.95 IN STOCK ADD TO CART © Adafruit Industries https://learn.adafruit.
Micro Servo - MG90D High Torque Metal Gear OUT OF STOCK OUT OF STOCK © Adafruit Industries https://learn.adafruit.
Recommended Speakers The Class-D amplifier on the Crickit is pretty powerful, so you can make quite a bit of noise! 4Ω Speakers You'll get a lot louder audio from 4Ω speakers.
Speaker - 3" Diameter - 8 Ohm 1 Watt $1.95 IN STOCK ADD TO CART The speakers below work just fine, but because the audio amp is pretty strong so you have to make sure not to damage the speakers by turning up the potentiometer on the Crickit to make the audio really loud. If you're getting buzzy sounds from them, turn that little trimmer potentiometer down. Mini Metal Speaker w/ Wires - 8 ohm 0.5W $1.95 IN STOCK ADD TO CART Thin Plastic Speaker w/Wires - 8 ohm 0.25W $1.
Medium Surface Transducer with Wires - 4 Ohm 3 Watt OUT OF STOCK OUT OF STOCK Bone Conductor Transducer with Wires - 8 Ohm 1 Watt OUT OF STOCK OUT OF STOCK © Adafruit Industries https://learn.adafruit.
Recommended Drives Solenoids Since the Crickit can only drive 5V power, you'll need to stick to this small 5V solenoid Your browser does not support the video tag. Mini Push-Pull Solenoid - 5V $4.95 IN STOCK ADD TO CART Vibration Motors You'll need to extend these wires but they'll work great at 5V and buzz very strongly Vibrating Mini Motor Disc OUT OF STOCK OUT OF STOCK © Adafruit Industries https://learn.adafruit.
Recommended Capacitive Touch The capacitive touch pads on the Crickit have large holes so its easy to connect alligator/croc clips. That's how we recommend you attach to them. The "small" size clips work best: Small Alligator Clip Test Lead (set of 12) $3.95 IN STOCK ADD TO CART Small Alligator Clip to Male Jumper Wire Bundle - 6 Pieces $3.95 IN STOCK ADD TO CART You can also use copper foil tape. Note that if you get foil with conductive adhesive, you can tape the foil right onto the Crickit pads.
Copper Foil Tape with Conductive Adhesive - 25mm x 15 meter roll $19.95 IN STOCK ADD TO CART You can use other conductive materials like paints! Either drip the paint into the pad itself and let it harden, or use alligator clips to connect from one pad to a paper with conductive paint on it. Bare Conductive Paint Pen - 10mL $12.50 IN STOCK ADD TO CART Bare Conductive Paint - 50mL $34.
Programming Options The method you choose to program your microcontroller and Crickit depends on what type of environment you are looking to use and available options. The chart below details which options are available with detailed descriptions on this page.
The Arduino IDE works with all Feather boards and with Crickit as an add-on library. The number of drivers for peripherals and sensors is generally excellent and Arduino is suitable for creating new drivers depending on complexity. The learning curve is very high to understand both the built-in functionality and the underlying C/C++ syntax. Error messages may not be intuitive. Compilation times can slow down development. Serial monitor support is included.
MakeCode MakeCode is currently not available for Crickit for micro:bit or the Crickit HAT for Raspberry Pi. With MakeCode, you can create robots simply and easily, using a drag-and-drop block interface. It's perfect for first time robot-makers, people who don't have a lot of coding experience, or even programmers who just want to get something going fast MakeCode uses a web browser only, so no IDE is required to install.
In the list of blocks, select ADVANCED and then EXTENSIONS In the Search Bar type in Crickit and click the magnifying glass. Click on the Crickit block that shows up to install Crickit support! You will now have a new CRICKIT bin of blocks you can use! Continue on to learn how to use these blocks For micro:bit Crickit © Adafruit Industries https://learn.adafruit.
Start by visiting https://makecode.microbit.org/beta (https://adafru.it/Csj), be sure to use the beta version unless you see that Microsoft has made Crickit support standard in the Extensions category. In the list of blocks, select Advanced and then Add Package In the Add Package... ? screen, place the following web address into the Search or enter project URL box: https://github.com/adafruit/pxt-crickit (https://adafru.
You will now have a new CRICKIT bin of blocks you can use! Continue on to learn how to use these blocks Note - some of the example MakeCode block screen shots are from the Circuit Playground Express version of MakeCode. In all cases like this, there are micro:bit MakeCode equivalents. If things differ significantly, we'll show the micro:bit MakeCode separately. © Adafruit Industries https://learn.adafruit.
MakeCode Servos You can plug up to four servos in the Servo block of Crickit. The pin spacing is just right for servo connections. At left are the connections for the Circuit Playground Express and Crickit combination. And here is the Crickit for micro:bit (the micro:bit plugs into the Crickit but is not shown for clarity). The servo connections are identical to the other Crickits.
https://adafru.it/CyB https://adafru.it/CyB https://adafru.it/CyC https://adafru.it/CyC Are your servos not moving a full 180 degrees? Don't fret! This is normal, see below about putting in custom pulse lengths to get the 'max range' your servo! Controlling servos is basically the same through a Crickit as through MakeCode directly.
forth instantly, try adding a delay of a second after moving to make sure it got to the angle you want! Although the angles range from 0 to 180, servos may have different ranges depending on the make and model. Also, each servo is a little different, so you may not get precisely the same angle even if its the same servo! Tweaking/adjusting the angle may be necessary. Precise Pulses For advanced use, you can hand-tune the pulse width.
MakeCode Drives The Drives block on Crickit makes it super easy to connect higher current devices. At left shows the Circuit Playground Express and Crickit combination connected to several devices. The Crickit for micro:bit is just as versatile. Note the micro:bit is not shown at left, it would have to be plugged into the Crickit. The Drive output of your Crickit is perfect for 5V-powered solenoids, relays, vibration motors or high powered LEDs.
https://adafru.it/CyD https://adafru.it/CyD https://adafru.it/CyE https://adafru.it/CyE Each Drive output is a PWM output, that means you can change the amount of current or speed of whatever is connected. Select which Drive pin you want to control with the pull down, Drive 1 through 4 are labeled on the Crickit Then you can set the value from 0 (drive off) to 1023 (drive all the way on). If you want to dim an LED or run a vibration motor at half power, use 512.
Remember you get 4 drive pins, so you can control them independently Changing the Drive Analog/PWM Frequency You can set the analog frequency in an On Start block. We recommend 1000 Hz (1 KHz) its a good standard number. Advanced makers can tweak this! © Adafruit Industries https://learn.adafruit.
MakeCode DC Motors Zoom! Cricket is a great motor driver platform and with MakeCode, it's super easy to use. Just connect to the Crickit Motor block. The Crickit with Circuit Playground Express is shown first at left. Note the GND terminal is not usually used with motors. And using motors with micro:bit is just as easy. Note: the micro:bit is not shown in the diagram at left for clarity, you'll need to plug one into the Crickit slot to have everything work.
Here's an example program that will move a single motor in different speeds and directions Setting Motor Speed You can set the speed of the motor from 0% to 100% with this block. You can select which motor to use, 1 or 2. Once you set the speed of the motor it will continue at that speed until you change it or ask it to stop. You can change direction by having a negative percentage speed! You may want to have two motors move at the same time so they act like wheels on a car.
This is sometimes handy if you want to use only positive numbers or to keep your code looking tidy. © Adafruit Industries https://learn.adafruit.
MakeCode Steppers Stepper motors are used in many projects and you can use them with Crickit and MakeCode. The Circuit Playground Express + Crickit connections are shown at left. And the micro:bit can control stepper motors also when plugged into the micro:bit version of Crickit (micro:bit not shown for clarity). You can control one or two stepper motors on Crickit. The Motor block can drive one bipolar stepper (wiring shown above) or one unipolar stepper.
Move the Motor Port Stepper One Direction Forever Here is a simple program that tells the stepper to move 20 steps, then wait 10 milliseconds, and repeats forever: You'll see the motor shaft slowly turning in the "positive" direction. If you use a bit of solid tape on the stepper's shaft as a small flag, you can see the rotation better. If the rotation is in the wrong direction, use a negative value for the number of steps, re. -20 .
Move the Drive Port Stepper One Direction Forever Here is a simple program that tells a stepper on the Drive port to move 20 steps, then waits ten milliseconds, and repeats forever. 10 milliseconds delay between step blocks is the minimum to ensure the stepper doesn't miss any steps between blocks. If you want to move the motor in the opposite direction, make the movement value negative, re. -20 . The block takes positive and negative values. © Adafruit Industries https://learn.adafruit.
MakeCode Signals Crickit Inputs such as reading analog/signals can sometimes lock up when using MakeCode with CircuitPlayground - we recommend using the alligator connection pads on the 'bare' CPX instead of the Crickit until this is fixed! Or you can use Arduino, CircuitPython, micro:bit, etc. The Signals block on Crickit allows you to expand your general-purpose inputs and outputs (GPIO). The Circuit Playground Express and Crickit combination is at left.
Digital Reads and Writes Here's an example wiring that goes with the code below. We have two switch buttons, connected to signals #1 and #2, the other side of the buttons connect to ground There's also two LEDs, connected to the signals #3 and #4 and the negative wires connected to ground. (All the 3.3V and Ground pins are connected together so you don't have to use the ones right next to the signal pin!) Note the pull up resistors for the buttons.
https://adafru.it/CyF https://adafru.it/CyF https://adafru.it/CyG https://adafru.it/CyG Analog Reads You can also read analog values like from a potentiometer or sensor. Lets do a demonstration where the center tap of a potentiometer is hooked up to Signal #3 - don't forget to also connect one side of the potentiometer to 3.3V and the other side to ground. And here is the example code. You can see we read the signal with crickit analog read signal which returns a value from 0 to 1023.
https://adafru.it/Cso https://adafru.it/Cso © Adafruit Industries https://learn.adafruit.
MakeCode Touch Crickit Inputs such as Touch can sometimes lock up when using MakeCode with CircuitPlayground - we recommend using the alligator connection pads on the 'bare' CPX instead of the Crickit until this is fixed! Or you can use Arduino, CircuitPython, micro:bit, etc. There are four capacitive touch pads you can use to detect human touch. They have big pads you can use to attach alligator clips to extend the pads' reach.
https://adafru.it/C36 https://adafru.it/C36 You can set different actions: if a touch is detected, change the direction of a motor as just one example. Example for Crickit and micro:bit If you touch the capacitive touch pads, the one NeoPixel on the Crickit will glow (pad 1), get broighter (pads 2 and 3) and go out (pad 4). © Adafruit Industries https://learn.adafruit.
https://adafru.it/Csn https://adafru.it/Csn © Adafruit Industries https://learn.adafruit.
MakeCode Audio Crickit provides an amplified audio output via the Speaker block. For the Circuit Playground Express + Crickit version, we take advantage of the CPX ability to play WAV files over the true-analog output pin A0. The micro:bit version of Cricket also has amplified audio output. The micro:bit is not shown in the diagram at left, just plug a micro:bit into the slot in the middle of Cricket in the direction indicated.
If you are using a Crickit with Circuit Playground Express (CPX), the Crickit becomes an amplified extension of the regular audio out. The sound is very clear and the volume can be higher than the CPX on-board speaker. Below I've taken a cute song snippet and reduced the volume from a previous value of 100 to 34 so one's ears don't hurt when it starts. If the slide switch is moved left (towards the on-board speaker on CPX), the song will play, moving the switch right silences it.
micro:bit Version The blocks available for music are a tiny bit different: © Adafruit Industries https://learn.adafruit.
There is no set volume block in MakeCode for micro:bit, so your volume is quite loud. It is suggested that you do not play tones forever like the example below to save your sanity. Here is the song code for micro:bit: © Adafruit Industries https://learn.adafruit.
https://adafru.it/Csl https://adafru.it/Csl © Adafruit Industries https://learn.adafruit.
MakeCode NeoPixels The Circuit Playground Express version of Crickit hardwires the NeoPixel control to Circuit Playground Express pad A1 as shown at left. MakeCode knows all about it and provides support via the LIGHTS block group which will show a NEOPIXELS sub block group for handling strips and other "off-board" NeoPixels like the NeoPixel terminal on Crickit. There is also one Crickit NeoPixel MakeCode allows you to control.
You can use the three special NeoPixel blocks in the CRICKIT block group extension to change the single NeoPixel onboard Crickit. They work just like the NeoPixel blocks under the LIGHT block group but just for the one Crickit pixel. Crickit for Circuit Playground Express and Feather (micro:bit is below) Within MakeCode for Circuit Playground Express, in the LIGHT block group, there is a special subgroup that pops below LIGHT when LIGHT is pushed called ... NEOPIXEL.
For the code below, it assumes a connected 30 NeoPixel strip (https://adafru.it/BPD) to the Crickit NeoPixel terminal block. When the program starts, the on start code up the variable named strip to refer to a NeoPixel strip connected to A1 (which all Circuit Playground Express Crickit strips are connected to) with 30 NeoPixels on it (You have to click the + on the block to specify the pin A1 and add the number of NeoPixels. https://adafru.it/CyH https://adafru.it/CyH © Adafruit Industries https://learn.
For micro:bit + Crickit For micro:bit, there is a small sun icon on Pin P16 on Crickit to help you remember that is the pin connected for NeoPixels. You will probably need to add the NeoPixels extension to MakeCode for NeoPixel control. Click the Advanced button then Add Package. Select the Adafruit NeoPixels extension. You will now have a new code block group called Neopixel which has the blocks you want to control the NeoPixel strip.
CircuitPython Code The Crickit for micro:bit is not programmable in CircuitPython. To use Crickit, we recommend CircuitPython. Python is an easy programming language to use, programming is fast, and its easy to read. Install CPX Special Build If you're using Circuit Playground Express (CPX), Please install this special 'seesaw' version of the CPX firmware.
Plug your Circuit Playground Express into your computer using a known-good USB cable A lot of people end up using charge-only USB cables and it is very frustrating! So make sure you have a USB cable you know is good for data sync Double-click the small Reset button in the middle of the CPX, you will see all of the LEDs turn green. If they turn all red, check the USB cable, try another USB port, etc. (If double-clicking doesn't do it, try a single-click!) © Adafruit Industries https://learn.adafruit.
You will see a new disk drive appear called CPLAYBOOT Drag the .uf2 file onto it. The CPLAYBOOT drive will disappear and a new disk drive will appear called CIRCUITPY That's it! You're done :) © Adafruit Industries https://learn.adafruit.
CircuitPython Servos To the left are the connections for the Crickit with the Circuit Playground Express. Note: The black wire on the servo connectors always points inward towards the microcontroller and center of Crickit. The light wire: yellow, orange, white, etc. faces outward from the Crickit. Here is the Feather Crickit connected to four servos. The Crickit HAT for Raspberry Pi can also control up to 4 servos like other Crickit boards.
Lets start by controlling some servos. You'll want at least one servo to plug in and test out the servo code. Visit our recommended servo page to check that you have a servo that works (https://adafru.it/Bfo). Once you do, plug in a servo into SERVO #1 spot, making sure the yellow or white wire is next to the 1 text label. This example will show rotating one servo from 0 to 180 degrees with a stop at 90 degrees.
import time from adafruit_crickit import crickit print("4 Servo demo!") # make a list of all the servos servos = (crickit.servo_1, crickit.servo_2, crickit.servo_3, crickit.servo_4) while True: # Repeat for all 4 servos for my_servo in servos: # Do the wave! print("Moving servo #", my_servo.angle = 0 time.sleep(0.25) my_servo.angle = 90 time.sleep(0.25) my_servo.angle = 180 time.sleep(0.25) my_servo.angle = 90 time.sleep(0.25) my_servo.angle = 0 servos.
import time from adafruit_crickit import crickit print("1 Servo demo with custom pulse widths!") crickit.servo_1.set_pulse_width_range(min_pulse=500, max_pulse=2500) while True: print("Moving servo #1") crickit.servo_1.angle = 0 time.sleep(1) crickit.servo_1.angle = 180 time.sleep(1) # right # left Continuous Rotation Servos If you're using continuous servos, you can use the angle assignments and just remember that 0 is rotating one way, 90 is 'stopped' and 180 and rotating the other way.
Likewise you can set the duty cycle to a custom value with crickit.servo_1._pwm_out.duty_cycle = number where number is between 0 (off) and 65535 (fully on). For example, setting it to 32767 will be 50% duty cycle, at the 50 Hz update rate Or you can use fractions like crickit.servo_1._pwm_out.fraction = 0.5 import time from adafruit_crickit import crickit print("1 Servo release demo!") while True: print("Moving servo #1") crickit.servo_1.angle = 0 # right time.sleep(10) print("Released") crickit.servo_1.
CircuitPython Drives The Crickit with Circuit Playground Express is shown at left. All the red wires connect to the Drives 5V terminal and the other wire connected to individual Drive terminals. Using Drives with the Feather-based Crickit is shown at left. Note: For CircuitPython, you need to use a CircuitPython-compatible Feather board. Crickit HAT for Raspberry Pi can also drive four devices via the Drive ports. © Adafruit Industries https://learn.adafruit.
Test Drive Lets start by controlling a drive output. You'll need to plug something into the 5V and DRIVE1 terminal blocks. I'm just using a simple LED with resistor but anything that can be powered by 5V will work. Note that the drive outputs cannot have 5V output so you must connect the positive pin of whatever you're driving to 5V.
More Drivers! OK that was fun but you want MORE drives right? You can control up to four! import time from adafruit_crickit import crickit print("4 Drive demo!") drives = (crickit.drive_1, crickit.drive_2, crickit.drive_3, crickit.drive_4) for drive in drives: drive.frequency = 1000 while True: for drive in drives: print("Drive #", drives.index(drive)+1) drive.fraction = 1.0 # all the way on time.sleep(0.25) drive.fraction = 0.0 # all the way off time.sleep(0.
CircuitPython DC Motors Connections from DC motors to the Circuit Playground Express Crickit is shown at left. There are two Motor drivers, labeled 1 and 2. The center GND terminal is not used for most DC Motor applications. The Feather Crickit connections for the Motor terminals is shown at left. Motors are just as easy to use with the Crickit HAT for Raspberry Pi as other versions of Crickit.
DC motors are controlled by 4 PWM output pins, the 4 PWM pins let you control speed and direction. And we'll use our adafruit_motor library to help us manage the throttle (speed) and direction for us, making it very easy to control motors Note that each DC motor is a little different, so just because you have two at the same throttle does not mean they'll rotate at the exact same speed! Some tweaking may be required The two wires of the DC motor can be plugged in either way into each Crickit Motor port.
Each of these are adafruit_motor.motor (https://adafru.it/BNE) type objects for the curious To make our code easier to read, we'll make new names for each motor: # make two variables for the motors to make code shorter to type motor_1 = crickit.dc_motor_1 motor_2 = crickit.dc_motor_2 Control Motor Now that we have our motor objects, we can simply assign the throttle, this will set the direction and speed. For example, to set the speed to full forward, use motor_1.
CircuitPython Steppers Connecting Crickit with Circuit Playground Express with stepper motors is shown at left. The Crickit with Feather uses identical connections with other Crickit boards to stepper motors. Note the Fritzing part for the blue stepper has changed wire order but the color connections shown are identical. Likewise you can drive two stepper motors with the Crickit HAT for Raspberry Pi. One on the Motor ports, one on the Drive ports.
Stepper motors rotate all the way around but only one 'step' at a time. Usually there's a few hundred steps per turn, making them great for precision motion. The trade off is they're very slow compared to servos or steppers. Also, unlike servos they don't know 'where' they are in the rotation, they can only step forward and backwards. There's two kinds of stepper motors: bipolar (4-wire) and unipolar (5 or 6-wire).
If you are using our 5V uni-polar stepper (https://adafru.it/BxF), wire in this order: orange, pink, red (ground), yellow, blue. Here is the CircuitPython code for stepping various ways. You can try tweaking the INTERSTEP_DELAY to slow down the motor. CircuitPython supports 4 different waveform stepping techniques. More on each is detailed at Wikipedia. (https://adafru.
import time from adafruit_crickit import crickit from adafruit_motor import stepper print("Bi-Polar or Uni-Polar Stepper motor demo!") # make stepper motor a variable to make code shorter to type! stepper_motor = crickit.stepper_motor # increase to slow down, decrease to speed up! INTERSTEP_DELAY = 0.01 while True: print("Single step") for i in range(200): stepper_motor.onestep(direction=stepper.FORWARD) time.sleep(INTERSTEP_DELAY) for i in range(200): stepper_motor.onestep(direction=stepper.BACKWARD) time.
If you are using our 5V uni-polar stepper (https://adafru.it/BxF), wire in this order: red (5V), orange, yellow, pink, blue. That should line up with the wires on the plug And here's the CircuitPython code. Note that the only difference is we're using the crickit.drive_stepper_motor object now! © Adafruit Industries https://learn.adafruit.
import time from adafruit_crickit import crickit from adafruit_motor import stepper print("Uni-Polar Stepper motor demo!") # make stepper motor a variable to make code shorter to type! stepper_motor = crickit.drive_stepper_motor # Use the drive port # increase to slow down, decrease to speed up! INTERSTEP_DELAY = 0.02 while True: print("Single step") for i in range(200): stepper_motor.onestep(direction=stepper.FORWARD) time.sleep(INTERSTEP_DELAY) for i in range(200): stepper_motor.onestep(direction=stepper.
CircuitPython Signals Connecting various sensors, switches, and indicators is easy with Crickit. The Crickit with Circuit Playground Express is shown at the left. Note that external pull up (or pull down) resistors are needed on the Crickit Signals block as Seesaw does not have the capability to set internal pull up or pull down resistors like on direct microcontrollers. Connections to a Crickit with Feather board are identical.
example), or analog input. This lets you add a ton of external components easily, and its all handled by seesaw. Perfect when you have a Feather without analog inputs (like the ESP8266) or just need a ton of extra pins. The signal pins are on a 3x8 female header, so you can poke wires directly in! Here's an example wiring that goes with the code below.
import time from adafruit_crickit import crickit # For signal control, we'll chat directly with seesaw, use 'ss' to shorted typing! ss = crickit.seesaw # Two buttons are pullups, connect to ground to activate BUTTON_1 = crickit.SIGNAL1 # button #1 connected to signal port 1 & ground BUTTON_2 = crickit.SIGNAL2 # button #2 connected to signal port 2 & ground # Two LEDs are outputs, on by default LED_1 = crickit.SIGNAL3 # LED #1 connected to signal port 3 & ground LED_2 = crickit.
Digital Read Then, you can read the values True or False with ss.digital_read(signal) Don't forget you have to set it to be an INPUT first! And if you don't have an external pull up resistor, you'll need to set it in the code. ss.digital_read(BUTTON_1) Digital Write Or, you can set the signal you want to a high value with ss.digital_write(signal, True) , or set to low value with ss.digital_write(signal, False) . Don't forget you have to set it to be an OUTPUT first! # LED On ss.
import time from adafruit_crickit import crickit # For signal control, we'll chat directly with seesaw, use 'ss' to shorted typing! ss = crickit.seesaw # potentiometer connected to signal #3 pot = crickit.SIGNAL3 while True: print((ss.analog_read(pot),)) time.sleep(0.25) By printing the value in a python tuple (ss.analog_read(pot),) we can use the Mu plotter to see the values immediately! © Adafruit Industries https://learn.adafruit.
CircuitPython Touch There's four capacitive touch pads you can use to detect human touch. They have big pads you can use to attach alligator/croc clips Whether you use a Circuit Playground Crickit or Feather Crickit, the touch pads are available. The four capacitive touch pads on the Crickit HAT for Raspberry pi are conveniently on the edge and vave nice holes for clipping alligator clips onto. You can read the value of the captouch pads from crickit.touch_#.
We determine if the touch is active by seeing the difference between the current 'raw' reading value and the first value. That means you do need to read the crickit touch pads without touching them first. Try loading this code and touching the four pads while looking at the REPL import time from adafruit_crickit import crickit # Capacitive touch tests while True: if crickit.touch_1.value: print("Touched Cap Touch if crickit.touch_2.value: print("Touched Cap Touch if crickit.touch_3.
© Adafruit Industries https://learn.adafruit.
CircuitPython Audio Amplified audio is available via the Speaker terminals. At left is the Circuit Playground Express and Crickit version. And this is the Feather and Crickit version. Be sure you order the correct Crickit board for the type of microcontroller you plan to use in your project. While the Crickits are nearly identical in capability, they are not the same in making connections to either Circuit Playground Express or Feather.
This is one of the few outputs that does not go through the seesaw chip. Instead, the audio is played directly from the CircuitPython board and the Crickit only amplifies it! Audio File Formats CircuitPython supports Mono (not stereo) 22 KHz sample rate (or less) and 16-bit WAV format.
You must drag/copy this onto your CIRCUITPY disk drive, it's a big file so it will take a minute to copy over Import Libraries We start by importing the libraries that we need to make audio output import audioio Then we import board , our standardhardware library. Create wave file and audio output Next we set the name of the file we want to open, which is a wave file wavfile = "howto.
from busio import I2C from adafruit_seesaw.seesaw import Seesaw import audioio import board import time # Create seesaw object i2c = I2C(board.SCL, board.SDA) seesaw = Seesaw(i2c) # what counts as a 'touch' CAPTOUCH_THRESH = 500 wavfile = "howto.wav" f = open(wavfile, "rb") wav = audioio.WaveFile(f) a = audioio.AudioOut(board.A0) a.play(wav) t = time.monotonic() # this is the time when we started # wait until we're at timecode 5.5 seconds into the audio while time.monotonic() - t < 5.5: pass a.
CircuitPython NeoPixels You can connect any type of NeoPixels to the NeoPixel port on the Crickit for Circuit Playground Express. Be sure you connect the Power and Ground connections appropriately. The center arrow terminal on Crickit NeoPixel block is connected to Din on the first NeoPixel or the beginning of a strip of NeoPixels. Likewise the Crickit Feather WIng has the same NeoPixel block. The board is just rotated a bit from the above picture, same location).
NeoPixels easily. The sample code for using NeoPixels on the Crickit vary slightly depending on which version of Crickit you have. Look for the appropriate section on this page for your combination of Crickit and microcontroller. NeoPixels with Circuit Playground Express + Crickit If you are looking to use the NeoPixels on the Circuit Playground Express board itself, Adafruit has several tutorials that program them with CircuitPython. See Make It Glow with Crickit for details.
rc_index = (i * 256 // num_pixels) + j pixels[i] = wheel(rc_index & 255) pixels.show() time.sleep(wait) RED = (255, 0, 0) YELLOW = (255, 150, 0) GREEN = (0, 255, 0) CYAN = (0, 255, 255) BLUE = (0, 0, 255) PURPLE = (180, 0, 255) while True: print("fill") pixels.fill(RED) pixels.show() # Increase or decrease to change the speed of the solid color change. time.sleep(1) pixels.fill(GREEN) pixels.show() time.sleep(1) pixels.fill(BLUE) pixels.show() time.sleep(1) print("chase") color_chase(RED, 0.
# The colours are a transition r - g - b - back to r. if pos < 0 or pos > 255: return (0, 0, 0) if pos < 85: return (255 - pos * 3, pos * 3, 0) if pos < 170: pos -= 85 return (0, 255 - pos * 3, pos * 3) pos -= 170 return (pos * 3, 0, 255 - pos * 3) def color_chase(color, wait): for i in range(num_pixels): pixels[i] = color time.sleep(wait) pixels.show() time.sleep(0.
Currently the micro:bit is not supported in CircuitPython. The micro:bit is programmable in MicroPython but there is no Crickit drive support for MicroPython at present. For More Information See the tutorial Make It Glow with Crickit (https://adafru.it/Cxx). © Adafruit Industries https://learn.adafruit.
Python Docs Python Docs (https://adafru.it/CAJ) © Adafruit Industries https://learn.adafruit.
CircuitPython Examples Need some...err...inspiration? Here's some example projects with CircuitPython code and wiring diagrams. They're not full-featured guides but they provide a good basis for seeing how to use Crickit! Most of the examples use the Circuit Playground Express version of Crickit as that was the first Crickit released. For CircuitPython based projects, the Feather Crickit should work fine as long as the project does not use Circuit Playground Express based hardware.
Bubble Bot Its summer time and that means tank tops, ice cream and bubbles! This robot friend makes a bountiful burst of bubbles all on its own. Parts List Your browser does not support the video tag. Circuit Playground Express $24.95 IN STOCK ADD TO CART Adafruit CRICKIT for Circuit Playground Express OUT OF STOCK OUT OF STOCK Standard servo - TowerPro SG-5010 $12.00 IN STOCK ADD TO CART © Adafruit Industries https://learn.adafruit.
DC Toy / Hobby Motor - 130 Size $1.95 IN STOCK ADD TO CART Wiring Diagram Code This simple robot doesn't do a lot but it does it very well! We have one DC motor with a fan attachment, and one servo motor where we connect the bubble wand. Every few seconds, the wand goes down into the bubble mix, then back up, the fan turns on for 3 seconds, then turns off and the process repeats! © Adafruit Industries https://learn.adafruit.
# CircuitPython 3.0 CRICKIT demo import time import board from adafruit_motor import servo, motor from adafruit_seesaw.pwmout import PWMOut from adafruit_seesaw.seesaw import Seesaw from busio import I2C i2c = I2C(board.SCL, board.SDA) ss = Seesaw(i2c) print("Bubble machine!") SERVOS = True DCMOTORS = True # Create 4 Servos servos = [] if SERVOS: for ss_pin in (17, 16, 15, 14): pwm = PWMOut(ss, ss_pin) pwm.frequency = 50 _servo = servo.Servo(pwm) _servo.angle = 90 # starting angle, middle servos.
Feynman Simulator If you are a fan of physics wunderkind Richard Feynman and you like bongo drums, this Feynman simulator will satisfy your every desire. Between wise quips, this Feyn-bot will dazzle you with its drumming expertise (https://adafru.it/BxR). Parts List Your browser does not support the video tag. Circuit Playground Express $24.95 IN STOCK ADD TO CART Adafruit CRICKIT for Circuit Playground Express OUT OF STOCK OUT OF STOCK Your browser does not support the video tag.
Micro servo $5.95 IN STOCK ADD TO CART Mono Enclosed Speaker - 3W 4 Ohm OUT OF STOCK OUT OF STOCK Wiring Diagram Solenoids don't have 'direction' - any current will make them push. So even though we wired the black wire to 5V and the red wires to the #1 and #2 drive ports, they'll work just fine. The microservo is taped to a wooden stick that moves the paper cut-out mouth up and down, for a Monty-Python-style puppet (https://adafru.it/BxS). © Adafruit Industries https://learn.adafruit.
Code Our code plays through a few wave file quips and quotes we found online, with some interstitial bongo drumming. Once all the audio has been played, it bongos for a long time, then repeats! # CircuitPython 3.0 CRICKIT demo import gc import time import audioio import board from adafruit_motor import servo from adafruit_seesaw.pwmout import PWMOut from adafruit_seesaw.seesaw import Seesaw from busio import I2C i2c = I2C(board.SCL, board.
time.sleep(0.1) # Move mouth back and forth def talk(t): for _ in range(t): myservo.angle = 150 time.sleep(0.1) myservo.angle = 180 time.sleep(0.1) filenum = 0 # counter to play all files while True: gc.collect() print(gc.mem_free()) # time to play the bongos! bongo(5) time.sleep(1) # OK say something insightful play_file(wavfiles[filenum]) # and move the mouth while it does while a.playing: talk(1) # Done being insightful, take a break time.
Slime Night Ladyada was unable to get to sleep. Feeling restless she decided to visit her workshop and make some slime to help soothe her soul.
DC Gearbox Motor - "TT Motor" - 200RPM - 3 to 6VDC $2.95 IN STOCK ADD TO CART Foot Pedal Potentiometer - Sewing Machine Speed Controller $26.95 IN STOCK ADD TO CART 3.5mm (1/8") Stereo Audio Jack Terminal Block $2.50 IN STOCK ADD TO CART Mono Enclosed Speaker - 3W 4 Ohm OUT OF STOCK OUT OF STOCK © Adafruit Industries https://learn.adafruit.
Adafruit NeoPixel LED Dots Strand - 20 LEDs at 2" Pitch $27.50 IN STOCK ADD TO CART Wiring Diagram CircuitPython Code This project has a foot pedal potentiometer that controls the speed of the TT motor that spins the platter around. Since foot pedals are rheostats (variable resistors) you need another resistor to finish the divider. We use a plain 10K, any value from about 4.7K to 47K will do fine. When not pressed, the analog reading value is about 700. When pressed, the reading goes down to about 50.
from busio import I2C import neopixel import audioio import board # Create seesaw object i2c = I2C(board.SCL, board.SDA) seesaw = Seesaw(i2c) # built in CPX button A button = DigitalInOut(board.BUTTON_A) button.direction = Direction.INPUT button.pull = Pull.DOWN # NeoPixels pixels = neopixel.NeoPixel(board.A1, 10, brightness=0) pixels.fill((0,0,250)) # Analog reading from Signal #1 (ss. #2) foot_pedal = AnalogInput(seesaw, 2) # Create one motor on seesaw PWM pins 22 & 23 motor_a = motor.
pixels.brightness = 1 else: pixels.brightness = 0 time.sleep(0.5) # loop delay time.sleep(0.1) © Adafruit Industries https://learn.adafruit.
Flying Trapeze Feel the excitement, the thrill, the rushing air beneath your wings - without having to leave home or run any risk of injury or sweating! This Flying Trapeze bot uses a servo claw to grip onto a willing gymnast, and release it into the air when the detected acceleration has reached a sufficient peak! Parts List The servo claw we used had a built in metal gear servo that could draw significant current when actuated! We found a 4xAA battery pack with good NiMH batteries would last a while but
Male DC Power adapter - 2.1mm plug to screw terminal block OUT OF STOCK OUT OF STOCK Wiring Boot.py Since we want to have the ability to data log the accelerometer, we need to put the CPX into 'filesystem write mode' this boot.py will let you use the switch on the CPX to select whether you want to log data or go into trapeze-release mode © Adafruit Industries https://learn.adafruit.
# Save as boot.py to turn on/off datalogging capability import digitalio import board import storage switch = digitalio.DigitalInOut(board.D7) # For Circuit Playground Express switch.direction = digitalio.Direction.INPUT switch.pull = digitalio.Pull.UP # If the switch pin is connected to ground CircuitPython can write to the drive storage.remount("/", switch.value) CircuitPython Code Our Python code is dual use.
my_servo = servo.Servo(pwm) # Create my_servo with pwm signal # LED for debugging led = DigitalInOut(board.D13) led.direction = Direction.OUTPUT # two buttons! button_a = DigitalInOut(board.BUTTON_A) button_a.direction = Direction.INPUT button_a.pull = Pull.DOWN button_b = DigitalInOut(board.BUTTON_B) button_b.direction = Direction.INPUT button_b.pull = Pull.DOWN # NeoPixels! pixels = neopixel.NeoPixel(board.NEOPIXEL, 10, brightness=1) pixels.
if logpoints > 25: led.value = True #print("Writing: "+outstr) fp.write(outstr+"\n") fp.flush() led.value = False logpoints = 0 else: # display some neopixel output! if z > 20: # MAXIMUM EFFORT! pixels.fill((0, 255, 0)) if release: my_servo.angle = 180 elif z < 3 and y > 0: # means at the outer edge release = True # flash red when we peak pixels.fill((255, 0, 0)) else: pixels.fill((0,0,int(abs(z)*2))) time.sleep(0.05) For the curious, our data log file is here! (https://adafru.
R.O.B. GyroBot We picked up a Nintendo R.O.B. robot from our local online auction site and when it appeared we decided to figure out how to get it working. There's 3 motors inside, and the R.O.B. already comes with motor drivers and end-stops, so instead of driving the robot directly, we decided to control the R.O.B. using Circuit Playground Express (CPX) and Crickit! The code is all in CircuitPython.
Super-bright 5mm IR LED $0.75 IN STOCK ADD TO CART Small Alligator Clip Test Lead (set of 12) $3.
Code! Save to your CPX as code.py and touch the alligator clips to control your R.O.B. The IR LED should be 1-2 feet away and pointed at the R.O.B's left eye (or, the right-most eye when you are looking at R.O.B) It will calibrate when first starting up, and play some tunes.
import import import import touchio audioio neopixel board pixels = neopixel.NeoPixel(board.NEOPIXEL, 10, brightness=1) pixels.fill((0,0,0)) # Create seesaw object i2c = I2C(board.SCL, board.SDA) seesaw = Seesaw(i2c) # switch switch = DigitalInOut(board.SLIDE_SWITCH) switch.direction = Direction.INPUT switch.pull = Pull.UP # We need some extra captouches touch2 = touchio.TouchIn(board.A2) touch3 = touchio.TouchIn(board.A3) # LED for debugging led = DigitalInOut(board.D13) led.direction = Direction.
startfile = "startup.wav" loopfile = "loop.wav" with open(startfile, "rb") as f: wav = audioio.WaveFile(f) a.play(wav) for _ in range(3): IR_Command(Calibrate) time.sleep(0.5) while a.playing: IR_Command(Open) time.sleep(1) IR_Command(Close) time.sleep(1) f = open(loopfile, "rb") wav = audioio.WaveFile(f) a.play(wav, loop=True) while True: led.value = switch.value if not switch.value: continue # Main Loop poll switches, do commands # easily tell if we're running #touch_vals = (touch2.raw_value, touch3.
© Adafruit Industries https://learn.adafruit.
Gear Tower Plastic toys are great for hacking, modding and improving using Crickit! This box o' gears is fun for about 10 minutes...but when you add motors, sensors and robotics you can make cool interactive art This example shows how to use the light sensor on the Circuit Playground Express to trigger a motor to rotate.
TT Motor Pulley - 36mm Diameter $0.75 IN STOCK ADD TO CART Mono Enclosed Speaker - 3W 4 Ohm OUT OF STOCK OUT OF STOCK Wiring CircuitPython Code For "Force Wave" demo This project is pretty simple, it looks to see when the light sensor is shaded by your hand and changes the motor from © Adafruit Industries https://learn.adafruit.
running to off or vice versa. import time from busio import I2C import analogio from adafruit_seesaw.seesaw import Seesaw from adafruit_seesaw.pwmout import PWMOut from adafruit_motor import motor import board light = analogio.AnalogIn(board.LIGHT) print("Wave on/off to turn") # Create seesaw object i2c = I2C(board.SCL, board.SDA) seesaw = Seesaw(i2c) # Create one motor on seesaw PWM pins 22 & 23 motor_a = motor.DCMotor(PWMOut(seesaw, 22), PWMOut(seesaw, 23)) motor_a.
import time from busio import I2C import analogio from adafruit_seesaw.seesaw import Seesaw from adafruit_seesaw.pwmout import PWMOut from adafruit_motor import motor import board light = analogio.AnalogIn(board.LIGHT) print("Theramin-like turning") # Create seesaw object i2c = I2C(board.SCL, board.SDA) seesaw = Seesaw(i2c) # Create one motor on seesaw PWM pins 22 & 23 motor_a = motor.DCMotor(PWMOut(seesaw, 22), PWMOut(seesaw, 23)) motor_a.
CPX-1701 This is the adventure of the United Space Ship CircuitPlayground. Assigned a five year galaxy patrol, the bold crew of the giant starship explores the excitement of strange new worlds, uncharted civilizations, and exotic code. These are its voyages and its adventures. Explore exciting new modes of propulsion by creating a really big vibrating motor. This Crickit project attaches a bunch of CD's to an up-cycled CD-ROM motor for a cool looking warp drive.
Thin Plastic Speaker w/Wires - 8 ohm 0.25W $1.75 IN STOCK ADD TO CART Wiring Diagram CircuitPython Code This project is pretty simple, it plays some audio clips, and then lights up the built in NeoPixels and powers up the motor in time with the effects. import time from busio import I2C from adafruit_seesaw.seesaw import Seesaw from adafruit_seesaw.
# Create seesaw object i2c = I2C(board.SCL, board.SDA) seesaw = Seesaw(i2c) # Create one motor on seesaw PWM pins 22 & 23 motor_a = motor.DCMotor(PWMOut(seesaw, 22), PWMOut(seesaw, 23)) # audio output cpx_audio = audioio.AudioOut(board.A0) # neopixels! pixels = neopixel.NeoPixel(board.NEOPIXEL, 10, brightness=1) pixels.fill((0, 0, 0)) # give me a second before starting time.sleep(1) motor_a.throttle = 0 # warp drive off f = open("01space.wav", "rb") wav = audioio.WaveFile(f) cpx_audio.play(wav) t = time.
while cpx_audio.playing: pass f.close() © Adafruit Industries https://learn.adafruit.
Mag Neato We picked up a magnetic foam shape kit, to make a fridge-mounted marble run. But picking up the marble after each run is such a drag - wouldn't it be fun if you could use your Crickit to help lift the ball back up and re-start the marble run? With an electromagnet, we can pick up the stainless steel balls. A DC motor acts as a pulley, and a servo helps align the electromagnet so it can navigate around the foam.
DC Gearbox Motor - "TT Motor" - 200RPM - 3 to 6VDC $2.95 IN STOCK ADD TO CART Standard servo - TowerPro SG-5010 $12.00 IN STOCK ADD TO CART 1 x 5V Electromagnet Use a "50N" one for good pick up ability! Wiring Diagram Even though an electromagnet doesn't have 'direction' and thus could be controlled by a Drive pin, we opted for a Motor port because these electromagnets can draw up to 700mA and that's more than the Drive pin.
Code! Save to your CPX as code.py and press the CPX buttons to move the pulley up and down. Capacitive touch pads #1 and #4 twist the servo and then the switch enables and disables the electromagnet. The most interesting part is smooth_move which is our gentle servo movement helper, it will carefully move the servo rather than jostling it and the magnet which would possibly cause the balls to fall. import time from busio import I2C from adafruit_seesaw.seesaw import Seesaw from adafruit_seesaw.
touch_vals = (seesaw.touch_read(0), seesaw.touch_read(3)) # print(touch_vals) touch1 = False if seesaw.touch_read(0) > 500: touch1 = True if touch1 != last_touch1: if touch1: start_angle = my_servo.angle end_angle = start_angle - 20 end_angle = max(0, min(end_angle, 180)) print("left from", start_angle, "to", end_angle) for a in smooth_move(start_angle, end_angle, 25): my_servo.angle = a time.sleep(0.03) last_touch1 = touch1 touch4 = False if seesaw.
print("GRAB") else: print("RELEASE") last_switch = switch.value time.sleep(0.01) © Adafruit Industries https://learn.adafruit.
(Don't Fear) The Crickit Parts List Adafruit CRICKIT for Circuit Playground Express OUT OF STOCK OUT OF STOCK Your browser does not support the video tag. Circuit Playground Express $24.95 IN STOCK ADD TO CART Panel Mount Right Angle 10K Linear Potentiometer w/On-Off Switch $1.50 IN STOCK ADD TO CART © Adafruit Industries https://learn.adafruit.
Solid Machined Metal Knob - 1" Diameter $3.95 IN STOCK ADD TO CART Mono Enclosed Speaker - 3W 4 Ohm OUT OF STOCK OUT OF STOCK Adafruit NeoPixel LED Strand 20 LED 4" Pitch OUT OF STOCK OUT OF STOCK 1 x Fog Machine with Remote https://www.amazon.com/Virhuck-400-Watt-Portable-Halloween-Christmas/dp/B074WMWWS5 1 x Cow Bell Craft store cowbell Wiring Diagram © Adafruit Industries https://learn.adafruit.
For the remote, we soldered four wires Black ground wire to the battery spring (negative) terminal Red +5V wire to the battery flat (positive) terminal White and Purple go to the 'switched' part of each switch, which, when connected to 5V activates that switch CircuitPython Code import time import audioio from digitalio import DigitalInOut, Pull, Direction from adafruit_seesaw.seesaw import Seesaw from adafruit_seesaw.
led.direction = Direction.OUTPUT # Two onboard CPX buttons for FOG buttona = DigitalInOut(board.BUTTON_A) buttona.direction = Direction.INPUT buttona.pull = Pull.DOWN buttonb = DigitalInOut(board.BUTTON_B) buttonb.direction = Direction.INPUT buttonb.pull = Pull.DOWN # Use the signal port for potentiometer w/switch MORECOW = 2 # A switch on Signal #1 SWITCH = 3 # A potentiometer on Signal #2 # Add a pullup on the switch seesaw.pin_mode(SWITCH, seesaw.
# Maps a number from one range to another. def map_range(x, in_min, in_max, out_min, out_max): mapped = (x-in_min) * (out_max - out_min) / (in_max-in_min) + out_min if out_min <= out_max: return max(min(mapped, out_max), out_min) return min(max(mapped, out_max), out_min) # Wait before starting up time.sleep(3) play_file("i-gotta-have-more-cowbell.wav") # a pause between audio clips time.sleep(1) play_file("only-prescription-more-cowbell.wav") while seesaw.
fog_off.duty_cycle = 0 pixels[8] = (255, 255, 0) pixels[7] = (255, 255, 0) time.sleep(1.5) play_file("i-coulda-used-more-cow-bell.wav") © Adafruit Industries https://learn.adafruit.
Arduino Code The Crickit HAT for Raspberry Pi is not programmable in Arduino. The microcontrollers installed on top of Crickit communicate to execute Crickit commands via the seesaw chip located on the Crickit. Seesaw is a helper microcontroller which talks to the main microcontroller via the serial I2C protocol. There is a bit of setup to get things working in your Arduino code but it is not difficult.
There are two files you should include in your sketches, Adafruit_seesaw.h and Adafruit_Crickit.h . Pin definitions for controlling Crickit functions are in Adafruit_Crickit.h for reference. #ifndef _CRICKIT_TERSTER_H #define _CRICKIT_TERSTER_H #include "Adafruit_seesaw.
© Adafruit Industries https://learn.adafruit.
Arduino Servos The location of the Servo connections on Crickit are similar on all three versions of the board: Circuit Playground Express, Feather, and micro:bit. © Adafruit Industries https://learn.adafruit.
Test Servos Lets start by controlling some servos. You'll want at least one servo to plug in and test out the servo code. Visit our recommended servo page to check that you have a servo that works (https://adafru.it/Bfo). Once you do, plug in a servo into SERVO #1 spot, making sure the yellow or white wire is next to the 1 text label. This example will show rotating one servo from 0 to 180 degrees with a stop at 90 degrees. #include "Adafruit_Crickit.h" #include "seesaw_servo.
Are your servos not moving a full 180 degrees? Don't fret! This is normal, see below about min/max pulse lengths to 'tune' your servo! More Servos! OK that was fun but you want MORE servos right? You can control up to four! The servos are on the seesaw pins 17 (CIRCKIT_SERVO1), 16 (CIRCKIT_SERVO2), 15 (CIRCKIT_SERVO3), 14 (CIRCKIT_SERVO4) This example is similar to the 1 servo example, but instead of creating one myservo object, we'll make an array called servos that contains 4 servo objects.
#include "Adafruit_Crickit.h" #include "seesaw_servo.h" Adafruit_Crickit crickit; #define NUM_SERVOS 4 //create an array of 4 servos with our crickit object seesaw_Servo servos[] = { seesaw_Servo(&crickit), seesaw_Servo(&crickit), seesaw_Servo(&crickit), seesaw_Servo(&crickit) }; //these are the pins they will be attached to int servoPins[] = { CRICKIT_SERVO1, CRICKIT_SERVO2, CRICKIT_SERVO3, CRICKIT_SERVO4 }; void setup() { Serial.begin(115200); //begin the crickit if(!crickit.begin()){ Serial.
myservo.attach(CRICKIT_SERVO1); to, say, myservo.attach(CRICKIT_SERVO1, 750, 2250); Here we've change the minimum pulse from the default 1000 microseconds to 750, and the default maximum pulse from 2000 microseconds to 2250. Again, each servo differs. Some experimentation may be required! Continuous Rotation Servos If you're using continuous servos, you can use the angle assignments and just remember that 0 is rotating one way, 90 is 'stopped' and 180 and rotating the other way.
Arduino Drives The Drives port provides the ability to drive higher current devices. The functionality is identical on all versions of Crickit shown at left. © Adafruit Industries https://learn.adafruit.
Test Drive Lets start by controlling a drive output. You'll need to plug something into the 5V and DRIVE1 terminal blocks. I'm just using a simple LED with resistor but anything that can be powered by 5V will work. Note that the drive outputs cannot have 5V output so you must connect the positive pin of whatever you're driving to 5V.
#include "Adafruit_Crickit.h" Adafruit_Crickit crickit; void setup() { Serial.begin(115200); Serial.println("1 Drive demo!"); if(!crickit.begin()){ Serial.println("ERROR!"); while(1); } else Serial.println("Crickit started"); //our default frequency is 1khz crickit.setPWMFreq(CRICKIT_DRIVE1, 1000); } void loop() { //turn all the way on crickit.analogWrite(CRICKIT_DRIVE1, CRICKIT_DUTY_CYCLE_OFF); delay(500); //turn all the way off crickit.
#include "Adafruit_Crickit.h" Adafruit_Crickit crickit; #define NUM_DRIVES 4 int drives[] = {CRICKIT_DRIVE1, CRICKIT_DRIVE2, CRICKIT_DRIVE3, CRICKIT_DRIVE4}; void setup() { Serial.begin(115200); Serial.println("4 Drive demo!"); if(!crickit.begin()){ Serial.println("ERROR!"); while(1); } else Serial.println("Crickit started"); //our default frequency is 1khz for(int i=0; i
Arduino DC Motors The hexagonal Crickets at left all have a similar Motor port which can drive two DC motors. © Adafruit Industries https://learn.adafruit.
DC motors are controlled by 4 PWM output pins, the 4 PWM pins let you control speed and direction. And we'll use our seesaw_Motor library to help us manage the throttle (speed) and direction for us, making it very easy to control motors Note that each DC motor is a little different, so just because you have two at the same throttle does not mean they'll rotate at the exact same speed! Some tweaking may be required The two wires of the DC motor can be plugged in either way into each Crickit Motor port.
#include "Adafruit_Crickit.h" #include "seesaw_motor.h" Adafruit_Crickit crickit; seesaw_Motor motor_a(&crickit); seesaw_Motor motor_b(&crickit); void setup() { Serial.begin(115200); Serial.println("Dual motor demo!"); if(!crickit.begin()){ Serial.println("ERROR!"); while(1); } else Serial.println("Crickit started"); //attach motor a motor_a.attach(CRICKIT_MOTOR_A1, CRICKIT_MOTOR_A2); //attach motor b motor_b.attach(CRICKIT_MOTOR_B1, CRICKIT_MOTOR_B2); } void loop() { motor_a.throttle(1); motor_b.
Arduino Signals The 8 GPIO pins on the Crickit are in the Signals block of pins. You have the 8 data pins, each input/output, 3.3v logic, analog or digital. These GPIO are controlled by the Crickit's seesaw chip, not directly by the microcontroller or the Raspberry Pi. Thus programming them takes a bit more work but they provide some great benefits. Signals on the Crickit are available on the following pins: © Adafruit Industries https://learn.adafruit.
Silkscreen Label Arduino Macro Seesaw Pin 1 CRICKIT_SIGNAL1 2 2 CRICKIT_SIGNAL2 3 3 CRICKIT_SIGNAL3 40 4 CRICKIT_SIGNAL4 41 5 CRICKIT_SIGNAL5 11 6 CRICKIT_SIGNAL6 10 7 CRICKIT_SIGNAL7 9 8 CRICKIT_SIGNAL8 8 You can use these as analog or digital I/O pins, setting the mode, value and reading with the seesaw library directly: © Adafruit Industries https://learn.adafruit.
#include "Adafruit_Crickit.h" Adafruit_Crickit crickit; #define #define #define #define BUTTON_1 CRICKIT_SIGNAL1 BUTTON_2 CRICKIT_SIGNAL2 LED_1 CRICKIT_SIGNAL3 LED_2 CRICKIT_SIGNAL4 void setup() { Serial.begin(9600); if(!crickit.begin()){ Serial.println("ERROR!"); while(1); } else Serial.println("Crickit started"); //Two buttons are pullups, connect to ground to activate crickit.pinMode(BUTTON_1, INPUT_PULLUP); crickit.pinMode(BUTTON_2, INPUT_PULLUP); // Two LEDs are outputs, on by default crickit.
Arduino Capacitive Touch Capacitive touch capability is in two places: On the four alligator clip friendly pads on the Capacitive Touch area on Crickit. There are also four additional unlabeled capacitive touch pins, Signal Block pins 1-4 are touch capable. Capacitive touch is very useful for activating things in your projects. The following code demonstrates the features of the Crickit cap touch pads. © Adafruit Industries https://learn.adafruit.
// Adafruit Crickit Capacitive Touch Demo for Arduino // // Displays the value of Adafruit Crickit touchpad values when touched // // Tested with the Crickit + micro:bit, all good #include "Adafruit_Crickit.h" Adafruit_Crickit crickit; #define CRICKIT_NUM_TOUCH 4 #define CAPTOUCH_THRESH 500 void setup() { Serial.begin(9600); // Set up serial monitor - be sure it is set to 9600 Serial.println("Cap Touch Demo"); if(!crickit.begin()) { // Check if Crickit is attached Serial.
Arduino NeoPixels Crickit makes it really easy to add NeoPixels (WS2812/WS2811/SK6812 chipsets) to your project. The Crickit has a 3terminal block connector with Ground, Signal and 5V power. The signal line has a level shifter on it so it will be 5V logic level, for nice clean signals. This output is slightly different depending on what kind of Crickit you have.
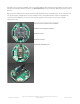
If you have a micro:bit Crickit, NeoPixels are driven by micro:bit Pin P16. Use the Adafruit_NeoPixel library (https://adafru.it/aZU) to control NeoPixels connected to Crickit through micro:bit P16. However, if you want, you can cut the jumper underneath the Crickit and solder closed the ss pad so that the seesaw chip controls the NeoPixels (for advanced hackers only). See below.
Turn the Crickit over and locate the jumper block on the bottom as circled in yellow in the first image. You will need to take a knife and cut the tiny gold trace pointed by the red arrow to sever the current NeoPixel to microcontroller connection. Using a soldering iron, put a mice bright solder connection between the pads as marked by the blue arrow. The Seesaw Pin 20 is now connected to the NeoPixel connections on Crickit. The Adafruit_seesaw library (https://adafru.
// NEO_RGB Pixels are wired for RGB bitstream (v1 FLORA pixels, not v2) // NEO_RGBW Pixels are wired for RGBW bitstream (NeoPixel RGBW products) seesaw_NeoPixel strip = seesaw_NeoPixel(12, PIN, NEO_GRB + NEO_KHZ800); // // // // IMPORTANT: To reduce NeoPixel burnout risk, add 1000 uF capacitor across pixel power leads, add 300 - 500 Ohm resistor on first pixel's data input and minimize distance between Arduino and first pixel. Avoid connecting on a live circuit...if you must, connect GND first.
uint16_t i, j; for(j=0; j<256*5; j++) { // 5 cycles of all colors on wheel for(i=0; i< strip.numPixels(); i++) { strip.setPixelColor(i, Wheel(((i * 256 / strip.numPixels()) + j) & 255)); } strip.show(); delay(wait); } } //Theatre-style crawling lights. void theaterChase(uint32_t c, uint8_t wait) { for (int j=0; j<10; j++) { //do 10 cycles of chasing for (int q=0; q < 3; q++) { for (uint16_t i=0; i < strip.numPixels(); i=i+3) { strip.setPixelColor(i+q, c); //turn every third pixel on } strip.
} © Adafruit Industries https://learn.adafruit.
Hacks & Upgrades Speeding up many requests from Raspberry Pi to CRICKIT If your project is making a large number of requests from your Raspberry Pi to CRICKIT, the speed of the I2C connection between boards may be an issue. Fortunately this can be changed. For the best performance, you'll want to consider tweaking the I2C core to run at 1MHz. By default it may be 100KHz or 400KHz To do this edit the config with sudo nano /boot/config.
4700uF 10v Electrolytic Capacitor $1.95 IN STOCK ADD TO CART Connect the capacitor using the NeoPixel terminal blocks. The 5V and GND lines are shared across the board so even if its a DC motor or servo causing the issues, this will help! It's just the most convenient place to attach a large capacitor because the two terminal blocks are nicely spaced. Connect the capacitor using the NeoPixel terminal blocks.
F.A.Q. Why did you misspell "Cricket"? We wanted a unique name, inspired by the original Cricket robotics platform from MIT (which then became the PicoCricket), but not with the exact same name! © Adafruit Industries https://learn.adafruit.
My code gives the following error in the REPL/Serial window: The code from adafruit_crickit import crickit always throws Traceback (most recent call last): File "code.py", line 1, in File "adafruit_crickit.py", line 66, in MemoryError: memory allocation failed, allocating 152 bytes CircuitPython will pull in libraries from /lib on the device before looking for any "baked in" ("Frozen" libraries) in the main CircuitPython code.
Downloads Files PCB Files on GitHub (https://adafru.it/BEj) Fritzing objects in Adafruit Fritzing Library (https://adafru.it/aP3) Datasheets TPS259573 eFuse power supply protection chip (https://adafru.it/Bfj) DRV8833 DC motor driver chip (https://adafru.it/Bfk) ULN2003A Darlington driver chip (https://adafru.it/Bfl) Circuit Playground Crickit Schematics Click to embiggen © Adafruit Industries https://learn.adafruit.
Crickit HAT Schematics © Adafruit Industries https://learn.adafruit.
© Adafruit Industries https://learn.adafruit.
© Adafruit Industries https://learn.adafruit.
© Adafruit Industries Last Updated: 2019-07-18 04:35:44 AM UTC Page 201 of 201