
Datasheet
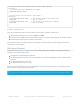
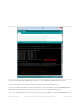


// the setup function runs once when you press reset or power the board
void setup() {
// initialize digital pin LED_BUILTIN as an output.
pinMode(LED_BUILTIN, OUTPUT);
}
// the loop function runs over and over again forever
void loop() {
digitalWrite(LED_BUILTIN, HIGH); // turn the LED on (HIGH is the voltage level)
delay(1000); // wait for a second
digitalWrite(LED_BUILTIN, LOW); // turn the LED off by making the voltage LOW
delay(1000); // wait for a second
}
4. Perform a Factory Reset
Once the core Bluefruit firmware has been updated, the final step is to perform a factory reset.
With the board still powered up, connect the DFU pin to GND
Leave the pin set to GND (or hold the DFU button down) for >5 seconds until the BLUE status LED starts to blink
Remove the DFU jumper cable or release the DFU button
This will cause a factory reset which will wipe all config data, and should restore your board, getting you back to a
normal state in most situations!
Still Having Problems?
Hop on over to our support forums (https://adafru.it/dYq) clearly explaining your problem along with the following
information, and, we'll be happy to help:
You product name and ideally the product ID
The Bluefruit firmware version you are using (available at the top of the Serial Monitor output on most example
sketches)
The Operating System your are using
The Arduino IDE version you are using
Providing the above information in your first post will skip a round of two of back and forth and you'll get an answer
from us quicker, saving everyone time and effort!
Be sure to see the FAQ section of this learning guide as well, which has answer to many common problems!
© Adafruit Industries https://learn.adafruit.com/adafruit-feather-32u4-bluefruit-le Page 197 of 211