
User Manual
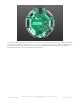
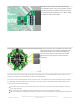

The Crickit gives you 4 slots for 4 independent servos.
You can use micro, mini, standard, large size servos.
Analog and digital work great. Continuous or 180-degree
are OK. As long as you've got a servo with a 3-pin
connector, you're golden.
Servo notes:
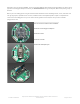
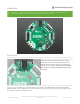
The white/yellow 'signal' wire goes next to the # marking on each port.
Each servo is controlled by a 16-bit hardware timer at 50 Hz so you will not see any jitter. The signal line is 3.3V
logic
The power to each servo comes from the DC power supply, 5VDC nominal.
The Crickit can set the pulse width to any value, but in general you'll want to stick to 500ms to 2500ms wide
pulses. This is customized in the Arduino, CircuitPython or MakeCode software.
There is variation from servo to servo, so getting the exact same speed or angle may require some calibration
and tweaking. Again, this can be customized in the driver code, the Crickit just generates whatever pulses you
like!
The seesaw chip on the Crickit does all the management of these pins so your Feather or CPX does not directly
control them, it must send a message to Crickit. They are on seesaw pins 17, 16, 15, 14 in that order.
Typical Adafruit Hobby Servos to consider:
Sub-micro Servo (https://adafru.it/Bzy)
Micro Servo (https://adafru.it/f1g)
Micro Servo - High Powered, High Torque Metal Gear (https://adafru.it/Bzz)
Standard Servo - TowerPro SG-5010 (https://adafru.it/BzA)
Standard Servo - High Torque Metal Gears (https://adafru.it/BzB)
And more in the Adafruit Shop (https://adafru.it/BzC) including Servo Accessories
2 x DC Motors
© Adafruit Industries
https://learn.adafruit.com/adafruit-crickit-creative-robotic-interactive-
construction-kit
Page 14 of 201