
User Manual


https://adafru.it/CyF
https://adafru.it/CyF
https://adafru.it/CyG
https://adafru.it/CyG
Analog Reads
You can also read analog values like from a
potentiometer or sensor.
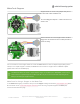
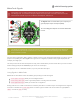
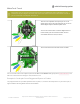
Lets do a demonstration where the center tap of a
potentiometer is hooked up to Signal #3 - don't forget to
also connect one side of the potentiometer to 3.3V and
the other side to ground.
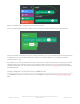
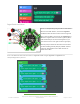
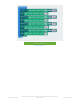
And here is the example code. You can see we read the signal with crickit analog read signal which returns a value
from 0 to 1023.
For Crickit and Circuit Playground Express
The map MATH function changes 0 to 1023 to 0 to 9. The graph NEOPIXEL block will light the number of NeoPixels
map returns in rainbow colors.
Be sure the potentiometer is connected to Crickit Signal 3 and not one of the other Signal terminals.
https://adafru.it/C35
https://adafru.it/C35
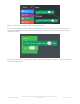
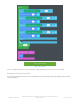
For Crickit and micro:bit
The code displays a heart icon on the micro:bit display. The brightness is changed by taking the reading from the
potentiometer connected to Crickit Signal 3 (0 to 1023) and dividing by 4 to get a brightness from 0 to 255. So the
potentiometer is essentially a manual brightness control for the micro:bit LED array.
© Adafruit Industries
https://learn.adafruit.com/adafruit-crickit-creative-robotic-interactive-
construction-kit
Page 72 of 201