
User Manual

Digital Reads and Writes
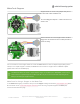
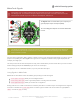
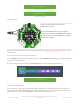
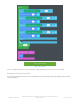
Here's an example wiring that goes with the code below.
We have two switch buttons, connected to signals #1
and #2, the other side of the buttons connect to ground
There's also two LEDs, connected to the signals #3 and
#4 and the negative wires connected to ground. (All the
3.3V and Ground pins are connected together so you
don't
have
to use the ones right next to the signal pin!)
Note the pull up resistors for the buttons. Seesaw does
not allow enabling internal pullup or pulldown resistors
at present. Also 330 ohm current limit resistors are
shown for the LEDs.
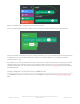
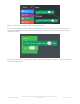
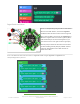
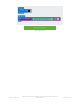
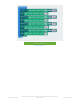
Here is the MakeCode that reads the buttons on signal #1 and #2 and lights signal #3 and signal #4 if the
corresponding button is pressed:
© Adafruit Industries
https://learn.adafruit.com/adafruit-crickit-creative-robotic-interactive-
construction-kit
Page 71 of 201