
User Manual


Test Servos
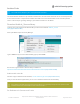
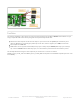
Lets start by controlling some servos. You'll want at least one servo to plug in and test out the servo code. Visit our
recommended servo page to check that you have a servo that works (https://adafru.it/Bfo). Once you do, plug in a
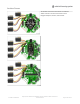
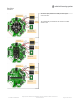
servo into SERVO #1 spot, making sure the yellow or white wire is next to the 1 text label.
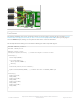
This example will show rotating one servo from 0 to 180 degrees with a stop at 90 degrees.
#include "Adafruit_Crickit.h"
#include "seesaw_servo.h"
Adafruit_Crickit crickit;
seesaw_Servo myservo(&crickit); // create servo object to control a servo
void setup() {
Serial.begin(115200);
if(!crickit.begin()){
Serial.println("ERROR!");
while(1);
}
else Serial.println("Crickit started");
myservo.attach(CRICKIT_SERVO1); // attaches the servo to CRICKIT_SERVO1 pin
}
void loop() {
myservo.write(0);
delay(1000);
myservo.write(90);
delay(1000);
myservo.write(180);
delay(1000);
myservo.write(90);
delay(1000);
}
© Adafruit Industries
https://learn.adafruit.com/adafruit-crickit-creative-robotic-interactive-
construction-kit
Page 171 of 201