
User Manual
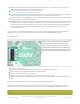
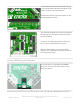
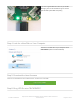

The micro:bit Crickit is the easiest of them all! Just plug
in your micro:bit with the LED grid facing towards the pin
numbers as shown on the Crickit silkscreen.
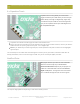
You'll also see that Pin 0 is marked for speaker use and
Pin 16 for NeoPixels (sun icon).
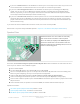
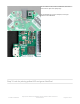
The Crickit HAT for Raspberry Pi uses the standard Pi 40
pin header (at top in the picture at left) to plug onto the
Pi expansion header.
The holes in the Crickit HAT align with the holes in the
Pi so you can use standoff posts for a secure fit.
All of the functional blocks on the octagonal Crickit
boards are on the Crickit HAT, they are just moved to fit
the rectangular HAT shape.
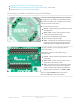
seesaw USB Debug and Indicators
The seesaw chipset is the programmed ATSAMD21
processor in the south section of the board. It comes
with its own parts too
Across from the power input is the seesaw debug USB connection. This USB power cannot power the Crickit and it
© Adafruit Industries
https://learn.adafruit.com/adafruit-crickit-creative-robotic-interactive-
construction-kit
Page 21 of 201