
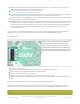
User Manual


500mA current limit per output, you can double/triple/quadruple pins up to get more current, if you like. Just
make sure to tell the Crickit to turn on/off all four pins in a row.
Kick-back protection diodes for each output to 5V power.
Uses a ULN2003 Darlington driver (https://adafru.it/Bfl)
Instead of 4 solenoids/relays you can connect & control a single uni-polar stepper motor, connect the 5th (and
6th if it exists) wire to 5V. Won't work with bi-polar steppers, use the DC motor ports for that.
The drive outputs are also PWM-able, so you can control LED brightness or motor power. If using with solenoids
or relays, set the duty cycle to 0% or 100% only.
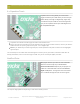
Advanced usage: If you want to drive higher-voltage
non-inductive/motor
devices, like 12V LEDs, you can power
the positive line of the LEDs from 12V, then connect the negative line of the LEDs to drive pins. Make sure your
12V power supply ground is connected to the Crickit ground. Not recommended unless you feel confident you
won't accidentally put 12VDC into the Crickit! Kick-back diode wont work in this case so not for use with
motors/coils/solenoids...
The seesaw chip on the Crickit does all the management of these pins so your Feather or CPX does not directly
control them, it must send a message to Crickit. They are on seesaw pins 13, 12, 43, 42 in that order.
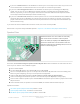
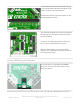
8 x Signal I/O
Sure you can drive servos and motors but sometimes
you just want to blink an LED or read a button. The
Crickit has an eight-signal port. You can use these as
"general purpose" input/output pins. We solder a 3x8
female socket header in so you can plug wires in very
easily. Each signal has matching 3V and Ground power
pins.
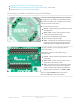
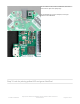
All pins are 3.3V logic level
All pins can read analog inputs (potentiometers, bend sensors, etc) at 12-bit resolution
All pins can be set to outputs with high (3.3V) or low (0V) voltage
All pins can drive about 7mA when set to outputs
All pins can have an internal ~50Kohm pull-up resistor set when used as an input
Bonus: If you absolutely need more
capacitive touch
pins, Signal #1, #2, #3, #4 are four more capacitive touch
inputs.
Signal pin #1 is special and can be set to be a true analog 'output' with 10-bit precision.
The seesaw chip on the Crickit does all the management of these pins so your Feather or CPX does not directly
control them, it must send a message to Crickit. They are on seesaw pins 2, 3, 40, 41, 11, 10, 9, 8 in that order
The Signal pins do not have configurable pull up or pull down resistors like on many microcontrollers. Please
© Adafruit Industries
https://learn.adafruit.com/adafruit-crickit-creative-robotic-interactive-
construction-kit
Page 17 of 201