
User Manual


Each of the 8 signal pin numbers is available under the crickit object as SIGNAL1 through SIGNAL8 . Note these are
not DigitalInOut or Pin objects! We need to use the crickit.seesaw object to set the mode, direction, and readings
To simplify our code we shorted the crickit.seesaw object to just ss
Digital Pin Modes
You can set the mode of each signal pin with ss.pin_mode(
signal
,
mode
) where
signal
is the crickit.SIGNAL# from
above and
mode
can be ss.OUTPUT , ss.INPUT or ss.INPUT_PULLUP .
import time
from adafruit_crickit import crickit
# For signal control, we'll chat directly with seesaw, use 'ss' to shorted typing!
ss = crickit.seesaw
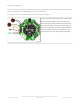
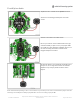
# Two buttons are pullups, connect to ground to activate
BUTTON_1 = crickit.SIGNAL1 # button #1 connected to signal port 1 & ground
BUTTON_2 = crickit.SIGNAL2 # button #2 connected to signal port 2 & ground
# Two LEDs are outputs, on by default
LED_1 = crickit.SIGNAL3 # LED #1 connected to signal port 3 & ground
LED_2 = crickit.SIGNAL4 # LED #2 connected to signal port 4 & ground
ss.pin_mode(LED_1, ss.OUTPUT)
ss.pin_mode(LED_2, ss.OUTPUT)
ss.pin_mode(BUTTON_1, ss.INPUT_PULLUP)
ss.pin_mode(BUTTON_2, ss.INPUT_PULLUP)
ss.digital_write(LED_1, True)
ss.digital_write(LED_2, True)
while True:
if not ss.digital_read(BUTTON_1):
print("Button 1 pressed")
ss.digital_write(LED_1, True)
else:
ss.digital_write(LED_1, False)
if not ss.digital_read(BUTTON_2):
print("Button 2 pressed")
ss.digital_write(LED_2, True)
else:
ss.digital_write(LED_2, False)
# For signal control, we'll chat directly with seesaw, use 'ss' to shorted typing!
ss = crickit.seesaw
ss.pin_mode(BUTTON_1, ss.INPUT_PULLUP)
ss.pin_mode(BUTTON_2, ss.INPUT_PullUP)
...
ss.pin_mode(LED_1, ss.OUTPUT)
ss.pin_mode(LED_2, ss.OUTPUT)
© Adafruit Industries
https://learn.adafruit.com/adafruit-crickit-creative-robotic-interactive-
construction-kit
Page 108 of 201