
User Manual


Arduino IDE Setup
Once you have the WICED Feather board support package set up -- as described in Get the WICED
BSP (https://adafru.it/rod) earlier in this guide -- you can start compiling code against FeatherLib or update the firmware
on your device directly from the Arduino IDE.
To make sure that the Arduino IDE has access to all of the tools, libraries and config data it needs, however, you will
first need to make some adjustments in the IDE:
Board Selection
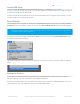
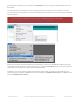
The first thing to do (assuming that you already have the WICED BSP installed on your system, as describe in Get the
WICED BSP earlier in this guide!) is to make sure that you have Adafruit WICED Feather selected as the Board target.
To change the board target, simply click the Tools > Board menu item and then select Adafruit WICED Feather under
the 'Adafruit Feather Boards' heading:
The actual position of the board in your menu will depend on your system setup, but it should resemble the following
image:
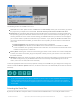
Setting the 'Section'
As described in the System Architecture page in this guide, the WICED Feather is broken up into three separate
firmware images: the user code, FeatherLib, and the USB DFU bootloader.
Each of these firmware images exists in a specific section of the flash memory on the STM32F205 MCU, and you can
switch between the two user-modifiable sections via the Tools > Section menu:
Selecting the right board target is critical since the board target is what causes the FeatherLib support files to
be included as part of the build process!
© Adafruit Industries https://learn.adafruit.com/introducing-the-adafruit-wiced-feather-wifi Page 46 of 202