
User Manual

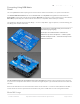
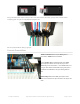


So! From the prior page, refer to the socket that’s
correct for your matrix type. The labels may be a little
different (or none at all), but most are pretty close to
what’s shown here.
Then
swap the columns
to find the correct position for a
given signal.
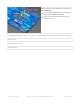
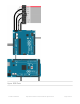
Either end of the ribbon cable can be plugged into the matrix INPUT socket. Notice below, the “key” faces the same
way regardless.
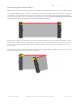
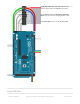
With the free end of the ribbon toward the center of the matrix, the Arduino can be hidden behind it.
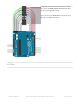
With the free end of the ribbon off the side, it’s easier to see both the front of the matrix and the Arduino
simultaneously, for making additional connections or for troubleshooting.
© Adafruit Industries https://learn.adafruit.com/32x16-32x32-rgb-led-matrix Page 16 of 44