
User Manual


Connecting Using RGB Matrix
Shield
This is the preferred method for pairing these matrices with an Arduino-sized board, as it’s quick and trouble-free.
The Adafruit RGB Matrix Shield works with the Arduino Uno and compatible ATmega328-based boards like the
Adafruit Metro. It also works directly with the Adafruit Metro M0…and with one or more jumper wires can work with the
Metro M4 (and potentially other boards with this form factor, if a compatible Arduino library is available).
The shield does
not
work with the Arduino Mega — see the “Jumper Wires” page for pinouts, or consider making your
own Mega proto shield for that board.
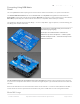
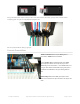
The shield arrives unpopulated and you’ll need to do a
little soldering to get it going.
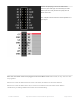
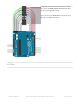
Header pins are installed from the underside and
soldered on top. Three components — a button, power
terminal and 16-pin header — insert from the top and are
soldered underneath.
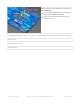
The 16-pin (8x2) header must be installed in the correct orientation! The polarity notch is indicated on the silkscreen,
or you can see in the photos above that the notch faces the digital I/O pins. If you install this backwards the matrix will
not work!
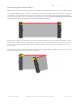
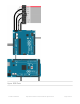
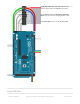
Power to the LED matrix can be connected to the shield’s screw terminals — red wire to +5Vout, black wire to GND —
and the whole circuit is then powered from the Arduino’s DC jack or a USB cable at a safe and regulated 5 Volts.
Metro M4 Usage
© Adafruit Industries https://learn.adafruit.com/32x16-32x32-rgb-led-matrix Page 13 of 44