
Datasheet


The screen looks best if the HDMI resolution exactly matches the PiTFT resolution, so the final step is to configure the
system for 320x240 video:
Append the following lines to the bottom of the file:
OPTIONAL: you can also use “640 480” in place of “320 240” above. This is exactly twice the PiTFT native resolution,
and the tftcp utility will perform a smooth 2:1 filtering of the image. Any larger though and the image isn’t as sharp (and
text becomes tiny, like when we first tested it).
Now reboot and the PiTFT should activate toward the end of the boot process.
Resistive Touchscreen Support
This is even more experimental than the tftcp utility…it only works with the resistive screen, and there’s no calibration
support yet, but if you’d like to try it out…
First there’s some prerequisite software to install:
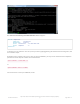
“cd” to the same directory where the software was downloaded earlier, and try it out…
Whether you’re in X11 or in text console mode (e.g. Raspbian Lite), the cursor should move in response to touch, which
is emulating a mouse.
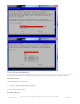
If that seems OK, press control+c to stop it and we’ll use the same steps to make it auto-run on boot:
Insert this line just above the “exit 0” at the end of the file:
/usr/local/bin/tftcp &
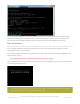
sudo nano /boot/config.txt
disable_overscan=1
hdmi_force_hotplug=1
hdmi_group=2
hdmi_mode=87
hdmi_cvt=320 240 60 1 0 0 0
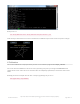
sudo apt-get update
sudo apt-get install python-pip python-smbus python-dev
sudo pip install evdev
cd Adafruit_Userspace_PiTFT-master
sudo python touchmouse.py
sudo cp touchmouse.py /usr/local/bin
sudo nano /etc/rc.local
/usr/bin/python /usr/local/bin/touchmouse.py &
© Adafruit Industries
https://learn.adafruit.com/adafruit-pitft-28-inch-resistive-touchscreen-display-raspberry-
pi
Page 40 of 70