
Datasheet


Easy Install
The PiTFT requires kernel support and a couple other things to make it a nice stand-alone display. We have a detailed
step-by-step setup for hackers who want to tweak, customize or understand the PiTFT setup. If you just want to get
going, check out the following for easy-install instructions!
Ready to go image
If you want to start with a fresh image, we have two for Raspbian. There's the larger 'classic Jessie' image that will
boot into X by default, and requires a 8G image, it has a lot more software installed. There's also the smaller 'Jessie
Lite' that will boot into the command line, and can be burned onto a 2G card! Click below to download and install into a
new SD card. Unzip and follow the classic SD card burning tutorials
Download Jessie-based PiTFT 2.4", 2.8" and
3.2" Resistive Image for Pi 1, 2, 3, Zero (Sept 23,
2016)
https://adafru.it/s7f
Download Jessie Lite-based PiTFT 2.4", 2.8" and
3.2" Resistive Image for Pi 1, 2, 3, Zero (Sept 23,
2016)
https://adafru.it/s7A
Previous images:
Raspbian Jessie 2016/03/25-based image
Raspbian Jessie Lite 2016/03/25-based image
Raspbian Jessie 2015/09/24-based image
Raspbian Wheezy 2015/09/09-based image
Raspbian 2014/06/20-based image
Raspbian 2014/09/09-based image
DIY Installer script
If you don't want to download an image, you can run our installation package helper from inside your existing Raspbian
install. It will download the kernel add-ons, and configure your Pi for PiTFT joy
The helper is available for perusal here if you are interested in how it works
Step 1. Expand Filesystem
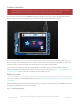
Start by expanding the filesystem This is required!!!
These images are customized for the RESISTIVE touch 2.8" PiTFT, also known as PID #1601 and #2298 or
the Resistive 2.4" HAT, a.k.a PID #2455 - These are not for use with 3.5" PiTFT or Capacitive Touch PiTFT
© Adafruit Industries
https://learn.adafruit.com/adafruit-pitft-28-inch-resistive-touchscreen-display-raspberry-
pi
Page 15 of 70