
Troubleshooting guide


DEMONSTRATION
MILLPWR
®
Operation Manual
4-1
Demonstration Program
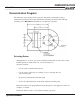
The following steps and key stroke sequences will guide you through creating a
demonstration program based upon information from the print below. This will help
introduce you to
MILLPWR and familiarize you with how it operates.
Selecting Datum
Although there is no clear "zero point" identified on this print, use the center of the
bolthole pattern as datum. There are several advantages to
using this location:
• it is the center of the bolt hole pattern
• it is the center of the large arc, making it easy to calculate the arc's
start and end points
• the pocket is dimensioned from this point
• nearly all of the dimensions on the print originate from this point
This print could also be programmed using another point—the upper left corner, for
example—as datum.
The datum will be ready to set just before running a program.