
Troubleshooting guide


SETUP
MILLPWR
®
Operation Manual
7-14
Electronic Edge Finder
An electronic edge finder enables you to “teach” positions, find the
center point of a circle, skew a part or locate datum (also known as
workpiece zero) by simply “touching off” on the part. The greatest
advantage of an electronic edge finder is that it instantly senses when
you’ve made contact —even if you’ve over-traveled.
MILLPWR lets you define the “Diameter” and “Unit” of measure
(either inches or millimeters) for an electronic edge finder. Once this
information has been entered into
MILLPWR, MILLPWR will automatically compensate for the
radius of the tip of the electronic edge finder when performing any of the operations mentioned
above.
T
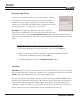
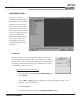
o define the diameter and unit of measure for an electronic edge finder:
• From Setup, highlight “Electronic Edge Finder” then press the ENTER key.
• Enter a value for the electronic edge finder’s tip diameter and unit of measure
(either inches or millimeters) then press the
USE key.
• Continue with Setup or press the
USE NEW SETTINGS softkey.
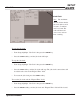
Job Clock
MILLPWR includes a job clock that can be used to keep track of the time you spend on each job.
The job clock works like a stopwatch, counting in one second intervals after you’ve pressed the
START softkey and stopping after you’ve pressed the STOP softkey.
The job clock appears in the “Status” bar and is visible from both the PGM and DRO screens.
It reflects how much time has elapsed since the clock was started. Every time you stop the job
clock, the time will be added to the “Elapsed Time” field on the “Job Clock” menu and the
value in the “Status” bar will be reset to zero. You can use the job clock to time each step of a
project and then refer to the “Elapsed Time” for the total time spent on the job.