
Specifications


Southwestern Industries, Inc.
ProtoTRAK SMX K2, K3, K4 & Retrofit Safety, Installation, Maintenance, Service & Parts List Manual
60
The following steps take you in logical sequence through the assemblies for the knee
mills. For drawings of these assemblies see Figures 31 and 32 in Section 5. These
instructions break the machine down from fully assembled and point out the areas to look
at specifically.
3. Check that the belt is properly tightened. A loose belt can lead to excessive backlash
compensation values on motor encoder only machines.
4. Check that the nut that tightens up against the ball screw pulley is tight. If this is
loose the pulley may not run true on the ball screw.
5. Check that the tapered sleeve that seats the pulley has not clamped to the ball screw
prematurely. It should be seated firmly against the pulley. Tightening the nut may
not have ensured this. Also make sure the pulley is keyed to the ball screw.
6. Ensure that the screws that hold the bearing housing in place to the bracket are not
loose.
7. Ensure that the Clamp Nut is secured. The following applies to the clamp nut:
• When loosening, make sure to back out the 10-32 screw from the clamp nut.
• When tightening, snug the 10-32 screw so the clamp goes onto the ball screw
thread with some drag. Thread it onto the ball screw and torque the clamp nut
to 50 ft/lbs and then tighten the screw down.
8. Take out the angular contact bearings and inspect them. They should roll smoothly
and be lightly greased. If not, replace them. When putting the bearings back into
the housing make sure to put them in correctly. Failure to do this will cause
problems. The thin race of each bearing should be facing inward toward the spacer
ring.
Note: the bearing housing and spacer ring are matched sets - keep them together.
9. Check the ball screw mounting to the yoke. Make sure the SHCS are tight.
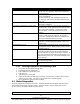
10. Inspect the ball screw, ball nut and yoke for the potential problems shown in the
chart on the next page.
CAUTION!
Unlike a lead screw, do not unscrew the ball screw from its nut. This will destroy the ball screw!
Potential Problem: Check By:
Bad ball screw • Visually inspecting the ball nut - if the nylon seal is broken or deformed,
if contamination has visibly entered the ball nut or if balls are out of the
ball nut, replace the ball screw.
• Cranking the ball screw through a significant part of its travel. If it
jams, feels loose or has rough spots, replace the ball screw.
• Using the dial indicator on a vertical flat of the ball screw to check for
backlash between the ball screw and ball nut.