
User`s manual

PowerBrick™ -CV 4.0 Quick Reference Manual
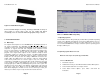
Figure 2.2: Front side of PowerBrick -CV 4.0
Connect all applicable cables such as:
Keyboard (USB)
Mouse
Monitor
Power supply cable
DVR cable
Optional device cables or units that you provide yourself could include
the following:
USB cable
Speaker and microphone cables
RJ45 Ethernet TP cable
RS232 Serial port cable
Camera
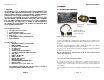
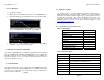
Figure 2.3: Changeable Hard Disk of PowerBrick -CV 4.0
Remove six screws (Four black color, two metal color) and open Hard Disk
cover in the front side plate. Then pull out hard disk to change.
Page 3
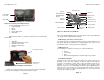
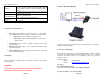
Figure 2.4 : Back side of PowerBrick -CV 4.0
After connecting all applicable cables it is safe to power-on the system. (Warning:
use only DC from the dedicated power supply)
2.3 Mounting in your vehicle or final location
T
his chapter provides you with the information of fixed system mounting. Prior to
that, please prepare the installation tools and appropriate items. If you are not
clear about the items, contact your dealer for information.
2.4 Mounting tools
F
or mounting your computer in a vehicle you need the following tools:
Ranch
Screw driver
Drill
Bolts and nuts appropriate to mount the plate in your vehicle
2.5 Computer installation
Mounting screws or bolts and nuts for mounting to your specific vehicle are not
provided, as there are many variations of thickness that the unit might be
mounted to. If mounting in a vehicle that is subject to vibration and shock, It Is
important to use the mounting plate with attached shock absorbers where
vibration could occur. The mounting plate should be fastened tightly with bolts
and nuts. Please ensure that if you mount any bolts/nuts under the computer,
that they do not touch the computer itself. Otherwise, the shock absorbers will
not protect the computer properly.
Page 4
Status LED
Power Button
Power LED
Removable hard disk
Hard disk cover
and screws
HD LED
RS232 COM Port3
GPS/WiFi/CDMA
Antenna
VGA Port
HDMI Port
MIC Jacks
Speaker Jacks
DVR P
o
rt
3x USB 2.0 Port
Fuse Protect 10A
Ethernet Port2
RS232 COM Port2
RS232 COM Port1
Ethernet Port1
Main Power
Switch
L-IN Audio Jacks
DC (12v) Input