
User manual


AcuBrite 15-Nav Manual
Prepari ng the installation site
1. Select an installation site that has sufficient space behind for cable connections and ventilation.
2. Tape the supplied flush mount template in the required position.
3. Using a jigsaw, carefully remove the shaded portion of the template.
4. Using a suitable file, smooth the edges of the aperture.
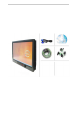
Installing the display
1. Carefu lly insert the monitor into the aperture, ensuring that the gasket on the rear of the fascia lays f lat
against the aperture edge.
IMPORTANT:
The gasket must lay flat against the aperture edge to ensure watertight integrity.
2. Place the mounting bracket lugs into the keyways and move them to the rear, securing the bracke t to the
monitor.
Note: The mounting brackets can be used in either the horizontal or vertical keyways as required.
3. Using a suitable screwdriver, tighten the mounting bracket screws to secure the monitor in position.
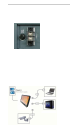
4. Connect all cables as required - see “Re ar co nn ect i ons” bel ow.
Page 6