active forever.
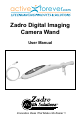
Read these instructions before use. Model No.: DICW01 Congratulations on purchasing the Zadro Digital Imaging Camera Wand which can be used to capture photos or video to easily examine your skin and body in hard or impossible to see places. View and document your health concerns. Save those images on your computer for future comparison of shape, size and color. Use Zadro Digital Imaging Camera Wand to magnify small objects or text and see them on the computer screen allowing for easier reading or viewing.
- Intra-oral, gums, throat or teeth - Bottom of feet for easier viewing • Any healthcare concerns can be captured in a photo and saved on your computer. The grid scale in the camera wand can be used when picture is taken to help estimate size. Pictures can either be emailed to your physician or saved for comparison over time for any changes in shape, size or color. • Magnifying feature in camera allows you to better view and manipulate difficult to see objects, such as a sliver embedded under skin.
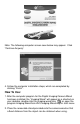
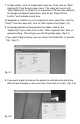
Note: The following computer screen seen below may appear. Click “Continue Anyway”. 4. Follow the computer installation steps, which are completed by clicking “Finish”. How To Use: 1. After the computer program for the Digital Imaging Camera Wand has been installed, the “Imaging Wand” will appear as a shortcut on your desktop, double click the imaging wand icon or open the program Imaging Wand from ZHS Imaging Wand in your start menu. 2.
Capture Button Removable Stand Camera LED Lights Light Adjustment Wheel fig. 1-1 3. Turn light adjustment wheel on cable until light quality is optimal for viewing. 4. To take a picture with the Digital Imaging Camera Wand, obtain the desired image on your computer screen, then either click the capture button on the camera wand (fig. 1.1) or from the “Capture(R)” drop down menu, click “Still Image Capture” (fig.1-2). fig. 1-2 5.
7. To take videos, click on Capture(R) menu bar. Then click on “Start Capture(S)” from the pull down menu. The video will record until “Stop Capture(S)” is clicked or for maximum of 30 seconds (default). To change the default record time, click on the “Record Time Limit(L)” and indicate record time. To designate a location on your computer to store video files, click the “File(F)” from the menu bar, click on “Set Capture File Folder...(S)”. 8.
Troubleshooting: • If you see the webcam view on the computer, then you may need to temporarily disable your webcam or video camera in order for the Digital Imaging Camera Wand to take priority. • If your computer screen is black and you don’t see any images, you will need to do the following: - On the menu bar, go to “Options(O)”, and make sure “Preview(P)” is checked. Note – If you don’t have preview checked, you will not see an image on the screen.
Cleaning and Maintenance: • Keep the Digital Imaging Camera Wand clean and dry after use. • If necessary, clean the wand before and after use. The wand is water resistant but it should not be soaked in water. It should be cleaned with a damp cotton cloth or with cotton swabs. Under no circumstances should abrasive cleaning products be used. • The lens is made of high transmission glass coating. Please use professional lens cleaning paper or soft cloth to avoid lens surface scratching.