Enhanced Visibility Internet Keyboard Model : 110-EVIK Rev.
VisiKey® Wired Keyboard Manual Thank you for purchasing the VisiKey® Enhanced Visibility Internet Keyboard. System Requirements IBM PC or MAC compatible USB or PS/2 port for keyboard Microsoft Windows™ 2000, XP or higher* & MAC OS X *Our keyboards are compatible with many other versions of Microsoft Windows™; however we are sorry, we can not provide technical support or assistance with any of these older versions.
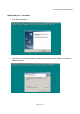
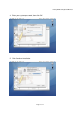
VisiKey® Wired Keyboard Manual HotKey Manager™ Installation 1. Click Next to continue. 2. Click “Next” to accept the default installation destination or click “Browse” to choose a different location.
VisiKey® Wired Keyboard Manual 3. Once the installation is complete you will be prompted to restart your computer. Click “Finish” How to access the VisiKey® Hotkey Manager™. Once installed a “V” icon will appear on your task bar near the time. To open the VisiKey® Hotkey Manager™, simply double click the “V” icon. Software Installation (MAC OS X™) If you installed any software for your previous keyboard or mouse, please remove that software/driver before you install the VisiKey® software.
VisiKey® Wired Keyboard Manual 1. Place the VisiKey® Driver CD into your CD/DVD drive. 2. The CD-Rom should auto-run opening a window that has several driver icons for you to choose from. If this does not happen, please follow the step below: a. Double click the CD image (located on your desktop), to open a window showing the files on the CD. 3. Choose the Driver labeled “VK MAC Manager 1.0.dmg” and double click to mount the disk image. 4. Choose the file named “VK MAC Manager 1.0.
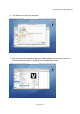
VisiKey® Wired Keyboard Manual 2. Click on the picture of the hard drive, then click Continue. 3. Click Upgrade.
VisiKey® Wired Keyboard Manual 4. Enter your system password, then click OK. 5. Click Continue Installation.
VisiKey® Wired Keyboard Manual 6. Click Restart to restart your computer. 7. After the restart has completed, open your Finder window, you can then launch the VisiKey® Hotkey Manager™ by finding it in the Applications folder.
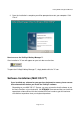
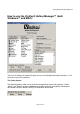
VisiKey® Wired Keyboard Manual How to use the VisiKey® Hotkey Manager™ (both Windows™ and MAC). There are 15 hotkeys to enable one touch access to multimedia and internet functions. 12 of these keys can be user defined. The Power Center: The following hotkeys allow a user to control the operating state of the computer. “Sleep”, “Wake”, and “Power” functions cannot be changed but may be activated by checking the desired box. Note the default setting is unchecked or deactivated.
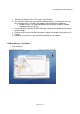
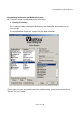
VisiKey® Wired Keyboard Manual Customizing the Internet and Multimedia Center: All 12 buttons can be customized by one of three ways. 1. Turning off a hotkey. This is done by simply selecting the desired key and clicking the white button next to “Turn key off”. The example below shows the “Internet” key has been turned off. Please note to restore any hotkey back to the original setting, select the key and click the “Default This Key” button.
VisiKey® Wired Keyboard Manual 2. One touch URL or Program. The hotkeys can be set to open a web page or start a program. Select the hotkey, click the “URL or Program:” then type in the complete URL and click “Apply”. Click “Exit” to close. The following example shows the “Search” hotkey has been customized to open the Google™ web page.
VisiKey® Wired Keyboard Manual To start a program with a hotkey, click to select the key. Next click the “URL or Program:” and either type the path to the .exe file or use the “…” button to browse to the file. The “Email” key has been set to open Microsoft Outlook™, see below.
VisiKey® Wired Keyboard Manual 3. Setting Keystroke commands. The hotkeys can be configured to replay a series of keystrokes with a single touch. Bring up the VisiKey® HotKey Manager™, select the hotkey to customize and click on the “Keystroke” to allow combination of keystrokes to be entered in the field below. When finished click “Apply” then “Exit” to close the HotKey Manager™. The example below shows a “Stop” hotkey set to save documents with the Ctrl+S keystroke command.
VisiKey® Wired Keyboard Manual Resetting the Hotkeys. Hotkeys can be reset individually or all at once. To restore the default setting on a single hotkey select it and click “Default This Key” button. By clicking the “Default All Keys” button, all hotkeys will be restored to their predefined commands. Hardware Installation Connect Your Keyboard PS/2 Connection 1. Shut down and turn off your computer.
VisiKey® Wired Keyboard Manual The keyboard is a 104-key model; it comes with 12 hot keys that enable one touch access to multimedia / internet functions. The following are the default settings: 1. Play/Pause: Play or pause audio or video CD 2. Volume Down: Decrease the volume 3. Volume Up: Increase the volume 4. Mute: No sound 5. Prev: Go to the previous media track 6. Next: Go to the next media track 7. Stop: Stop downloading the content of the web page 8.
VisiKey® Wired Keyboard Manual Trouble Shooting: 1. If your keyboard is not responding, be sure to check if the connector is correctly installed into your computer and securely connected to the correct port. Check to see if there are any breaks or sharp twists in the cable. 2. If your USB keyboard does not respond make sure your computer is turned on. If you connected your mouse while your computer was shut down, try disconnecting and re-connecting the mouse while the computer is turned on. 3.
VisiKey® Wired Keyboard Manual Health Warning Use of a keyboard or pointing device may be linked to serious injuries or disorders. When using a computer, as with many activities, you may experience occasional discomfort in your hands, arms, shoulders, neck or other parts of your body. However, if you experience symptoms such as persistent or recurring discomfort, pain, throbbing, aching, tingling, numbness, burning sensation or stiffness, DO NOT IGNORE THESE WARNING SIGNS.
VisiKey® Wired Keyboard Manual 1-Year Limited Warranty VISIKEY, LLC (VISIKEY) warrants this PRODUCT against defects in material and workmanship under normal use and service for one year from the original date of purchase. VISIKEY, at its option, shall repair or replace the defective unit covered by this warranty. Please retain the dated sales receipt as evidence of the date of purchase. You will need it for any warranty service. Without the original sales receipt, the warranty is void.