
Instruction Manual


Table Of Contents
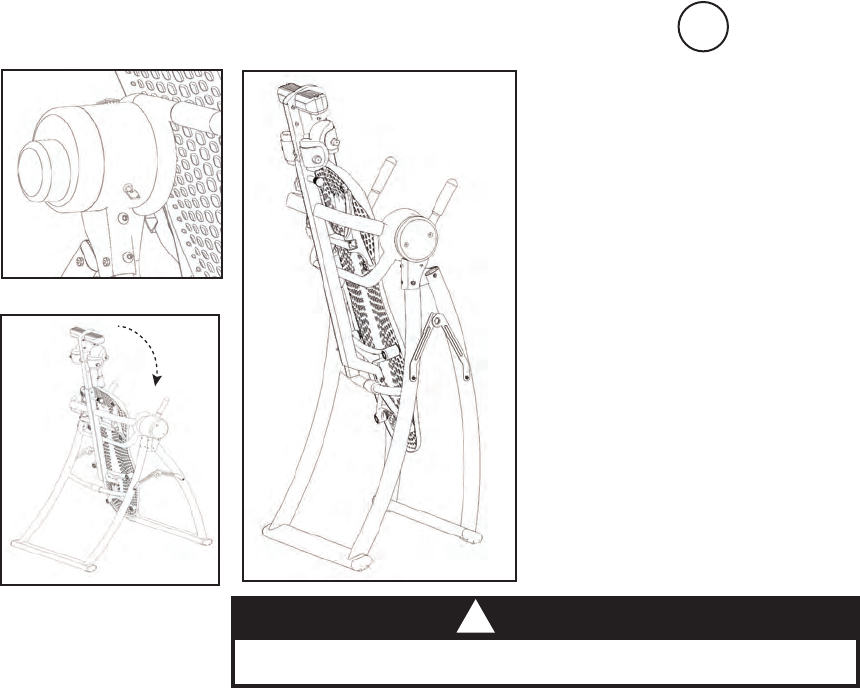
Figure 1/ Figura 1
Figure 2/ Figura 2
GROUNDING INSTRUCTIONS / INSTRUCTIONS DE MISE À LA TERRE / INSTRUCCIONES PARA LA CONEXIÓN A TIERRA
• This product must be grounded. If it should malfunction or break down, grounding provides a path of least resistance for electric
current to reduce the risk of electric shock. This product is equipped with a cord having an equipment-grounding conductor and a
grounding plug. The plug must be plugged into an appropriate outlet that is properly installed and grounded in accordance with all
local codes and ordinances.
DANGER
- Improper connection of the equipment-grounding conductor can result in a risk of electric shock. Check with a qualied
electrician or serviceman if you are in doubt as to whether the product is properly grounded. Do not modify the plug provided with
the product - if it will not t the outlet, have a proper outlet installed by a qualied electrician.
• This product is for use on a nominal 120-V circuit, and has a grounding plug that looks like the plug illustrated in sketch A in Figure
1. A temporary adapter that looks like the adapter illustrated in sketches B and C in Figure 2, may be used to connect this plug to
a 2-pole receptacle as shown in sketch B if a properly grounded outlet is not available. The temporary adapter should be used only
until a properly grounded outlet (sketch A) can be installed by a qualied electrician. The green colored rigid ear, lug, or the like
extending from the adapter must be connected to a permanent ground such as a properly grounded outlet box cover. Whenever
the adapter is used, it must be held in place by a metal screw.
• Ce produit doit être mis à la terre. En cas de dysfonctionnement ou de panne, la mise à la terre fournit une voie de moindre
résistance pour le courant électrique an de réduire les risques de choc électrique. Ce produit est équipé d’un cordon avec
un équipement-conducteur de mise à la terre et une prise mise à la terre. La prise doit être branchée à une che adaptée
correctement installée et mise à la terre, conformément aux codes et aux ordonnances locaux.
ANGER
– Le branchement incorrect de l’équipement-conducteur de mise à la terre peut engendrer un risque de choc électrique.
Consultez un électricien ou un réparateur qualiés si vous avez des doutes concernant la mise à la terre de l’appareil. Ne modiez pas la prise fournie avec le produit – si elle
n’est pas adaptée à votre che, faites installer une che adaptée par un électricien qualié.
• Ce produit doit être utilisé sur un circuit nominal de 120 V, et est équipé d’une prise mise à la terre comme celle présentée dans le schéma A de la gure 1. Vous pouvez
utiliser un adaptateur temporaire comme l’adaptateur illustré dans les dessins B et C pour brancher cette prise à une che à deux broches si vous ne disposez pas de
prise correctement mise à la terre. L’adaptateur temporaire doit être utilisé uniquement jusqu’à ce qu’une prise correctement mise à la terre (dessin A) soit installée par un
électricien qualié. La patte ou broche rigide verte sortant de l’adaptateur doit être branché à une mise à la terre permanente telle que le couvercle du boîtier d’une prise
mise à la terre. Lorsque l’adaptateur est utilisé, il doit être maintenu en place à l’aide d’une vis métallique.
• Este producto debe estar conectado a tierra. En caso de mal funcionamiento o que deje de funcionar, la conexión a tierra proporciona un camino de menor resistencia para
la corriente eléctrica para reducir el riesgo de descarga eléctrica. Este producto está equipado con un cable que tiene un conductor y un enchufe con conexión a tierra. El
enchufe debe conectarse a un tomacorriente adecuado que esté debidamente instalado y conectado a tierra de acuerdo con todos los códigos y ordenanzas locales.
PELIGRO
: una conexión inadecuada del conductor de descarga a tierra puede provocar el riesgo de descarga eléctrica. Consulte con un electricista calicado si tiene dudas
sobre si el producto está correctamente conectado a tierra. No modique el enchufe que viene con el producto; si no encaja en el tomacorriente haga que un electricista lo
instale correctamente.
• Este producto es para usar en un circuito nominal de 120 V, y tiene un enchufe con conexión a tierra como el enchufe ilustrado en el dibujo A de la Figura 1. Si no se
encuentra disponible una conexión a tierra, se puede utilizar un adaptador temporal como el ilustrado en los dibujos B y C para conectar este enchufe a un tomacorriente
de 2 polos como el que se muestra en el dibujo B. El adaptador temporal debe utilizarse solamente hasta que una conexión a tierra (dibujo A) pueda ser instalada por un
electricista calicado. La pestaña rígida y verde, la orejeta o la prolongación similar del adaptador, deben estar conectadas a tierra permanentemente, como una caja de
toma a tierra. Siempre que se utilice el adaptador, debe mantenerse en su lugar mediante un tornillo de metal.
MAINTENANCE
• Unplug the inversion table before performing maintenance.
• To clean the Table Bed, wipe down with a damp cloth.
• Do not use abrasive cleaners.
SAFETY LOCK and KEY
• The Safety Lock allows the table to be deactivated without the need to unplug
the power supply.
• Insert the Safety Key and turn clockwise to disable the Safety Lock and engage
the motor. The Safety Key will remain in place when the table is in-use (Figure 19).
• Upon completion of your inversion session, turn the Safety Key counterclockwise,
remove from the Motor Housing and store in a secure place for future use.
STORING THE INVERSION TABLE
• Loosen the De-Rattler Knob.
• Pull the height-selector locking pin, slide the Main Shaft in all the way, and engage
the pin in the storage setting.
• By pressing the Rotation Adjustment Button, rotate the Table Bed to its fully
inverted position until it reaches the Crossbar (Figure 20).
• Unplug the inversion table before storing.
• Pull up on the Spreader Arms to fold the A-frame (Figure 21).
CAUTION: Proceed carefully. This product is heavy. Folding the A-Frame may
pinch ngers if not done cautiously.
• Be sure to leave the A-Frame partially open, as to prevent tipping.
• Ensure that the electrical cord has been properly stored while not in use.
Step / Étape / Paso 7
Figure 19/ Figura 19
Figure 20/ Figura 20
Figure 21/ Figura 21
WARNING
!
Tipping Hazard: For upright storage, leave the A-Frame open wide enough to remain stable, or secure to the
wall to prevent tipping. In households with small children the table should be stored at on the oor, not upright.