Saunders Lumbar Traction Devices User’s Guide SAUNDERS LUMBAR HOMETRAC DELUXE (PN 101099A) SAUNDERS STX LUMBAR TRACTION DEVICE (PN 100799) US Patents #6,059,548 #6,506,174 #D415,254 #7,108,671 Other Patents Pending active forever.
SECTION ONE: GENERAL GUIDELINES AND PRECAUTIONS Congratulations on your purchase of a Saunders Lumbar Traction Device. Your new traction device is designed to provide safe and effective traction (stretching) to the lumbar region (low back). Your traction device requires minimal assembly and is nearly ready to use out of the case. Read these instructions completely before proceeding.
Before You Begin Review the guidelines you received from your healthcare provider regarding the: • • • • amount of traction recommended (never so much that it hurts) duration (amount of time) of each treatment hold and relax times if intermittent traction is recommended number of treatments recommended per week or per day For lumbar (low back) traction, remove clothing, belts and accessories around the trunk and lower back area.
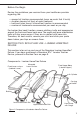
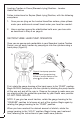
Set-up - Lumbar HomeTrac Deluxe 1. Remove the Saunders Lumbar HomeTrac Deluxe from the carrying case. Place the Lumbar HomeTrac Deluxe on a rm surface. 2. Lay the Lumbar HomeTrac Deluxe out at. Figure 2 shows how the “J” tabs on the upper surface easily t into the slots on the lower end. 3. Remove the hand pump from the foam enclosure. Place the hand pump on the oor next to the unit as shown. 4. Open the buckles on the stabilization belts.
6. NOTE: It is important that both belts t quite snugly – as tight as possible without discomfort. Retighten both belts now, if needed. 7. Apply traction using the pump as described in Section Three.
Applying Traction in Prone (Stomach-Lying) Position - Lumbar HomeTrac Deluxe Follow instructions for Supine (Back-Lying) Position, with the following exceptions: 1. Once you are lying on the Lumbar HomeTrac surface, place pillows under your ankles and a small towel under your head for comfort. 2. Have a partner secure the stabilization belts over your bare skin as described in Step 5 on page 6.
Do not exceed the level of traction prescribed by your health care provider. The stretch provided by traction should never cause pain. Relax . . . let your traction device do the work. When the treatment is complete, release the traction by rotating the gauge housing to the “RELEASE” position. Slacken the belts, then release the buckles. You should rest and relax for a few moments before getting out of the traction device.
Set-up - STx Lumbar Traction Device 1. Place the STx on a rm surface. Open the closure straps that secure the STx in a closed position and lay it out at. 2. Remove the stabilization belts (2) and hand pump from the storage compartment. Place the hand pump on the oor next to the unit. 3. Attach the lower and upper stabilization belts to the lower and upper anchor hooks as shown (Figure 5). Position the belts so that their edges are overlapping.
Storage Your Saunders Lumbar HomeTrac should be stored in its protective case. Replace the pump in the protective foam enclosure. Fold all belts, closing buckles where applicable. Your Saunders STx should be stored in the closed or folded position with all components stored in the storage compartment. Troubleshooting Saunders Lumbar Traction Devices feature a very accurate, sensitive gauge. The pump is speci cally designed not to leak in the “HOLD” position.