
User guide


9
EverGo User Manual
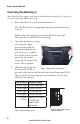
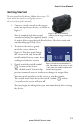
4. Gentlyinsertthebattery(s)into
the battery compartment located
ontopofthedevice.Before
insertingthebattery(s),becertain
that the battery connector on the
bottom of the battery lines up
withthearrowlocatednextto
the battery slot and the Philips
Respironics logo faces the inside
of the device. Pull back the plastic
retainertoallowthebatterytot
properly.
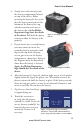
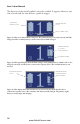
5. Ifyourdeviceusesasecondbattery,
you may remove or insert the
secondary battery using the small
flap on the top of the carrying
case to gain access to the battery
compartment,shownhere.Referto
thediagramundertheapwhich
showshowthebatteryisinserted.
Again, the Philips Respironics
logo should face the inside of the
device.
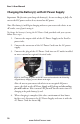
6. Afterthebattery(s)isinserted,checktomakesureitislevelwithor
slightlybelowthetopoftheplasticcase.Whenfullyinserted,the
plastic retainer tab holds the battery in place. If the battery extends
abovethetopgraysurface,itmaybeinbackwards.Removeitand
insertitcorrectly.Donotforcethebattery.
7. Zipthecaseclosedandkeep
itzippedduringuse.
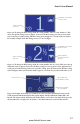
8. Touchthescreenonce
to verify that the battery
symbol(s)isvisible.Ifyoudo
notseebatterysymbol(s),the
battery(s)hasbeeninserted
incorrectly. Reinsert it if
necessary.
Figure 3. Inserting the primary
battery.
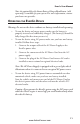
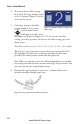
Figure 5. Typical startup screen showing
2 batteries, each 3/4 full, with 421 hours of
device usage and with software version 1.0.0.0.
VER 1.0.0.0
Figure 4. Inserting the secondary
www.ActiveForever.com