
User guide

MOTOR ONLY PREVENTIVE MAINTENANCE INSTRUCTIONS
TOOLS REQUIRED:
Phillips Head Screwdriver
9/64th Allen Wrench
Compressed Air
INSTRUCTIONS:
Turn the power to the unit off.
Unplug the motor from the circuit board.
Using the 9/64 Allen Wrench remove the allen screws that hold the Drive Assembly.
Remove the Drive Assembly.
Loosen the Phillips Head Screws enough to create a gap between the three (3) sections of the motor.
Caution: Do not remove the screws.
Blow enough air through the three (3) gaps to
clear the carbon build up.
Tighten the screws to secure the sections.
Return the Drive Assembly and test the unit.
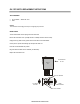
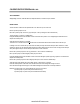
A S im p le P rev en tative M a in ten an c e
P ro c e d u re to C lea r the C a rb o n fro m th e
P h o e n ix M o to r
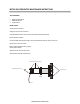
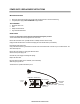
P lug
P h illip s H e a d S c rew s
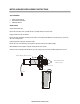
Blo w a ir thro u g h th e g a p s
Too ls R e q u ired:
In s tru c tio n s :
-9/6 4 A lle n W rench
-P hillip s H e a d S crew d river
-C o m p ressed A ir
1. Tu rn th e p o w er o ff to th e u nit.
2. U nplug th e m o tor fro m the circuit b oa rd
3. U sing th e 9/64 A lle n W re n ch re m o ve th e alle n scre w s th at h old the D riv e
A ssem bly.
4. R em o v e th e D riv e A sse m b ly.
5. Loo sen the P h illips H ead S cre w s e noug h to cre a te a g a p be tw e e n th e 3
sec tio n s of the m o tor.
6. B lo w e n ough a ir to cle a r the carb o n b uild u p .
7. Tig hte n the screw s enough to secure th e sectio n s.
8. R eturn the D rive A s sem bly a nd te st th e u nit.
B e c a re fu l n o t to re m o v e th e s c rew s
th ro u g h th e g a ps (3)
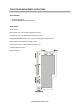
A lle n S cre w s
1 2 3
Toll F re e 800.2 7 3.52 3 3 61 4 .871.1 470 F a x: 614.8 71.1 4 7 0
To:_ _ _ __________________________ _ ____ _ ____ _ ____ _ _
C o m p any:___ _ _ ___ _ _ _ __________________________ _ __
F ax:_ _________________ _____ _____ ____ _ _ ___ _ _ ___ _ _ _
1 /9/03 L M
Plug
www.ActiveForever.com