PHOENIX SCOOTER S35010 / S35015 OWNER’S MANUAL 1 www.ActiveForever.
TABLE OF CONTENTS 1. PREFACE AND INTRODUCTION ……..………………………………… 2. SAFETY NOTICE…………………………………………………………...…. 4 3. PARTS INTRODUCTION……………..……………….. ……………………. 9 4. OPERATION………………………………………………………………….... 10 3 2.1 Before driving 2.2 While driving 2.3 Labeling 2.4 EMI 4.1 Control panel 4.2 How to operate your scooter 4.3 How to set to freewheel mode 5. DRIVING ON THE ROAD…………………………………………………….. 15 6. BATTERY CHARGING AND CARE……………………………………..... 16 6.1 Charging the battery 6.2 Battery 6.
1. PREFACE AND INTRODUCTION Please carefully read this owner’s manual before using the vehicle. Improper use of the vehicle could result in harm, injury or traffic accidents. To ensure that you get the most your scooter, please read this owner’s manual before using. ! This owner’s manual includes operation instructions for every aspect of the vehicle, assembly instructions, as well as instructions for how to deal with possible accidents.
2. SAFETY NOTICE 2.1 BEFORE DRIVING The user needs to be familiar with the usage and operation of this vehicle before driving. Therefore, please follow the recommendations in this safety notice. The same traffic rules apply to the use of this vehicle as apply to pedestrians ! For your safety, please follow and adhere to the same traffic laws as pedestrians. ! Please do not drive your scooter after consuming alcohol or when you are tired. ! Please be careful when driving your scooter in low light.
2. SAFETY NOTICE 2.2 WHILE DRIVING Do not use your vehicle under the circumstances below. ! On surfaces that are muddy, gravelly, bumpy, narrow, snowed over, icy, or canal towpaths not guarded by any fence or hedge. Keep away from places where you might get the wheels stuck. ! Do not drive at night or when it is raining, snowing, misty, or windy. ! Do not drive your vehicle in an “S” pattern or make erratic turnings. ! Do not take the scooter onto escalators.
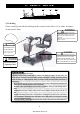
2. SAFETY NOTICE 2.3 Labeling Please carefully read all the labeling on the scooter before drive it. For future reference, do not remove them . WARNING Please hold the tiller before loosening the tiller adjustment knob. Before lifting or driving the scooter make certain the tiller adjustment knob is fully tightened. Never attempt to adjust the tiller while the scooter is motion.
2. SAFETY NOTICE 2.4 EMI This portion of the content will provide the user with basic information that describes the problems with EMI, known sources of EMI, protective measures either to lessen the possibility or exposure or to minimize the degree of exposure, and suggested action should unexpected or erratic movement occur. Caution: It is very important that you read this information regarding the possible effects of electromagnetic interference on your electric SCOOTER.
2. SAFETY NOTICE 3. Long-range transmitters and transceivers, such as commercial broadcast transmitter (radio and TV broadcast antenna towers) and amateur (HAM) radios. Note: Other types of hand-held devices, such as cordless phones, laptop computers, AM/FM radios, TV sets, CD player, and cassette players, and small appliances, such as electric shavers and hair dryers, so far as we know, are not likely to cause EMI problems to your powered scooter.
3. PARTS INTRODUCTION PARTS DESCRIPTION 1. Control panel 4. Tiller Adjustment Knob 7. Battery Pack 10. Seat Post Knob 2. Basket 3. Charger Socket 5. Seat 6. Seat Rotation Lever 8. Freewheel Lever 9. Anti-tip wheels 11. Seat Height Adjustment Pin 9 www.ActiveForever.
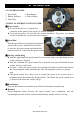
4. OPERATION 4.1 CONTROL PANEL 1. Speed Dial 3. Battery Indicator 5. Power Eye 2. Horn Button 4. Power Switch 4.2 HOW TO OPERATE YOUR SCOOTER Power switch ! To switch the power on , turn the key clockwise in the ignition. The power eye should illuminate. ! To switch the power off, turn the key counter-clockwise. The power eye should switch off and the key can be removed if required. Speed Dial Turn the speed dial to determine the maximum speed of the scooter.
4. OPERATION ! Warning When on a gradient NEVER set the vehicle to the freewheel mode. The electromagnetic brakes will not be applied. This may result in injury or damage. Seat ! The seat can be rotated and locked in position at 45 degrees intervals. ! Push the seat adjustment lever forward and swivel the seat. ! Release the lever, and then continue swiveling the seat until it locks in position. " Attention Return the seat to the forward position before driving.
# Suggestion 1. You should recharge the batteries after each time the vehicle is used to ensure maximum range. The batteries should be charged up at least once a week even if the scooter is not used. 2. After charging or replacing a new battery, drive the vehicle for 2-3 minutes to make sure the battery capacity is sufficient. 3. In wintertime, the battery may respond more slowly and the battery range may be reduced. 4. When driving on a gradient, the battery indicator light might move up and down.
4. OPERATION 4.3 How to set to freewheel mode Lever Lever Fig 4.1 Fig 4.2 Engaged mode (Fig. 4.1): Push the lever completely and the scooter can be driven by motor power. Freewheel Mode (Fig 4.2) Pull the lever up and the scooter can be moved manually.
4. OPERATION ! Warning � Please hold the tiller before loosening the tiller adjustment knob. � Before lifting or driving the scooter make certain the tiller adjustment knob is fully tightened. � Never attempt to adjust the tiller while the scooter is motion. 14 www.ActiveForever.
Starting and Driving 1. 2. 3. 4. 5. 6. 7. 8. 9. Make sure the seat is installed properly. Make sure the tiller has been secured properly. Fold down the armrests so you can rest your arms on them. Turn the power switch to “ON”. Check battery indicator to see whether there is enough power for your journey. If you have any doubt about the remaining power, please recharge the batteries before departure. Set the speed dial to a position you feel safe and comfortable with.
6. BATTERY CHARGING AND CARE 6.1 CHARGING THE BATTERY Method 1: On board Charging (see photograph) Follow the procedure below step by step: 1. Turn the power switch to (OFF) 2. Plug the charger’s power cord into a wall receptical. 3. Open the charging socket cap on the tiller shroud. Then connect the charger’s round plug to the charging socket. 4. Switch on the charger. 5. Both the charger’s red and orange LED will be lit when beginning charging. The charging duration is about 6 hours.
6. BATTERY CHARGING AND CARE Charging Hours The charging duration is about 6 hours. To ensure optimum performance a 10-hour charge is recommended. But we do not recommend a charging more than 24 consecutive hours. Batteries (Inside the Pack) 1. The S35010 / S35015 is powered by two sealed lead-acid deep-cycle batteries. 2. The batteries supplied with the scooter are 12 V 12ah batteries. 3. Size : 5.94” x 3.89” x 3.
6. BATTERY CHARGING AND CARE ! The batteries carry a six-month manufacturer's warranty. This warranty only covers issues relating to manufacturing faults, and not faults relating to failure to recharge the batteries as instructed above. # Suggestion – How to maximize your batteries efficiency and service life 1. Fully recharge your new battery before its first time use. 2. Be sure to charge the battery fully every time.
6. BATTERY CHARGING AND CARE ! Warning 1. The wiring system and charger are well situated in the battery pack while being assembled in plant. Do not attempt to re-locate the wiring system by yourself. The improper layout of wiring system may result in the wires pinched by battery box, which might result in the electronic system failure. 2. Be sure the battery wires are connected to their right battery terminal.
7. INSPECTION AND MAINTENANCE 7.1 INSPECTION • Clean the scooter with a damp cloth and dust down approximately once a week to preserve the appearance of the scooter. • Adjust the tiller height and return to the original position and swivel the seat once a week to ensure the parts adjust and remove smoothly and easily when required. • Check for signs of wear and tear on the tires and the upholstery on a regular basis.
7. INSPECTION AND MAINTENANCE 7.3 BATTERY, FUSE AND TIRE Battery Refer to the section entitled “6. BATTERY CHARGING AND CARE ”. Fuse If the battery charger is turned on and no LED are lit, check the fuse. # Suggestion Ask for help from your dealer to inspect or replace the fuse, since the tiller shroud has to be removed first before you can replace the fuse. Tires The condition of the tires depends on how you drive and use your scooter. ! Please check the tread depth regular.
7.5 MOVING ABOUT ! Switch off the power with power key before moving. Always dismount from the scooter before moving. ! Lift the scooter by the chassis, and not by the shroud. Lifting the scooter by the bumper could cause damage or injury. ! For your safety, always ask for help if required. You will need two people when moving or lifting the scooter whole. If you are on your own, please disassemble the scooter before lifting. Refer to the section below. 7.
7. INSPECTION AND MAINTENANCE Knob lock ! Warning Always unplug the rear section electrical connector before separating the two sections. 7.7 ASSEMBLING THE SCOOTER # Suggestion The assembly process is essentially the disassembly process in reverse. First study the text and photographs in the disassembly procedure before re-assembling the scooter. 23 www.ActiveForever.
7. INSPECTION AND MAINTENANCE 1. Position the front and rear sections of S35010 / S35015. 2. Align the lower curved locking brackets of the front section with the corresponding pegs on the front of the rear section. 3. Plug in electrical connector to connect the front and rear sections. 4. Holding the lower seat post, slowly pivot the rear section forward until the curved locking brackets are fully connected on to the top rear pegs. 5.
8. TROUBLESHOOTING TROUBLE SHOOTING If you have trouble with your scooter, you can inspect the following before taking you scooter to the dealer. If you cannot solve the problem, contact your dealer for assistance.
9. SPECIFICATION S P E C I F I C AT I O N S Model S35010 S35015 Dimension (L x W x H mm) 37.8” x 18.9” x 34.6” 960 x 480 x 880 mm (L x W x H inch) Weight W/I battery 87.6 lb / 39.8 kg W/O battery 66 lb / 30 kg Battery 12V 12 Ah x 2 Charger 24V 2A Front Tire 200 x 50 solid Rear Tire 200 x 50 solid Driving System Direct rear wheels (with differential gear) Brake System Electromagnetic brake Control Method By speed control lever Top Speed 4 mph / 6.
10. WARRANTY 9.1 WARRANTY There is a limited lifetime warranty on your new Phoenix Scooter. The warranty covers the scooter for parts only during this period. For more detail, please see the Warranty Conditions below. Warranty Conditions: To apply the warranty should your scooter require attention please contact your service provider.
10. WARRANTY 10.1 VIN (VEHICLE INDIFICATION NUMBER) To ensure the correct after sales service and warranty service support , please write down the vehicle identification number that is stuck on the back right-hand side of the frame.
! !!!!!!!!!!!!!!!!!!!!!!!!!!!!!!!!!!!!! 29 www.ActiveForever.