
User manual


Table Of Contents
- Introduction
- Using Qwest DSL
- Performing a Basic Setup
- Setting Up Static IP Address
- Configuring Advanced Settings
- Accessing Advanced Settings
- WAN IP Address
- Wireless Settings
- Wireless MAC Authentication
- Wireless Advanced Settings
- DHCP Server
- Services Blocking
- Website Blocking
- Remote Management/Telnet
- Port Forwarding
- DMZ Hosting
- Firewall
- Dynamic Routing
- NAT (Network Address Translation)
- Static Routing
- IP QoS Setting
- Telnet Timeout Setting
- LAN IP Address
- Viewing the Modem’s Status
- Using Utilities
- Troubleshooting
- Reference
- Static IP Address on the Computer
- Computer Security
- Specifications
- Glossary
- Firewall Security Level Services
- Alternative System Setup
- Additional Technical Support Options
- Notices
- Limited Warranty
40
Actiontec DSL Modem User Manual
41
Chapter 5 Configuring Advanced Settings
☞
Note: Before Remote Management can be activated, the admin-
istrator password must be set. To do this, go to the Setup screen
and select Change Admin Password. Follow the instructions in
the subsequent screens
To access the Modem via Telnet, activate Remote Telnet by selecting On next to
“Remote Telnet.”
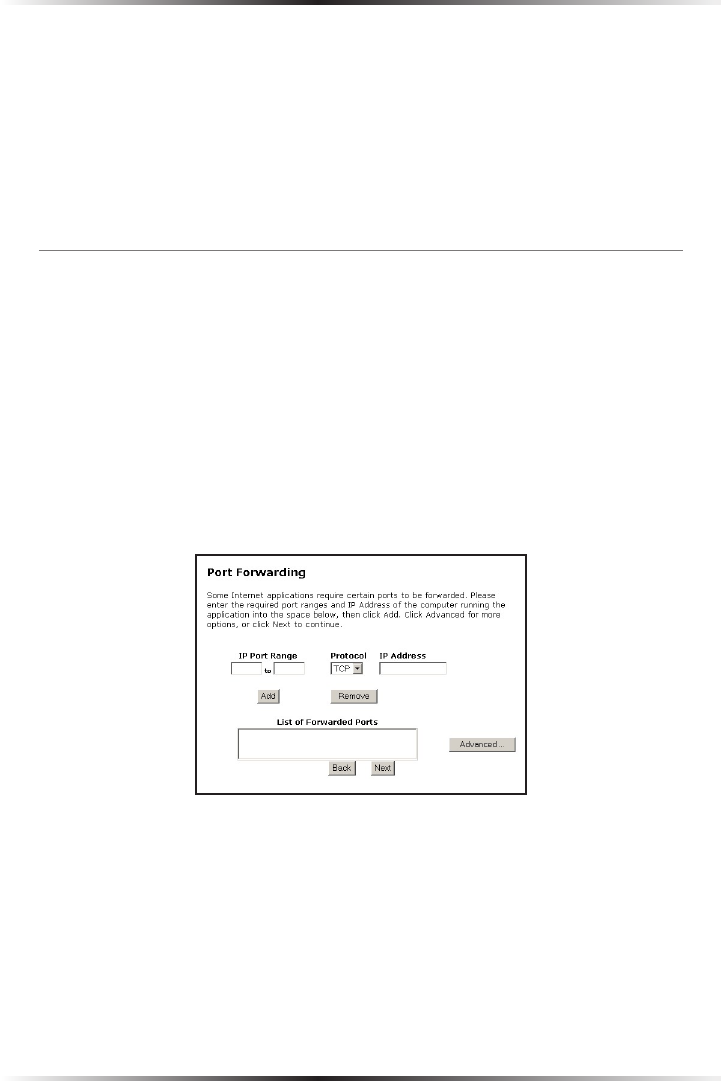
Port Forwarding
Selecting Port Forwarding in the “Advanced Settings” screen generates the “Port
Forwarding” screen. Port forwarding allows certain programs to bypass the
Modem’s built-in firewall, allowing access to parts of the network (for hosting a
Web or ftp server, for example). To use port forwarding, enter the IP port range
in the “IP Port Range” text boxes. (If more than 10 ports are needed, Actiontec
recommends using DMZ Hosting. See “DMZ Hosting” on the next page for more
information.) Choose the protocol type from the “Protocol” list box, then enter the
IP address of the computer on the network to be used as a host. Click Add. The
forwarded ports appear in the “List of Forwarded Ports” text box.
To remove forwarded ports, highlight them, then click Remove.