USER MANUAL zControl
Introduction This manual will guide you through the setup of your ActionTec zControl, the breakthrough system that will make your home control and home monitoring easy and enjoyable! Please make sure you read all instructions before proceeding with the installation.
Table of Contents 1 2 3 4 IV Inspecting Your zControl 1 1.1 Inspecting the Ports on Your zControl 1 1.2 Inspecting the LEDs on Your zControl 1 Connection, Registration, and Activation 2 2.1 Connecting to the Internet 2 2.2 Registration 2 2.3 Activation 4 Accessing the User Interface 5 3.1 UPnP Access 5 3.2 IP Address Access (Advanced) 6 3.3 Mobile Device Access 6 Overview: Basic UI Features and Elements 8 4.1 Administrator Mode 8 4.2 Settings 8 4.3 Devices 9 4.
6 7 Managing Z-Wave Devices 14 5.1 Adding Z-Wave Devices 14 5.2 Adding Z-Wave Devices (UI method) 14 5.3 Removing Z-Wave Devices 15 Installing Home Monitoring Devices 16 6.1 Installing Motion/Occupancy Sensors 16 6.2 Installing UPnP Cameras 16 6.3 Installing non-UPnP Cameras 17 Advanced UI Features 18 7.1 Device Management 18 7.2 Rooms, Scenes, and Schedules 18 7.3 Monitoring 22 7.4 Triggers 23 7.5 Messages 24 7.
10 VI 9.9 Motion Detector Takes Too Much or Too Little Time to Return to “No motion” State 30 9.10 Unable to Access my Panasonic IP Camera 30 9.11 Unable to View My Panasonic IP Camera Video 30 9.12 Why Do I Have an Upgrade Notification Message on My zControl Interface? 31 9.13 Cannot Add New Z-Wave Devices to My zControl 31 9.14 Understanding the LEDs 32 Appendix A - Remote Controllers (Advanced Setup) 33 10.1 Preparing the zControl to Use the Remote Controller 33 10.
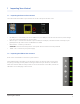
1 Inspecting Your zControl 1.1 Inspecting the Ports on Your zControl Let’s take a look at the back of your zControl to see all of the ports and their uses.
2 Connection, Registration, and Activation 2.1 Connecting to the Internet 1. 2. 3. Plug one end of the provided Ethernet cable into the Ethernet port of your zControl, and the other end into your router Plug one end of the power cable into the 12VDC 1.4A port of your zControl and the other end into a wall socket or power strip.
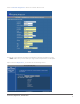
Click on New User Registration. You’ll see a screen like this one: Provide all of the required information and whatever optional information you like. NOTE: Make sure you write down your login name and password in a safe place.
2.3 Activation Activation will allow you to start using your zControl, access your zControl User Interface, and receive upgrades and new services as they become available. Open a browser window and go to http://digitalgardeneronline.com/zControl again, click on Manage My Profile, and log in. From the menu on the left side of the screen, click on the Activate ControlPoint option.
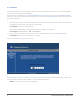
3 Accessing the User Interface (UI) The best and easiest way to access the User Interface is to open a browser window and go to http://digitalgardeneronline.com/zControl where you’ll see this screen again: Once there, click on Control My Home. You can use this method to access your zControl UI from any computer -at home, at work, abroad -- anywhere! For your convenience, there are also several other ways to access the UI. 3.
Simply double-click on the zControl ZCHAV1 icon to access the User Interface (UI). Your default browser will launch automatically and display the zControl UI. 3.2 IP Address Access (Advanced) Advanced users: you can obtain your zControl’s IP address by looking at your router’s list of attached devices. If you know your zControl’s IP address, you can enter it into your browser’s address bar to access the UI from any computer on your network.
When you receive the SMS message (this may take several minutes), it will contain a download link. Open the link on your mobile device and the UI will be downloaded automatically. If Adobe Flash Lite 2.1 is not installed, it will also be downloaded automatically. Depending on your mobile device, you may have to confirm/okay the installation steps. Whenever a mobile UI upgrade is available, your mobile device will receive another SMS message with a download link.
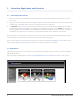
4 Overview: Basic UI Features and Elements Let’s take a minute to get familiar with the basic elements of the UI and what they do. We’ll get into more detail later, after several devices have been configured. The first thing you see when you access your UI will be this screen. Until you’ve configured some devices, all of those panes will be empty. They may also be different sizes -you can resize them at any time by clicking on and dragging the bottom-right corner of any pane. 4.
4.3 Devices Near the top of the UI, you’ll see a row of 6 icons that form the main menu. The leftmost icon is labeled Devices. Clicking on it will bring you to a listing of all of the devices the zControl has discovered. We haven’t configured any devices yet, so this list should still be empty. 4.4 Rooms Next, you’ll find the Rooms icon. Like the list of devices, the list of rooms will be empty.
4.9 Mobile UI Features When you load the mobile UI, you will be asked to enter your username and password. If you would like to have your credentials memorized so you can login automatically, check the “Auto Login” checkbox by using the select button on your Smartphone.
All devices are detected automatically and show up in exactly the same way as in the zControl UI. They are grouped by the device class: “Cameras”, “Switches”, “Lights”, etc. The Cameras view allows you to monitor and control your cameras in real-time. In order to switch to “Control” mode you have to click the button at the bottom to change to “Controlling”. This means that now you can use right, left, up and down controls on your Smartphone keyboard to move the camera to a desired position.
The Messages view allows you to read the messages and see their timestamps. Message / Alerts of high importance will pop-up in Mobile UI automatically as they might need your immediate attention. Examples of such events might be: ›› Your front door is open ›› Important message from the management system The Schedules view allows you to see schedules configured for your ControlPoint. The Scenes view allows you to see and run the scenes created for your ControlPoint. 4.9.
the selected language. All customer-created names will not be affected by this selection. (e.g., if you named your device “Floor lamp”, it will be displayed as a “Floor lamp” regardless of the language selected in the UI.) ›› Temperature display: allows you to choose between Fahrenheit and Celsius scales.
5 Managing Z-Wave Devices 5.1 Adding Z-Wave Devices There are many different kinds of Z-Wave devices. These include lamp modules, thermostats, motion/occupancy sensors, blinds/shades, fans, appliance modules, and so on. There is one simple installation procedure for all of these devices: 1. 2. 3. 4. Plug in the Z-Wave device within six feet of the zControl Push the blue Z-Wave button on the front of the zControl.
Click on the Add button. The Activity LED will begin blinking green slowly Push the button on the Z-Wave device (it will be labeled On/Off, Service, Program, or something similar) When the Activity LED turns solid green or starts blinking green rapidly, the Z-Wave device has been successfully added 7. If the Activity LED blinks red slowly three times, the Z-Wave device has not been successfully added. Go back to step 4 and repeat the procedure 8. Repeat steps 4 through 7 for each Z-Wave device 9.
6 Installing Home Monitoring Devices 6.1 Installing Motion/Occupancy Sensors To install a motion/occupancy sensor, simply follow the above instructions for installing Z-Wave devices. Once the motion/occupancy sensor is installed, it may be necessary to push the button on the front of the device one more time to activate it. 6.1.1 Setting Up the CA9000 The CA9000 sensor has a 5-position switch along its bottom side that determines how quickly it responds to the absence of motion/occupancy.
9. Click on the Setup tab at the top of the page, then click on DHCP. At the bottom of the DHCP page, press Save 10. Close all setup software, including your browser, and restart the camera by unplugging it and plugging it back in 6.3 Installing non-UPnP Cameras To install a non-UPnP camera, consult its documentation to learn how to assign it an IP address and configure it for network access.
7 Advanced UI Features 7.1 Device Management Now that you have some devices set up, open your UI and click on the Devices icon. Clicking on any device in the listing will let you focus on that device. If you’re in Administrator Mode, you can also rename it (we recommend giving your devices unique and distinctive names) and also use the Wink feature. Wink will turn on and off the specified lamp/appliance module at 3 second intervals, which is useful to help you identify Z-Wave devices in your home.
to control devices in your home by location, by situation, and by time. 7.2.1 Rooms By organizing your devices into Rooms, you can make it easier to find exactly the device you want to control. To create a Room, you’ll need to do the following: 1. 2. Turn on Administrator Mode Click the Rooms icon. A new set of buttons will appear under the main menu: 3. 4.
7.2.2 Scenes By creating Scenes, you can control whole Rooms and groups of devices with the push of a button. To create a Scene, you’ll need to: 1. 2. 3. 4. Turn on Administrator Mode Click the Scenes icon.
You can Run a Scene at any time. Note that you must be in Administrator Mode if you want to Add or Delete a Scene, Edit a Scene’s name, or Add more devices to a Scene. 7.2.3 Schedules By creating Schedules, you can set the Scenes you’ve already created to be automatically Run at a time of your choice. A Schedule is essentially a Scene that Runs at a preset time. To create a Schedule, you’ll need to 1. Turn on Administrator Mode 2. Click the Schedules icon.
7.3 Monitoring Clicking on the Monitor icon in the main menu will bring up two panes. The top one will display whatever the selected camera “sees” and is labeled “Display.” The bottom one shows thumbnails of what each camera “sees” and is labeled “Filmstrip.” 7.3.1 The “Filmstrip” Pane Clicking on any thumbnail in the Filmstrip pane will select that camera and display that camera’s feed in the Display pane.
7.4 Triggers Triggers are one of the most powerful features of the zControl. Setting up triggers allows changes in a motion/occupancy sensor’s state to “trigger” many of the zControl’s other functions. For example, a light can be set to turn on whenever motion/occupancy is detected in the room. To set up a trigger, you’ll need to focus on a motion/occupancy sensor through the device listing. A pane will appear with two Rules listed.
7.5 Messages You can see the Messages pane by selecting Messages from the pull-down menu on your Dashboard. The Messages pane is divided into two parts, one (marked with an exclamation point) for Alerts, and one for Messages. 7.5.1 Messages Most Messages you receive will inform you about your zControl discovering an additional device. You can scroll through Messages by clicking on the left and right arrows. You can also delete Messages by clicking on the delete button. 7.5.
Note that you can go to http://digitalgardeneronline.com/zControl and click on Configure Alerts from the left menu to set Alerts and/or Messages to be delivered to your email address, mobile device, or online chat client. 7.6 Controlling Multiple zControls Before you can start controlling additional zControls, you must Activate them online. 7.6.1 Activating Additional zControls Online If you’d like to Activate an additional zControl, simply open a browser window and go to http://digitalgardeneronline.
7.6.2 Choosing Which zControl to Control When you go to http://digitalgardeneronline.com/zControl and click on Control My Home, you may be prompted to enter your username and password. After you’ve done so, a window will appear with a list of all of the zControls that you have Activated. Click on the one you’d like to control and then click the Select button. If you’d like to start controlling a different zControl, just open a new browser window and access it in the same way.
8 Suggestions The ActionTec zControl is a powerful and flexible tool for monitoring and controlling your home. What follows is a list of some obvious and not-so-obvious ways of applying that power and flexibility towards simple and effective home control.
9 Troubleshooting 9.1 Unable to Register with Portal Server Symptom: Unable to Register with the Portal Server Solution: ›› Make sure that your network connection is working properly. You should see the Power and Ethernet LEDs showing solid green and the Online LED blinking green ›› Ensure you have Internet connection, e.g. go to a known trusted website ›› Verify that you are using correct URL: http://digitalgardeneronline.
9.4 Browser Becomes Unresponsive Symptom: Browser freezing or locking up Solution: ›› Close and restart the browser. If unresponsive, you may need to access your Task Manager by simultaneously pressing the , , and keys once. In the Task Manager, select your browser and click End Task or End Process ›› Restart the browser and access the zControl User Interface to control your devices 9.
9.8 Motion Detector Is Not Being Detected Symptom: The CA9000 Motion detector does not show up in the UI Solution: ›› Check the batteries. If using a power supply, check the connections ›› You may have to press the button on the motion detector to activate it ›› If neither of the above steps solves the problem, you will need to Remove the motion detector by completing the procedure in section 5.3 Removing Z-Wave Devices. After you’ve done so, repeat the procedure in section 5.
9.12 Why Do I have an Upgrade Notification Message on My zControl Interface? Occasionally, your zControl may receive a software upgrade with additional features. When it does, you’ll see a notification like this one: Simply press the OK button and you will be able to continue using your zControl while taking advantage of the new features. 9.
9.14 Understanding the LEDs When the Activity and Online LEDs show solid orange or red, DO NOT turn off or restart your zControl as this may damage it. While a software or firmware download or upgrade is in progress, normal zControl functionality may be suspended. Please refer to the following chart to guide you through LED messages.
10 Appendix A – Remote Controllers (Advanced Setup) Your zControl starter kit may include a remote controller or one can be purchased separately from your service provider. The Intermatic CA-09 Wireless Remote Controller is an optional accessory that enables you to control your devices from a remote controller as well as from the zControl Interface.
Repeat these steps for each Z-Wave device in your home until you have successfully added all your modules. (Make sure to assign a different channel number for each device, otherwise you could end up turning on more than one device together) 10.3 Programming the zControl to Use the Remote Controller ›› Open your zControl Interface.
Regulatory Compliance Notices Class B Equipment This equipment has been tested and found to comply with the limits for a Class B digital device, pursuant to Part 15 of the FCC Rules. These limits are designed to provide reasonable protection against harmful interference in a residential installation. This equipment generates, uses, and can radiate radio frequency energy and, if not installed and used in accordance with the instructions, may cause harmful interference to radio communications.