
User's Manual
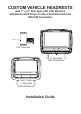

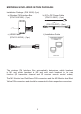
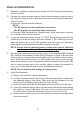
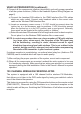
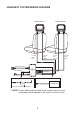
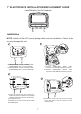
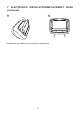

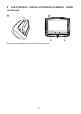
Table Of Contents

9
8” ELECTRONICS INSTALLATION/REPLACEMENT GUIDE
2
a)
M1 BLUE headrest connector
b)
Connect
HRM2/HRS2 WHITE cable connector to
M2 WHITE headrest connector
Connect
HRM1/HRS1 BLUE cable connector to
a
b
4
Rotate the screen up and move the locking tab
to the right to lock the monitor into the headrest
tray.
Installation
Install Monitor Unit To Headrest
NOTE: Switch off the ACC power during cable and unit installation. Failure to do
so may damage the unit.
1
a) Master/Satellite monitor headrest
cable (HRM1/HRS1) 8 Pin connector (BLUE)
b) Master/Satellite monitor headrest
cable (HRM2/HRS2) 9 Pin connector (WHITE)
a
b
3
a) Master/Satelite monitor headrest cable
(HRM1/HRS1) 8 Pin connector (BLUE)
b) Master/Satelite monitor headrest cable
(HRM2/HRS2) 9 Pin connector (WHITE)
e) Insert the monitor into the monitor tray.
Make sure that the cables are not trapped
between the monitor and the monitor tray
f) Install Screws (x4)
CAUTION: Do not use a power driver. HAND
TIGHTEN ONLY!
c) Connect HRM1/HRS1 BLUE cable
connector to M1 BLUE headrest connector.
d) Connect HRM2/HRS2 WHITE cable
connector to M2 WHITE headrest connector.
g) Rotate the screen UP and move the locking
tab to the right to lock the monitor into the
headrest tray.
(A)
(B)
(B)
(A)