Six Gun Select System Documentation 040-1101-01 Rev C ! Read this manual before use. ! Keep this manual with the machine at all times. www.globalvr.com support@globalvr.
Table of Contents Safety……………………………………..………………….……….. 3 Warnings………………………………….………………..………... 3 Environmental Conditons……………..……………..….............. 4 Regulatory Notices………………………..………………...….….. 4 Six Gun Select Game Description…..………….………...……... 5 SGS Cabinet Features…...………………………………………… 6 Cabinet Inspection……………..………...………………...…....… 7 Quick Draw Post Installation..……………………………………. 8 Setting Game Options and Resets……....……………..….….. 10 Main Menu……………………….…………………...………..…... 11 Game Mode Menu……………………….…..
Safety • • • • • • • • • • • The following safety instructions apply to all game operators and service personnel. Specific warnings and cautions will be found throughout this manual where they apply. We recommend that you read this page before preparing your arcade cabinet for game play. Use the following safety guidelines to help protect the system from potential damage and to ensure your personal safety.
Environmental Conditions The Six Gun Select cabinet is intended for indoor use only. Be sure to keep the cabinet dry and maintain operating temperatures of 10-40 Celsius or 50-104 Fahrenheit.
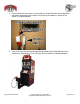
Six Gun Select Game Description The Classic Top Earners are back and better than ever! 4 notorious outlaws are on the loose and you're the only one who can stop 'em. Strap on your six-shooter and call them out! The Six Gun Select cabinet is built to last utilizing the latest in PC Technology. NO LASERDISCS! Fast action game play requires a sharp eye and quick draw to make it through alive. NEW PLAY MODE: action.
Six Gun Select Cabinet Features Hardware Features: • • • • • Page 6 of 27 Pentium 3 Computer 256 Megabytes of RAM 32 bit Color Optical Gun 640 x 480 Super VGA Monitor 040-1101-01 Rev C 5/19/2004 Copyright © 2004, All Rights Reserved System Documentation
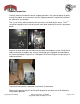
Cabinet Inspection Carefully remove the cabinet from the shipping container. Give yourself plenty of space around the cabinet as you remove it from the shipping container. Inspect the exterior of the cabinet for any damage. The 1st set of keys will be located in the coin return slot shown by the arrow. The 2nd set will be hanging on the inside of the coin mech door shown by the circle in the picture below. Remove the back door from the cabinet and inspect the computer system.
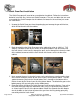
Quick Draw Post Installation The Quick Draw post will need to be assembled to the cabinet. Follow the instructions below to install the Gun, Holster and Quick Draw post. The nuts and bolts that are used to assemble the Quick Draw post to the cabinet are located in the cash box just under the Coin Mechs. 1. Unwrap the Quick Draw post from the packaging and unwrap the gun with holster, which will be found inside the cabinet. 2.
5. Finally connect the wire harness coming from the Quick Draw post to the two Molex connectors located next to the hole on the inside of the cabinet as shown by the arrows in the picture below. 6. You can test the Gun and Holster operation by going into the Operator Menu and selecting the Diagnostics Test to verify the Gun and Holster are working properly.
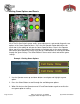
Setting Game Options and Resets All of The Six Gun Select’s game audits, game adjustments, and control diagnostics are options of the Game Operator Menu. Press the red Operator Button behind the coin mech door in the cabinet to activate the Game Operator Menu. Once in the Operator Menu you will use the Operator Menu buttons to navigate and set the game software. Most of the game options are set by using the Up / Down buttons to scroll up and down through the game settings.
Main Menu The Main menu is the default screen displayed when you press the Operator Button to enter into the Operator Menus. Game Mode This button is used to Enter the Game Mode Menu. You can then adjust Game play and Coin settings for the cabinet. Coin Stats This button is used to Enter the Coin Stats Menu. Game Stats This button is used to Enter the Game Stats Menu. Diagnostics This button is used to Enter the Diagnostics Menu.
Game Mode Menu The Game Mode menu is used to setup the type of money or credits used at your location, the amount of coins that are needed to start a game, and game play difficulty. Credit Display Defines whether Money or Arcade Credits are used to play this cabinet. The options to choose from are: Money, or Credits. Coins Per Pulse This sets how many credits are shown on screen for each coin drop. Free Play This will turn free play ON or OFF. The options to choose from are: ON and OFF.
Attract Volume This will adjust the attract volume for the game during the attract mode. The options to choose from are: 1- 10. Difficulty This will reduce the amount of time a player is given to shoot a bad guy on screen. The options to choose from are Easy and Hard. Main Menu This will return you to the previous Main Menu screen.
Game Resets Menu Restore Factory Settings Sets the Game Mode optional settings to the Factory Settings listed below U.S.A. Factory Settings Credit Display Coins Per Pulse Free Play Credits Per Game Credits Per Continue Number of Lives Game Volume Attract Volume Difficulty Dollars 1 OFF 2 2 3 7 7 Easy U.K.
High Scores Resets the High Scores held in the game. Reset All This will Reset all the records including High Scores and the Lifetime Records held by the game software. Main Menu This will return you to the previous Main Menu screen.
Coin Stats The Coin Stats menu shows the total number of coins collected for the cabinet, and the average game time per coin, as well as the last date and time the stats were reset. Both the Coin Stats and Lifetime Stats can be reset through the Game Resets menu. Press the Select Operator button to return to the previous Menu screen.
Diagnostics Menu The Diagnostics menu will perform different computer or monitor tests to verify the hardware on the cabinet is working properly. The Debug boxes will allow the game to be played with large boxes outlining the shooting targets within the game. This diagnostic test is used to verify the gun calibration is working correctly within the game play mode. This can also be turned on, so that very young players ages 3 and up will understand what targets to shoot at during game play.
Monitor Calibration Test When you begin the Monitor Calibration Test, use the Select Button to Start the test and to scroll through each monitor screen test. To exit the Monitor Calibration Test, press the Operator button. Use each monitor calibration screen test separately to adjust and fine-tune the picture on your monitor. Each screen is designed to either align the horizontal and vertical sync, or adjust the white balance, and color hues.
Starting a Game With the proper amount of credits inserted use the Gun and shoot the screen. You begin by choosing the difficulty of play: Easy and Hard. Once the game begins, use the gun to shoot bad guys on the screen and aim the gun to select levels. During the Draw sequence, you are required to holster your gun, and you can only remove it once the word DRAW has be displayed on screen.
USB Game Dongles The Six Gun Select cabinet comes with a USB Game Dongle to activate the game software. The USB Game Dongle is installed on USB port 2 on the back of the computer. When the USB Dongle is installed and working properly a Red LED light will illuminate inside the Dongle. In order for a USB Game Dongle to be recognized correctly it must be inserted into the USB port before the cabinet is powered ON.
Computer BIOS Settings The Computer Bios settings for the Parallel port must be set correctly in order for the Coin Inputs and Operator buttons to work correctly with the Joshua OS. If you run into a problem with the both Coin Inputs and Operator buttons not working, use the PS/2 keyboard provided with your cabinet to verify the Bios setting on your computer are set correctly. 1. While the computer is powered off, plug the PS/2 Keyboard into the purple colored PS/2 port on the back of the computer. 2.
System Restore CD’s In the event the software running on the computer becomes corrupt, or you run into software problems GLOBAL VR provides a way of restoring the software running on your Six Gun Select computer. The System Restore CD’s will load the Operating System and Game software on 1 CD. Please be aware when you use the System Restore CD’s you have the option of erasing all history for the coin and game audits held in the game software. Operating System and Game Software Restore CD 1.
Computer Rear Panel Diagram Port Computer Ports Description or Use 1 Video to ACT LABS Gun The Video Port on the computer connects first to the ACT LABS Gun module. Use the Video Port on the ACT LABS Gun Module to connect to the SVGA Monitor. 2 USB 0 USB Port 0 on the computer connects to the USB ACT LABS Gun Module.
Trouble Shooting Problem Possible Solution No Picture or Distorted Picture. Check for bad video cable or faulty video board or monitor. Check for loose or disconnected video signal cable. Make sure the monitor has power. Turn Game On and Nothing Happens. Check that the power cord is plugged into the computer. Make sure the cabinet On/Off switch is on. Confirm the power cord is plugged into a wall outlet. No Sound. Check that the audio cable is connected to the green audio port on the computer.
Six Gun Select Warranty Info LIMITED WARRANTY GLOBAL VR warrants that its computer circuit boards, hard drives, power supplies, monitors, displays, controls, sensors, and mechanical structures are free from defects in materials and workmanship under normal use and service for a period of ninety (90) days from the date of shipment.
Technical Support Free telephone, email and online support are provided for the Six Gun Select systems during the warranty period. In addition to helping with trouble shooting and diagnosing defective parts technical support is prepared to help you with questions about the operation of your Six Gun Select game.
Legal Statements (c) 2004 GLOBAL VR, Inc. All Rights Reserved The Six Gun Select is a trademark of American Laser Games Inc./ Her Interactive Inc. Programming (C) 2002 Digital Leisure Inc. All Rights Reserved. GLOBAL VR and the GLOBAL VR logo are trademarks of Global VR, Inc. All other trademarks are the property of their respective owners.