FIREWALL INFORMATION Attention Microsoft Windows XP and Windows 2003 Users! Microsoft Windows Firewall: Microsoft has included firewall protection on Windows XP with Service Pack 2 and on Windows 2003 Server with Service Pack 1. If you will be installing your timeQplus BIOMETRIC server on either of these two operating systems you will need to grant access on the firewall to the following applications and services after your installation is complete.
timeQplus BIOMETRIC™ Terminal User Manual timeQplus BIOMETRIC™ Terminal User Manual 43
Product Reference Guide Additional terminals, product upgrades and cables are available. Please contact Acroprint at 1.800.334.7190 to order today. Part Number: 01-0229-000 TQ100 terminal Chapter One: Introduction 1.1 1.2 1.3 Operating Environment………………………..…..... 4 System Description ……………………………......... 4 Enclosed Items …………………………………........
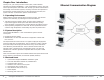
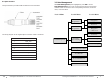
Chapter One: Introduction Thank you for your recent purchase of the TQ100, a data collection terminal for timeQplus BIOMETRIC™ time and attendance system. This user manual provides specific information that will help you better understand the functionality of the terminal (TQ100). Some key areas that are important to the terminal’s (TQ100) performance are the operating environment, the system overview, communication options and enrollment. Ethernet Communication Diagram 1.
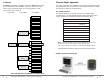
Chapter Two: Hardware Setup RS485 Wiring Diagram 2.1 Terminal Installation To power up the TQ100 biometric terminal: A) Unwrap the package and take out the terminal and accessories. B) Using the screws supplied, fasten the mounting plate on the wall in an appropriate place. Avoid areas with strong magnetic and/or electric fields. C) Attach the terminal to the mounting plate. D) Plug in the power supply and turn the terminal on (Press button). 2.
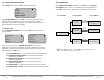
Chapter Three: TQ100 Biometric Terminal Menu Structure The terminal uses function and number keys to navigate through the menu options and to access system settings. Level-1 menus include: Data management, Settings and System Information. Each menu consists of subordinate level-2 menus such as User Registration and View Punches. Level-3 menu include enrollment method selection, sensitivity settings, etc.
8.2 RJ45 Interface 3.1 Data Management The RJ45 interface provides RS485 and Ethernet communication. With Data Management option highlighted, press OK to access Data Management level-2 menu and browse through the seven items available.
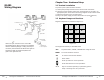
3.2 Setup Chapter Eight: Appendix With Setup highlighted, press OK to access the Setup level-2 menus and browse the four items available. There are a total of 18 level-3 menus as per the diagram below. For more information on each menu, please refer to page 26. Two types of interfaces are available in the terminal: 9-pin RS232 interface (for direct RS232 serial communication) and an RJ45 interface (for RS485 and TCP/IP over Ethernet communications).
7.2.4 Display Adjustment Setting 3.3 System Info Select Setup menu and press OK to display the following: With System Information highlighted, press OK to access System Information level-2 menus. You will see three menu items displayed. Press OK in each menu to display the corresponding item as follows: Setup System Record Communication Display Adjust Level-1 Menu Level-2 Menu Select Display Adjust and press OK.
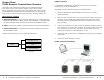
Chapter Four: Communications 4.1 Communication Interfaces There are two communication interfaces available for the TQ100 terminal: 9-pin RS232 interface and RJ45 interface, as illustrated in the Figure 4.1. The RS232 interface provides RS232 communication, while the RJ45 interface provides RS485 and Ethernet communication, see Figure 4.1 below. 7. Default Gateway Setting Items Explanation 192.168.1.1 Set the default gateway of the LAN when using the Ethernet communication. Factory Setting 192.168.1.
3. Port Number Setting Items Explanation 1 - 9999 To set the software port of the Ethernet communication of the terminal. Factory Setting 5005 4.2.1 Direct Connection using RS232 with RS232 communications Note: The port number must be consistent to port number of the software in the PC administration machine. No communication can be made otherwise. 4.
4.2.2 RS485 network connection using RJ45 interface 7.2.3 Communication Setting Select Communication Setting menu and press OK to access the level-3 menu displayed as follows: The TQ100 terminal can be connected using RS485. [Please Note: Due to the low demand for this type of connection, the RS232/ RS485 converter is not included in the standard package. See the Appendix at the end of this manual for details of the installation and setup of the RS485 configuration].
2. Total Punches Alert Setting Items 4.2.3 Network Connection using Ethernet communication function with RJ45 interface Explanation No Indicates that the terminal will not give out alert when punches stored on the terminal are overflowed. If the total punches surpass the maximum storage capacity, then the terminal will not store any new punches. The maximum storage capacity is 30,000 punches. 1 - 1500 The terminal will inform that the records are overflowed according to the value set.
Chapter Five: Fingerprint Registration/Enrollment When the TQ100 terminal and AttendanceRx software installation is complete, fingerprints will first be enrolled and then validated. For a network installation with multiple terminals a user’s enrollment is only needed on one terminal. Any timeQplus administrator can enable the enrolled user to use any terminal in the network. 5.
There are a total of six level-3 menus in the System Setting: Total Number of Administrators, Language, Time Setting, Voice Out, Unlock and Auto Shutdown, defaulted as below: The correct finger positioning method is illustrated below, front and side view. 1. Total Number of Administrators Setup Value Explanation 1-10 Set the total number of the administrators for the terminal Factory Setting 5 2.
5.2 Fingerprint Registration 7.1.8 Display Messaging There are two registration modes available for the terminal: fingerprint and password. 1. When viewing punches, the initials displayed on the interface have the following meanings: V_F: The registration type is fingerprint V_P: The registration type is password A unique ID number per user is required for enrollment. For each ID number you can enroll up to 10 fingerprints and 1 password.
7.1.
Press finger on the sensor window and remove it following the instructions on the screen. Press the same finger a second time and third time according to the instructions displayed. If the registration fails, the screen displays the message below and the previous step needs to be repeated. 7.1.
7.1.4 Select Delete Registration Data menu and press OK to access the level-3 menu as follows: Delete ID 00000 It is recommended to perform a fingerprint check to confirm its validity. If it validates, it means that your enrolled fingerprint is of good quality and the message in Figure B below is displayed.
Chapter Six: Terminal Usage and Punching In/Out 6.1 Successful validation when punching In/Out For every successful punch, the message on the interface displays as below, and if activated, a voice prompt saying “Thank you” is heard. “MP” Validated “Name” “Status” 7.1.2 Select Administrator Registration menu by pressing Admin and press OK to access the level-3 menu as follows: Admin Finger Password FP+PW Refer to Chapter Five for fingerprint enrollment and 7.1.1 for password registration.
Press OK or enter the corresponding ID number of the person and press OK to display the following: 6.2 Unsuccessful validation when punching In/Out A. When fingerprint validation method is used: Password If the fingerprint validation fails, the user will hear a vocal message saying “Please try again”.
Chapter Seven: Administrator Functions Attention: If there are no administrators enrolled, administrator settings can be accessed and modified by any user. The administrators must be enrolled and validated. Before any set up changes are performed, the administrator must be enrolled and validated. Then the administrator can perform administrative as well as time and attendance functions. The users without administrative rights can only use the time and attendance function.
Chapter Seven: Administrator Functions Attention: If there are no administrators enrolled, administrator settings can be accessed and modified by any user. The administrators must be enrolled and validated. Before any set up changes are performed, the administrator must be enrolled and validated. Then the administrator can perform administrative as well as time and attendance functions. The users without administrative rights can only use the time and attendance function.
Press OK or enter the corresponding ID number of the person and press OK to display the following: 6.2 Unsuccessful validation when punching In/Out A. When fingerprint validation method is used: Password If the fingerprint validation fails, the user will hear a vocal message saying “Please try again”.
Chapter Six: Terminal Usage and Punching In/Out 6.1 Successful validation when punching In/Out For every successful punch, the message on the interface displays as below, and if activated, a voice prompt saying “Thank you” is heard. “MP” Validated “Name” “Status” 7.1.2 Select Administrator Registration menu by pressing Admin and press OK to access the level-3 menu as follows: Admin Finger Password FP+PW Refer to Chapter Five for fingerprint enrollment and 7.1.1 for password registration.
7.1.4 Select Delete Registration Data menu and press OK to access the level-3 menu as follows: Delete ID 00000 It is recommended to perform a fingerprint check to confirm its validity. If it validates, it means that your enrolled fingerprint is of good quality and the message in Figure B below is displayed.
Press finger on the sensor window and remove it following the instructions on the screen. Press the same finger a second time and third time according to the instructions displayed. If the registration fails, the screen displays the message below and the previous step needs to be repeated. 7.1.
7.1.
5.2 Fingerprint Registration 7.1.8 Display Messaging There are two registration modes available for the terminal: fingerprint and password. 1. When viewing punches, the initials displayed on the interface have the following meanings: V_F: The registration type is fingerprint V_P: The registration type is password A unique ID number per user is required for enrollment. For each ID number you can enroll up to 10 fingerprints and 1 password.
There are a total of six level-3 menus in the System Setting: Total Number of Administrators, Language, Time Setting, Voice Out, Unlock and Auto Shutdown, defaulted as below: The correct finger positioning method is illustrated below, front and side view. 1. Total Number of Administrators Setup Value Explanation 1-10 Set the total number of the administrators for the terminal Factory Setting 5 2.
Chapter Five: Fingerprint Registration/Enrollment When the TQ100 terminal and AttendanceRx software installation is complete, fingerprints will first be enrolled and then validated. For a network installation with multiple terminals a user’s enrollment is only needed on one terminal. Any timeQplus administrator can enable the enrolled user to use any terminal in the network. 5.
2. Total Punches Alert Setting Items 4.2.3 Network Connection using Ethernet communication function with RJ45 interface Explanation No Indicates that the terminal will not give out alert when punches stored on the terminal are overflowed. If the total punches surpass the maximum storage capacity, then the terminal will not store any new punches. The maximum storage capacity is 30,000 punches. 1 - 1500 The terminal will inform that the records are overflowed according to the value set.
4.2.2 RS485 network connection using RJ45 interface 7.2.3 Communication Setting Select Communication Setting menu and press OK to access the level-3 menu displayed as follows: The TQ100 terminal can be connected using RS485. [Please Note: Due to the low demand for this type of connection, the RS232/ RS485 converter is not included in the standard package. See the Appendix at the end of this manual for details of the installation and setup of the RS485 configuration].
3. Port Number Setting Items Explanation 1 - 9999 To set the software port of the Ethernet communication of the terminal. Factory Setting 5005 4.2.1 Direct Connection using RS232 with RS232 communications Note: The port number must be consistent to port number of the software in the PC administration machine. No communication can be made otherwise. 4.
Chapter Four: Communications 4.1 Communication Interfaces There are two communication interfaces available for the TQ100 terminal: 9-pin RS232 interface and RJ45 interface, as illustrated in the Figure 4.1. The RS232 interface provides RS232 communication, while the RJ45 interface provides RS485 and Ethernet communication, see Figure 4.1 below. 7. Default Gateway Setting Items Explanation 192.168.1.1 Set the default gateway of the LAN when using the Ethernet communication. Factory Setting 192.168.1.
7.2.4 Display Adjustment Setting 3.3 System Info Select Setup menu and press OK to display the following: With System Information highlighted, press OK to access System Information level-2 menus. You will see three menu items displayed. Press OK in each menu to display the corresponding item as follows: Setup System Record Communication Display Adjust Level-1 Menu Level-2 Menu Select Display Adjust and press OK.
3.2 Setup Chapter Eight: Appendix With Setup highlighted, press OK to access the Setup level-2 menus and browse the four items available. There are a total of 18 level-3 menus as per the diagram below. For more information on each menu, please refer to page 26. Two types of interfaces are available in the terminal: 9-pin RS232 interface (for direct RS232 serial communication) and an RJ45 interface (for RS485 and TCP/IP over Ethernet communications).
8.2 RJ45 Interface 3.1 Data Management The RJ45 interface provides RS485 and Ethernet communication. With Data Management option highlighted, press OK to access Data Management level-2 menu and browse through the seven items available.
Chapter Three: TQ100 Biometric Terminal Menu Structure The terminal uses function and number keys to navigate through the menu options and to access system settings. Level-1 menus include: Data management, Settings and System Information. Each menu consists of subordinate level-2 menus such as User Registration and View Punches. Level-3 menu include enrollment method selection, sensitivity settings, etc.
Chapter Two: Hardware Setup RS485 Wiring Diagram 2.1 Terminal Installation To power up the TQ100 biometric terminal: A) Unwrap the package and take out the terminal and accessories. B) Using the screws supplied, fasten the mounting plate on the wall in an appropriate place. Avoid areas with strong magnetic and/or electric fields. C) Attach the terminal to the mounting plate. D) Plug in the power supply and turn the terminal on (Press button). 2.
Chapter One: Introduction Thank you for your recent purchase of the TQ100, a data collection terminal for timeQplus BIOMETRIC™ time and attendance system. This user manual provides specific information that will help you better understand the functionality of the terminal (TQ100). Some key areas that are important to the terminal’s (TQ100) performance are the operating environment, the system overview, communication options and enrollment. Ethernet Communication Diagram 1.
FIREWALL INFORMATION Attention Microsoft Windows XP and Windows 2003 Users! Microsoft Windows Firewall: Microsoft has included firewall protection on Windows XP with Service Pack 2 and on Windows 2003 Server with Service Pack 1. If you will be installing your timeQplus BIOMETRIC server on either of these two operating systems you will need to grant access on the firewall to the following applications and services after your installation is complete.