
User manual


13
Installing the Operational Battery Pack
First unplug the clock. The door to the battery pack compartment is located on the
bottom edge of the back of the clock. Remove the screw that secures the door.
The door may be tightly fitted. Insert a thin knife blade under the bottom of the door
at the screw end and rotate the blade to open the door.
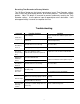
Insert Blade Here
Connect the battery cable to the connector on the left side of the compartment. Note
that the two ridges on the side of the battery connector should be facing down to line
up with the slots in the clock’s power connector. Turn the battery so that the cable
connection is on the bottom. Insert the battery pack into the clock with the wires
inserted into the opening in the side of the compartment. This is important since the
battery door can’t be attached if the battery is sitting on top of the wires. You may
need to use something like a pencil or ruler to push the wires into the opening.
Attach the door by inserting the door tabs into the left side of the compartment and
firmly rotating the door into place. If the door won’t close check to make sure the
wires aren’t under the battery. Plug in the power supply once the battery door is
secure. The ATR240 should be plugged in for 12 hours to fully charge the battery
pack.
Cleaning the ATR240
Do not use cleaning products that contain alcohol or other strong chemicals as they
could discolor or crack the terminal housing. Use a soft damp cloth to remove dirt.
Wipe dry.
Battery Compartment Cover
Power Connecto
r
Ext. Signal Device
Connector