
User manual


10
3.2 Basic programming instructions
The programming mode is entered by unlocking and removing the top
cover from the ATR 440 with the power on. The IN/OUT buttons on
the clock serve as function keys in the programming mode. The
functions of each button are listed below and on the inside cover of the
recorder.
PRO: Press the PRO(gram) button to select the program group. If
you're in P1 mode, press the PRO button again to enter the P2 program
group. Pressing PRO again will take you to the P3 programming
choices.
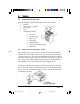
F1 F2 F3 F4 F5 E
CL
PRO
IN OUT IN OUT IN OUT + -
MORNING AFTERNOON OVERTIME
P1 YR/MO/DT TD/HR/MN CARD DST PAY END
P2 DAY CH SD SIGNAL TC IN/OUT ENTER
P3 N/A ACROSS SYNC SEC DOWN
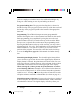
overtime has a separate column. Manual shifting is accomplished
by the employee selecting and pressing the IN/OUT buttons on the top
of the recorder. This causes the print to move across the card to the
selected position. Employees on different schedules can select the
appropriate "punch" location. The ATR 440 can also be programmed
to automatically move across the card. This is best utilized when a
"fixed" schedule is being used. (See position codes on the page 25).
Up/down and across the card adjustments The ATR 440 is a very
versatile time recorder. Because the spacing on different style time
cards vary, the ATR 440 allows for adjustments to assure each
registration is "near center" of the appropriate print position.
Settings
atr440 A5 paper size.p65 8/21/02, 8:16 AM10