
User Manual


Version 9E1 User’s Manual, Nimbie Chorus NBCH07
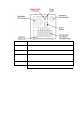
4) Use the NimbieCable that comes with e ach Clie nt unit to connect it to th e
Master unit.
Note:
The notch at the male connector on NimbieCable shall be
aligned with the cou nterpart of the connectors on the Master unit
and the Client unit.
5) Use the power cord that comes with the Master unit to connect it to a wall
outlet with a reliable power supply.
You have now completed the Nimbie Chorus System hardware installation.
Turning Power On and the Initialization
Before turning the power on, make sure the voltage setting on the rear panel
of the Master unit is properly set. Now, to ggle the power s witch on the re ar of
the Master unit to turn the power on.
During the initialization process, the LCD screen on the Master unit will
display a sequence of messages. In the mean time, each of the Client
unit will individuall y go through its init ialization process and you will hear
the drive tray in the Client unit move out and in.
Note:
The initialization shall take a minute. Please be patient until the
process has fully compl et ed.
When the initialization has completed, you will see:
1) All the Client units shall have its Ready indicator steadily light up.
Note:
Refer to the user’s manual that comes with the Client unit for the
meaning of its LED indicators.
2) On the Master unit, to the lower-right of the control buttons, the Ready
indicator shall light up steadily.
3) On the Master unit, the LINK indicator individually corresponding to a
successfully connected Client unit shall light up steadily.
4) Finally, on the Master unit the LCD shall displa y “HDD COPY”. Now, the
Nimbie Cho r us system is ready to work.
Note:
During and before the end of client unit initializat ion process, all
control panel keys will be inactive.
Turning the System Off
Before turning o ff, it i s recommen ded to make sure the Nimbi e Chor us system
is idle. In case there is an oper ation or a session going underway, wait u ntil it
has completed. Then, turn the power switch on the Master unit to the off
position.
@ 2010, Acron ova Technology, Inc. 13