OPERATION MANUAL Operation Manual Nimbie Automated Disc Publisher Model #: NB11 Series (PC-Connected) Serial Number: ______________________________ (The serial number is labeled on the rear panel of the device.
Operation Manual, Nimbie NB11 Version 1.3 (This page is intentionally left blank.) 2 © 2010, Acronova Technology, Inc.
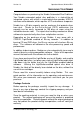
Version 1.3 Operation Manual, Nimbie NB11 PREFACE Important Safety Instructions For your safety, basic precautions should always be followed to reduce risk of damage, electric shock, fire, and personal injury. This includes the following: Read this manual carefully and follow all warnings and instructions. Operate the unit with only the proper electrical specifications as labeled on the device.
Operation Manual, Nimbie NB11 Version 1.3 brands, and trademarks are the property of their respective owners. FCC Compliance: This equipment has been tested and found to comply with the limits for a Class B digital device, pursuant to Part 15 of the FCC Rules. These limits are designed to provide reasonable protection against harmful interference in a residential installation.
Version 1.3 Operation Manual, Nimbie NB11 tampering, negligence, faulty installation, accidents, lack of reasonable care, unauthorized repairs or service, or if installed to any device not provided with the product, or if the serial number label provided with this product has been broken or removed. This warranty does not cover damages that occur in shipment, due to acts of God. All repairs and replacement services shall only be handled by Acronova Technology Inc, and by authorized service centers.
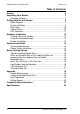
Operation Manual, Nimbie NB11 Version 1.3 Table of Contents Preface 3 Unpacking Your Nimbie 7 Package Contents......................................................................... 7 Getting Familiar with Nimbie 9 Block Diagram............................................................................... 9 A Look at Nimbie........................................................................... 9 Rear View....................................................................................
Version 1.3 Operation Manual, Nimbie NB11 UNPACKING YOUR NIMBIE Congratulations on purchasing the Nimbie Automated Disc Publisher. Your Nimbie automated optical disc publisher is a state-of-the-art integrated system, with a built-in single optical disc recorder, USB 2.0 interface and autoloader, which requires a PC and software to operate. Nimbie has a 30 disc capacity and an enclosure that protects discs from dust.
Operation Manual, Nimbie NB11 Version 1.3 Once you have removed all the parts included with your package, please check to see if any pieces are missing or damaged. If any part is missing or damaged, contact your local dealer immediately.
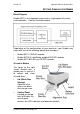
Version 1.3 Operation Manual, Nimbie NB11 GETTING FAMILIAR WITH NIMBIE Block Diagram Nimbie NB11 is an integrated system with a single optical disc drive, and autoloader. See the illustration below.
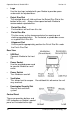
Operation Manual, Nimbie NB11 Version 1.3 Legs Use the four legs included with your Nimbie to provide space underneath for rejected discs. Reject Disc Slot The rejected discs will slide out from the Reject Disc Slot at the bottom of the unit. Always allow space beneath Nimbie to accommodate rejected discs. Finish Disc Slot Finished discs will exit from this slot. Finish Disc Bin This bin serves as the storage container for receiving and stacking completed discs.
Version 1.3 Operation Manual, Nimbie NB11 LED Indicators Nimbie’s status is reflected by the LED indicators. When turned on, it will enter initialization indicated by a flashing green ready light. When initialization is complete, the ready light will change to steady green. The table below describes the meanings of the LED indicators. E GT R Description The power switch is in the Off position Device Initialization Ready No Disc in Loader Error : Lit : Off © 2010, Acronova Technology, Inc.
Operation Manual, Nimbie NB11 Version 1.3 HARDWARE INSTALLATION Finding a Place for Nimbie Nimbie should be placed on a fairly level surface, firm enough to support the unit and discs. Always allow ample workspace for your operation, with easy access to the blank and finished discs. Do not expose the unit to direct sunlight or high humidity, as it may cause the unit to malfunction. If you desire, Nimbie can be placed on a raised block so there is ample room to receive discs from the Finish Disc Slot.
Version 1.3 3) 4) Operation Manual, Nimbie NB11 under the Finish Disc Slot. Use the power cord that came with the unit to connect Nimbie to a wall outlet with a reliable power supply. Use the USB cable that came with the unit to connect Nimbie to a host computer. You have now successfully completed Nimbie’s hardware installation. © 2010, Acronova Technology, Inc.
Operation Manual, Nimbie NB11 Version 1.3 SOFTWARE INSTALLATION Nimbie requires a device driver to be installed before it can work properly with the application software. Before starting the application software installation, the device driver must be installed. System Requirements Microsoft® Windows XP, Vista, 7 Pentium III 700Mhz (Pentium IV 1.
Version 1.3 Operation Manual, Nimbie NB11 BEFORE GETTING STARTED Tips for Handling Optical Discs Never touch the printable or data surface of the disc, as it may decrease quality and disc lifespan. Refer to the arrows on the illustration to the right, Always handle discs from the outer edge or the center hole. What You Need to Start a Disc Publishing Session The Nimbie NB11 is a PC-connected publisher, which requires a USB connection to a host computer.
Operation Manual, Nimbie NB11 Version 1.3 More Than 30 Discs in One Session Using the extension rods, Nimbie can process 100 or more discs without refilling. To increase Nimbie’s capacity to 100 discs, please follow the instructions below: 1) Open the Blank Disc Storage Lid. 2) Remove the extension rods from the lid’s underside.
Version 1.3 Operation Manual, Nimbie NB11 downward. 2) Run the LightScribe-enabled application software and follow the instructions to LightScribe label the discs. Turning Nimbie On Make sure that Nimbie’s device driver has been successfully installed as previously explained. Follow the steps below to get your Nimbie ready: 1) Connect the power cord to Nimbie and a wall outlet. 2) Turn Nimbie’s power switch to the On position. 3) Connect the USB cable to both Nimbie and your PC.
Operation Manual, Nimbie NB11 Version 1.3 (This page is intentionally left blank.) 18 © 2010, Acronova Technology, Inc.
Version 1.3 Operation Manual, Nimbie NB11 APPENDIX Nimbie Maintenance Periodically cleaning the device will ensure proper performance. Follow the steps below to maintain Nimbie: 1) 2) 3) 4) 5) 6) Turn the power switch to the Off position. Remove the master and blank discs. Unplug the power cord from the wall outlet. Unplug the USB cord from the host computer. Clean the Nimbie unit using a lint-free cloth moistened with warm water. Dry the unit immediately with a dry lint-free cloth.
Operation Manual, Nimbie NB11 Version 1.3 Writing Speed The recorder will automatically adjust the writing speed according to the disc quality. The system will monitor and automatically adjust the writing speed as the optical laser moves from the inner ring to the outer ring, up to the selected speed. The recorder’s maximum speed may never be reached if a lower grade disc is used. At the maximum speed, for a single recorder, duplicating a 4.7 GB DVD should not take more than 8 minutes.
Version 1.3 Operation Manual, Nimbie NB11 FREQUENTLY ASKED QUESTIONS Why is my duplication failure rate so high? Try a lower writing speed using the software. Use a different brand of blank discs. Check the power source. Why do my discs get stuck in the disc loader during the duplication process? Check to see if the disc is the standard size (120mm). Make sure discs are level in the loader. Reduce the quantity of discs per load. Some discs may bend from the weight of the discs placed on top of them.
Operation Manual, Nimbie NB11 Version 1.
Version 1.3 Operation Manual, Nimbie NB11 (This page is intentionally left blank.) © 2010, Acronova Technology, Inc.
Operation Manual, Nimbie NB11 Version 1.3 Acronova Technology, Inc. http://www.acronova.com Manual Ver.: 1.3, April 2010 Part #: 711-NT11-9AC6-3 24 © 2010, Acronova Technology, Inc.