
User`s guide


72 Copyright © Acronis, Inc., 2000-2010
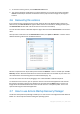
5. At the What to recover step, select the boxes which indicate the partitions to be recovered. Do
not select the MBR and Track 0 box, as this will result in selecting the entire disk for recovery.
Recovering the entire disk does not allow you to resize partitions manually. In such an event, the
new disk space will be proportionally distributed between the recovered partitions. If necessary,
you can recover the MBR later. Select the partitions and click Next.
Selecting partitions leads to appearance of the relevant steps "Settings of partition ...".
Please note that these steps are in ascending partition drive letter order and that this order
cannot be changed. The order may differ from the physical order of the partitions on the hard
disk.
In cases involving recovery of non-hidden partitions, the physical order of the partitions on the
new disk is not significant. Acronis True Image Home 2011 Netbook Edition automatically fixes
the appropriate Windows loader files.
This step allows you to find out whether the disk you are going to recover contains a hidden
partition. Hidden partitions do not have disk letters and they go first in the "Settings of partition
..." steps. If you find a hidden partition, see Recovering a disk with a hidden partition (p. 73).
6. You can specify the following partition settings: location, type, and size. Most likely, you will first
specify the settings of the system partition as it usually has the letter C. Since you are recovering
to the new disk, click New location. Select the destination disk by its assigned name or by its
capacity.
7. Clicking Accept will return you to the "Settings of partition ..." screen. Check the partition type
and change it, if necessary. You should remember that the system partition must be primary and
marked as active.
8. Proceed to specifying the partition size by clicking Change default in the Partition size area. The
partition will occupy the entire new disk by default. You can resize and relocate the partition by
dragging it or its borders with a mouse on the horizontal bar on the screen. Or you can enter
corresponding values into the appropriate fields (Partition size, Free space before, Free space
after). Remember that when resizing a partition, you need to leave enough unallocated (free)
space for a second partition.
Usually the free space before partitions is equal to zero. Click Accept when the partition is the
size you want and then click Next.
9. Begin specifying the settings for the second partition. Click New location and then select
unallocated space on the destination disk that will receive the second partition. Click Accept.
Check the partition type (change, if necessary). Specify the partition size which by default is equal
to the original size. Usually there is no free space after the last partition. Therefore allocate all of
the unallocated space to the second partition. Click Accept and then click Next.
10. Carefully read the summary of operations to be performed. If you do not want to validate the
backup, click Proceed. Otherwise click Options and select the Validate backup archive before
recovery box before clicking Proceed.
11. When the operation finishes, exit the standalone version of Acronis True Image Home 2011
Netbook Edition.
Windows should not "see" both the new and old drive during the first boot after recovery because this could
result in problems booting Windows. If you upgrade the old drive to a larger capacity new one, disconnect the
old drive before the first boot.
Switch off the computer, if you need to disconnect the old drive. Otherwise, just reboot the
computer after removing the rescue media.