
User`s guide


69 Copyright © Acronis, Inc., 2000-2010
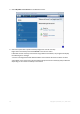
If you want to recover the partition to the state it was at an earlier date, click Explore and recover
under the Recover last version button. This will open Backup Explorer which allows you to select the
image backup version created on that date. Clicking Recover after selecting the required version will
open the Disk Recovery window.
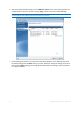
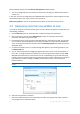
a) Select the corresponding check boxes of the partition(s) to recover.
If you backed up an entire disk, you can choose to recover the entire disk at once by clicking Switch to disk
mode. To be able to select partitions again, click Switch to partition mode.
b) In the recovery destination field below the partition name, select the destination partition. Those
partitions where the partition to be recovered can fit are marked by black lettering. Unsuitable
partitions are marked by red lettering. Note that all data on the destination partition will be lost
because it is replaced by the recovered data and file system.
c) After you finish with your selections, click Recover now to start recovery.
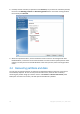
Sometimes you need to recover the MBR (Master Boot Record). For instance, it may be necessary
when Windows does not boot after recovery. To recover the MBR (either together with the partition
or individually), select the MBR check box.
If you recover the entire disk, the Recover disk signature check box appears. Disk signature is a part
of a hard disk MBR. It is used for uniquely identifying the disk media.
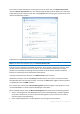
We recommend that you select the Recover disk signature check box due to the following reasons:
Acronis True Image Home 2011 Netbook Edition creates scheduled backups using the signature
of the source hard disk. If you recover the same disk signature, you don't need to re-create or
edit the backups created previously.
Some installed applications use a disk signature for licensing and other purposes.