
User`s guide


154 Copyright © Acronis, Inc., 2000-2010
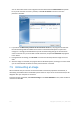
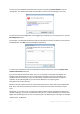
1. Click Convert Windows backup to Acronis backup on the Tools & Utilities screen.
2. Select the vhd file to convert.
3. Specify the path to the tib file to be created.
By default, the converted file will be created in the same location as the file to be converted.
However, you can select another location by clicking Browse. The file can be directed to any
storage supported by Acronis True Image Home 2011 Netbook Edition.
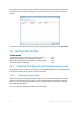
4. The next step allows you to set options for the tib backup to be created. You can protect the
backup with a password and encryption, select a desired compression level, and split the backup,
for example, for later burning to DVDs.
5. Add comments to the backup, if you wish.
6. Click Proceed in the Summary window.
7.6.2 Recovery using vhd files created by Windows Backup
You may have vhd files if you used the Windows Backup utility included into Windows Vista and
Windows 7 for backing up the system hard drive.
If you purchased Acronis True Image Home 2011 Netbook Edition after using Windows Vista or
Windows 7 backup utility, you can recover your system hard drive from those vhd files using Acronis
True Image Home 2011 Netbook Edition.
When you need to recover your system using a vhd backup file, proceed as follows:
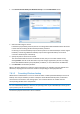
1. Arrange the boot order in BIOS so as to make your rescue media device (CD, DVD or USB stick)
the first boot device. See Arranging boot order in BIOS (p. 78).
2. Boot from the rescue media and select Acronis True Image Home 2011 Netbook Edition (Full
version).
3. After Acronis True Image Home 2011 Netbook Edition starts, click the My Disks link under
Recover on the Welcome screen.
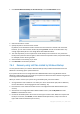
4. Choose the vhd backup file to be used for recovery by its creation date. When the required vhd
backup is not shown, click Browse, choose Windows Backup Archives (*.vhd) in the "Files of
type" field and locate the backup for recovery.